
User`s guide

PowerRIP 2000 Manual
iProof Systems, Inc.
10
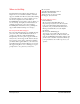
Uninstalling PowerRIP 2000
If you wish to remove a previously installed revision of
PowerRIP 2000 and replace it with a new revision, you
should use Uninstall. Uninstall will retain the integrity
of your validation while removing the previous revi-
sions components.
Go to Start>Programs>PowerRIP 2000 Epson>
Uninstall. the Install Shield Wizard will display
momentarily. Then the following warning will display.
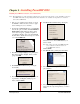
This will remove PowerRIP 2000 Epson from your
computer. Do you wish to proceed? Click OK. When
finished removing the following message will display.
PowerRIP 2000 Epson has been successfully unin-
stalled from your machine. Click OK.
Validating PowerRIP 2000
Before using PowerRIP 2000 you must validate your
copy of the software on your standalone or server
workstation. If you do not validate your copy of
PowerRIP 2000 PowerRIP or Demo will print across
your output. You do not need to validate the client
workstation. Follow the directions below to validate
your PowerRIP 2000 software.
1. Got to Start>Programs >PowerRIP 2000 to
launch PowerRIP 2000.
2. Click PowerRIP 2000 on the TaskBar to maxi-
mize the PowerRIP 2000 Control Panel.
3. Pull down the File menu and select Install
Validation. The PowerRIP 2000 Validation dia-
log will display.
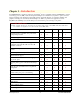
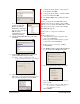
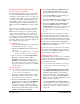
4. Write down your unique
User Code as it appears
in the dialog similar to
this dialog.
5. You will also need your
Product Code which
can be found on the
Product ID card inside
the software package.
6. To obtain your Activation Code, launch your web
browser and enter
http://www.iproofsystem.com.
Click on Product Registration. The Online
Registration and Validation page will display. Fill
out your registration information and then click
Submit Form.
7. The PowerRIP 2000 Online Validation web page
will display. Click Validate PowerRIP 2000.
8. The Validation page will appear. Enter your
Product Code and User Code then click Submit.
9. Your Activation Code will appear on the next
screen. Write down that code and quit your
browser.
10. Enter the Validation Code in the PowerRIP 2000
Validation dialog Activation box and click OK.
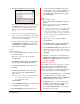
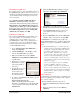
PowerRIP 2000 is now Validated. If you pull down
the PowerRIP 2000 File menu you will note that Install
Validation is now grayed out and Remove Validation is
active.
Note: The Install Validation process allows up to five
validations. When you install PowerRIP 2000 for
the first time, and Install Validation the number
of available validations will be reset to four.
When you Remove Validation, the counter is
reset back to five. There is no limit to the amount
of times you may Install Validation, providing
you remove validation first. You may also check
your remaining validations on the iProofSystems
validation web page
If you do not remember to put your validation
back in your WEB account when you do a
remove validation you will loose that validation.
If you loose all 5 validations you will have to call
the iProof System sales department for additional
validations. There will be a charge for the addi-
tional validations.
Remove Validation
You should Remove Validation before reformatting your
hard drive, upgrading your operating system, or upgrad-
ing to a newer computer.
To Remove Validation follow the steps below:
1. Launch PowerRIP 2000 and maximize PowerRIP
2000.
2. Pull down the File menu and select Remove
Validation.