
User`s guide


PowerRIP 2000 Manual
iProof Systems, Inc.
23
Overview
PowerRIP TIFF is ideal for creating high quality, high
resolution TIFF images that are platform independent.
The higher the resolution you select, the higher the
quality the TIFF image becomes. But it also should be
noted that the higher the resolution selected, the bigger
the file, the higher the quality the TIFF becomes. So a
large amount of free hard drive space to accommodate
high quality TIFF images needs to be available.
All the PowerRIP 2000 features are available when
using PowerRIP TIFF including:
• Make Compositions from Separations.
Note: Not all applications have the capacity to
create compositions from separations.
Photoshop, Word, and Excel are examples
of applications that cannot use this
feature.
• PowerRIP 2000s High quality color
management
• Compression for ease of portability and storage
• Ability to select a resolution that best suits your
needs.
• Ability to create RGB or CMYK TIFFs
Creating TIFF Images
Any application that has the ability to create a
PostScript file can be used to create a TIFF image using
PowerRIP TIFF. The PostScript file will be created by
the application using the applications Print to File fea-
ture and then processed by PowerRIP 2000 to create the
TIFF output.
Creating a TIFF Image using PageMaker 6.5
Note: It is assumed that the images and/or text you
wish to convert to a TIFF image is on the screen
and ready to be processed.
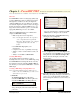
1. File>Print
The Print Document dialog will display.
Select PowerRIP TIFF in the Printer pull-down.
Select PowerRIP TIFF in the PPD pull-down.
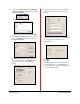
2. Click the Features button. The Print Features
dialog will display. Select the features that meet
your needs.
Note: Not all features are available on all revisions of PowerRIP 2000.
For an in-depth discussion of all the PowerRIP
TIFF features see Chapter 9, this document.
3. Click the Color button. The Print Color dialog
will display. Select Composite.
4. Click the Options button. The Print Options dia-
log will display. Select Normal in the Send Image
Data pull down. Select Write PostScript to file.
The file name should display to the left of the
Browse button.
5.Click the Browse button. The Write PostScript to
File dialog will display. Navigate to the folder you
wish to save your PostScript file in. Click Save.
The PostScript file will be saved to the folder you
indicated.
Chapter 5 - PowerRIP TIFF Available in the Platinum and LF Platinum versions only.
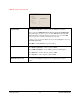
Note: This is a scrollable dialog.