
User`s guide


It should be noted that deselecting use Calibration in the
Folder Scanner Configuration dialog will disable the cus-
tomized calibration file. Your files will then be printed
with the PowerRIP 2000 default settings.
Output Calibration
NOTE: It is highly recommended that a densitometer
be used when calibrating the PowerRIP 2000.
Though you can calibrate without a densitome-
ter you will be relying on the human eye, light
source, etc., which as we discussed earlier can
have many variables.
Calibration to increases or decreases the color intensity
of your output. The intensity of the color can be defined
as the color saturation. When a color becomes less satu-
rated it becomes dull. More saturated it becomes brighter.
So Calibration should be used to increase the intensity or
brightness of the image.
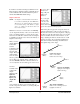
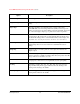
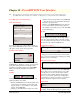
When you select
Output calibration
in the Folder
Scanners
Configuration dia-
log the Q-Curve
5.0 dialog will
display. The Cyan
channel will be
active. To adjust
all colors, pull down the arrow in the Channel Box and
choose either cyan, magenta, yellow, or black. Or you
can select All Same. All Same would cause all four col-
ors to be adjusted to the curve that appears on the screen.
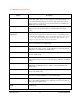
You must
remember when
working with
Output
Calibration the
higher the
number the
lighter your
output will
print.
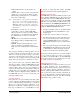
As an example, the 50% box represents the 50% dot
area. If you type 80 in the 50% box your image will print
lighter, less saturated.
PowerRIP 2000 Manual
iProof Systems, Inc.
31
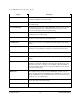
If you type 30 in
that box your
image will print
darker, more
saturated.
Or you can grab
the curve with
your cursor and
move the curve.
Notice when moving the curve that surrounding percent-
ages are also adjusted to blend properly.
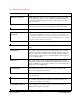
When ink is placed on paper the dot spreads, hence dot
gain. The characteristics of the paper, the percentage of
ink used and even the order colors are placed on the page
can affect dot gain. The critical area where your dot gain
decisions should be made are in the midtones of your
image. Adjusting the midtones should create an overall
pleasing color image. If you adjust the highlights and
shadows the midtones will change and will create an
unacceptable image when output.
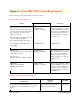
•Midtone
•Shadow
Details in the Shadow
Shadow is the darkest/
blackest area of the image.
•
Highlight
(White)
•Shadow
•Midtone
•Highlight
(White)
Details in the Highlights
Highlights are the lightest
detail in the image.
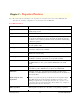
•
Highlight
(White)
This will flatten Highlights
Midtone is the tonal range between
highlights and shadows
.
•
Shadow
(Black)
•
Midtone