
User`s guide


PowerRIP 2000 Manual
iProof Systems, Inc.
32
Dot gain is the change in size of the printed dot. Dot gain
is defined as an additive percentage so the increase of the
dot size from 50% to 60% is called 10% gain. It should
also be noted, at this point, that the ink jet printer uses a
dithered (stochastic) dot.
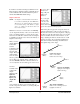
You must remember when working with Dot Gain curves
the higher the number the darker your output will
print. As an example the 50% box represents the 50%
dot area. If you type 60 in that box your image will print
10% darker. Notice, when moving the curve, that sur-
rounding percentages are also adjusted to blend properly.
Before working with calibration the following should
be considered:
1. The monitor should have been on for at least 1/2
hour so that the monitor stabilizes.
2. Make sure that the room light you are using during
calibration is the same light you will be using to
view the printed images.
3. Turn off Desktop Patterns. A light gray background
is the best color to use when calibrating.
4. Create a test CMYK file to be used when doing cal-
ibration testing. This file should contain a good rep-
resentation of the CMYK colors in a number of dif-
ferent percentages of color. When printing this test
file, make sure that you do your calibration with the
paper and the resolution that you are going to be
printing your images with.
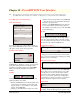
Using PowerRIP 2000 Calibration
Note: It is assumed that PowerRIP 2000 is launched and
that the PowerRIP 2000 Main Control Panel dia
log has been maximized.
1. Go to Input>Folder Scanners. The Folder
Scanner Configuration dialog will display.
2. Select Use Calibration in the bottom left corner of
the Folder Scanners Configuration dialog. Adjust
Calibration will display on the bottom right of the
dialog.
3. Click Adjust Calibration. The Q-Curve 5.0 dialog
will display.
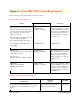
• Reset: Click Reset when you want to return to the
default curve
•
Highlight
(White)
•
Midtone
This will flatten the shadows.
•
Highlight
(White)
•
Midtone
•
Less Contrast
This will flatten the highlights.