
User`s guide

PowerRIP 2000 Manual
iProof Systems, Inc.
8
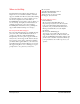
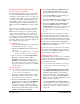
4. The Select Components dialog will display.
If you wish to add an additional new printer to the
PowerRIP 2000, but not remove previous print-
er(s), make sure you select both the new and
previous printer(s) in the Select Components
dialog.
If you have more then one printer installed and
wish to remove one of the printers, select the print-
er that you want to keep and deselect the printer
you wish to remove. Click Next.
5. After the components have been added or deleted
the Maintenance Complete dialog will display.
Click Finish. The PowerRIP 2000 splash screen
will redisplay. Click Exit.
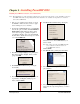
Repair
Repair should be used:
• If you wish to reinstall all the program components
previously installed.
1. Follow steps 1,2,3 and 4 page 6, Installing
PowerRIP 2000.
2. The Modify, repair, or remove the program dia-
log will display. Select Repair. Click Next.
3. The Select Location dialog will display. Click
Continue.
4. The Please Select Version dialog will display.
Select the revision of PowerRIP 2000 that you
wish to install.
Note: The gold seal on the PowerRIP 2000 CD
sleeve will tell you which revision of
PowerRIP 2000 you have.
Click Continue.
5. The PowerRIP 2000 Setup dialog will display and
PowerRIP will start reinstalling.
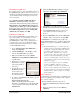
6. The Print Manager dialog will display. Select
your printer and click Continue. A dialog will
display asking you if you wish to update the driver
for each printer you have installed. Click Yes
and/or OK. The PowerRIP Setup dialog will dis-
play. Click Finish.
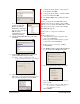
Remove
Remove should be used to:
• Remove all installed PowerRIP 2000 components
(printers).
• Remove a previous revision of PowerRIP 2000
before installing a new revision.
Note: If you have customized files such as ICC profiles
or calibration curves saved in the PRPC2000
folder, you should move them to another folder
for safe keeping. If they are not moved they will
be removed along with PowerRIP 2000 during
the remove function.
1. Follow steps 1,2,3 and 4 page 6, Installing
PowerRIP 2000.
2. The Modify, repair, or remove the program dia-
log will display. Select Repair. Click Next.
3. The Confirm File Deletion dialog will display. It
will as ask you Do you want to completely remove
the selected application and all of its components?
Click OK.
4. After the components have been uninstalled the
Maintenance Complete dialog will display. Click
Finish. The PowerRIP 2000 splash screen will
redisplay. Click Exit.
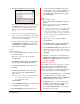
Additional Local Printers
If you installed components for more then one printer
on the initial install of PowerRIP 2000, the Print
Manager will install only one of the printer drivers
needed. You will have to use Additional Local Printers
to insert additional printers in the Print Manager.
1. Insert the PowerRIP 2000 CD into your CD-ROM
drive. The splash screen will appear. Click
Additional Local Printer. The PowerRIP Print
Manager Setup dialog will display.
2. Highlight the printer you wish to install. Click
Continue. A dialog will display telling you that
the driver has been installed. Click OK.
Go to Start>Settings>Printers and you will see
the driver you just installed.