User’s Guide © 2003 iProof Systems, Inc. All Rights Reserved. Information contained in this document is subject to change without notice and does not represent a commitment on the part of iProof Systems, Inc. The software described in this document is furnished under the dealer agreement or nondisclosure agreement. The software may be used or copied only in accordance with the terms of the agreement.
Contents Validating PowerRIP ImageSet .................................................................................... 4 Chapter 1 Introduction Features............................................................................ 6 Where to get help............................................................. 6 Chapter 2 Printing from applications to PowerRIP Imageset Selecting the destination printer ...................................... 7 Print Settings.................................................
Contents (cont.) Override job’s nesting settings....................... 24 Configure nesting ........................................... 24 The Separations Tab ............................................... 24 Make Composite ................................................ 24 Make Separation ................................................ 24 Configuring PowerRIP ImageSet program settings ........ 25 Chapter 6 Density Calibration The “all the same” checkbox...........................................
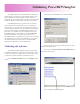
Validating PowerRIP ImagSet PowerRIP ImageSet can be downloaded and “test-driven” without having to purchase it. In this evaluation mode, a watermark will appear on all printed pages. Once the software is purchased, the user is supplied with a “product code” which will enable the validation of the product, removing the watermark.
The validation page will appear: Enter the validation code (activation code) into PowerRIP’s validation dialog: Click OK. A dialog will appear informing you that PowerRIP is now validated. Enter your product code (the 16-character code either on the CD or the CD case) in the box marked “Please enter your product code” Close PowerRIP. The validation will not take effect until PowerRIP is re-launched.
Introduction Chapter 1 PowerRIP ImageSet turns your printer into a PostScript® Level 3 compatible print server. PowerRIP ImageSet , a software raster image processor (RIP), reads and interprets PostScript Level 3 and allows your printer to print virtually any PostScript job. Simply select the PowerRIP printer entity from the local server or any remote Mac or PC running Windows, select your printing options and click print; PowerRIP takes care of the rest.
Chapter 2 Printing from Applications to PowerRIP ImageSet Selecting the destination printer Upon installation of PowerRIP ImageSet, a printer will be added to to the Windows operating system for each printer selected during PowerRIP ImageSet installation. The printer names are preceded by “PowerRIP” for example, if you’ve installed PowerRIP ImageSet and chose to support the Epson Stylus Pro 9600, a Windows printer will be added called “PowerRIP Stylus Pro 9600”.
PowerRIP ImageSet Print Settings The following are the settings which are common to all outpt devices supported by PowerRIP ImageSet. Although some of the choices available for these settings may vary from device to device, their function is the same. Paper Size This settings will tell PowerRIP ImageSet what size the destination media is. Please note that this setting is not necessarily the size of the document.
True Spot Colors When enabled, this option will tell PowerRIP ImageSet to enable the “True Spot” feature. This feature will recognize spot colors within a composite or separated job and, using a proprietary mechanism, render the color as accurately as possible on the output device. Screening This option lets you select the type of halftone screening to use. For “contone-looking” proofs, use Stochastic.
Printing to PowerRIP ImageSet From Remote Workstations Chapter 3 Sharing the PowerRIP Imageset Printers Before anyone can connect and print to PowerRIP ImageSet, you must “share” the proper printer entities. If you require Macintosh systems to connect and print to PowerRIP ImageSet, you must install Windows 2000 Server ’s or Windows XP Professional’s “Services for Macintosh” network add-on. This will enable the Macs to see the shared printers.
6) In the box labled “Print Servers” you will see a list of all Windows servers that were found on the network. Select the server where PowerRIP ImageSet is installed. This will cause the box labled “Shared Printers” to display all printers shared by that system. Printing From Remote Windows Client Printing to PowerRIP ImageSet from a remote Windows client is as straight-forward as printing to any networked printer. Simply select the newly created printer entity, set the desired options and print.
Connecting from Mac OS 9.x connect to. In this example we’ll be connecting to the Epson 1290. Please note that the Macintosh sees the printer entity’s “real” name rather than the “Share Name” that was assigned at share time. As mentioned before, it is necessary to load “Services For Macintosh” on the server system (the PC running PowerRIP ImageSet) to make the shared printer entities available to Macintoshes on the network (consult the Windows Server documentation for instructions on how to do this).
Printing from Mac OS 9.x Connecting from Mac OSX As mentioned before, it is necessary to load “Services For Macintosh” on the server system (the PC running PowerRIP). 1) 1) Open the Chooser and select LaserWriter or AdobePS.
Printing from Mac OSX IMPORTANT: Mac OS X does not regognize the optionrestrictions defined in the PPD. It is therefore imperative that you impose the printing restrictions yourself (resolution/paper-type combinations) as the operating system will not flag conflicts. 1) Go to “File/Print”. Select the printer entity in the Printer pull-down. In the Copies & Pages pull-downs go to Paper Feed and select the paper tray only if you’re printing to a printer which supports paper tray selections.
Operational Overview Chapter 4 Understanding the PowerRIP printing architecture. There are 4 main components in a PostScript printing environment. 1) The application that creates the page, 2) The PostScript driver which generates the PostScript code when an application prints the page, 3) The PostScript Raster Image Processor (RIP) which interprets the PostScript code and renders a rasterized representation of the page, 4) The physical connection (port) and 5) The actual printer.
Windows PostScript Driver In the case of PowerRIP ImageSet the first part of the cycle is the same as a hardware RIP architecture. The application prints its page and the Windows PostScript driver generates the PostScript code. The PostScript driver loaded by the PowerRIP Installer is version 5 which is the latest available from Microsoft/ Adobe. The proper PPDs are also loaded in the system. From here on thigs are different.
The PowerRIP Application Chapter 5 Configuration. The Main Control Dialog The PowerRIP ImageSet (aka PowerRIP Server) application is launched automatically when a job is printed to one of the Windows PowerRIP printer entities. It can also be launched by opening Start/Programs/PowerRIP ImageSet/PowerRIP ImageSet. The dialog consists of 3 sections: Information, Control and Configuration.
Pausing the Incoming Jobs Queue Clicking the Pause Queue button will pause the incoming jobs queue. Jobs will still arrive in the queue as they are found in the hot folders but they will not be processed. They will remain in the queue with a status of “waiting” until the queue is resumed. When the queue is paused, the third button changes to “Resume Queue”. Click this button to resume the queue. Once the queue is resumed, the queued jobs will begin processing in order of priority.
Output To: In this drop-down, you can select the proper output queue. Output queues are created at install-time (or manually by the user). The output queue is simply a printer entity which is used for PowerRIP to send data to the printer. The output queue you select should be outputting to the port that the selected printer is connected to. To view/configure the output queues, click the “Outputs” button on the main PowerRIP dialog window.
The Processed Jobs Queue. To view/manipulate the processed jobs queue, click the Processed Jobs tab. Job Info: This section displays the job name, creator and destination device. View Job Settings Clicking this button will let you view (but not change) the settings that were used to process the job.
The Pages Being Printed Queue (aka Page Queue). To view/manipulate the page queue, click the “Pages Being Printed” tab. Cancelling a page To cancel a page that’s currently printing or to delete a page before it prints, select the page(s) and click the Delete button. Alternately, you can select the pages, right-click and select Delete from the popup menu. You can also delete the page by opening the Page Information dialog (double-click on the page) and click the Delete button.
Manually inserting a PostScript or PDF file into the PowerRIP job queue. One of the nice features of PowerRIP ImageSet is the ability to rasterize PostScript and PDF files that were not printed specifically for our supported devices. Although PostScript is inherently a “device-independent” language, in the real world, this is not always the case. If you have a PostScript file that was intended for an imagesetter (Agfa, Lino, etc.
The Spot Color Configuration dialog allows the addition/ deletion and modification of user-defined spot colors in CMYK, RGB or Lab color spaces. Simply select the color space you wish to work in by clicking one of the radio buttons on the upper right. This will display all user-defined spot colors (if any) that were defined in that particular mode. As you select the spot color name in the name window, the values will appear in the appropriate boxes on the right. These can then be edited.
Input Profiles This lets you select the input profiles for CMYK and RGB. These drop-downs will list and let you choose any CMYK or RGB profile (ICM/ICC) found in the system. To add profiles to the PowerRIP PPDs, use the “Add ICM to PPD” utility in the PowerRIP ImageSet program group. Paper This section of the dialog allows you to change the media type and set any output-tray options. It also lets you to mirror or reverse the output.
Make Composite Selecting this checkbox turns on the “Make Composite From Separation” feature. Use this ONLY on separated PostScript files. If the file is not separated, the results will be unpredictable This feature will take the plates from a separated job with up to 256 plates and merge them together into a composite. This is a powerful feature widely used for proofing separations to view trapping, etc.
Chapter 6 Density Calibration (Q-Curve) PowerRIP ImageSet includes a calibration tool known as Q-Curve which is used to create the calibration files used to change the output density on a per-color basis. This application is launched automatically whenever the “Adjust Custom Calibration” button is clicked (see the Configure Output Section) or, when the “Apply Custom Calibration” checkbox is checked and there is no calibration curves defined for that job or queue setup.
Managing Inputs Chapter 7 PowerRIP ImageSet is designed to accept input from multiple sources. Hot folders being the primary way in which jobs are received. The printing mechanism, including hot folder, printer entities, etc. is automatically set up at install time. The user does not have to configure any of this to print normally. It is possible, however, to customize the inputs for particular needs.
Configuring Printer Entities It is not necessary to change these settings to print normally. Furthermore, it is recommended that the settings for the default printer entities not be modified unless you are sure of what you are doing. Wrong settings in this section will cause problems when printing. As mentioned before, upon installation, a Windows printer (appears in the list of printers unders start/settings/printers) is created for each output device selected at install-time.
Adding a Printer Entity and Hot Folder tutorial The previous 2 sections describes the operation of the Hot Folder Configuration and the Printer Entity Configuration dialogs. This section will walk you through the creation of a printer entity/hot folder to help you understand how they work together. In our example, PowerRIP ImageSet was installed with support for the Epson Stylus Photo 1290, the Epson Stylus Pro 9600, the TIFF Generator and the PDF Generator.
Since we want all jobs that are processed from this hot folder to have the same settings (Professional Media Photo Paper” at 1440x720 dpi using 85-line halftone), we’re going to un-check the “Use settings specified at print-time” and define our own settings. When you un-check this box, the “Specify Settings” button becomes enabled. Click the Secify Settings button. The EPSON Stylus Photo 1290 Setup dialog will appear. Set the paper type first, this will enable the proper range of resolutions.
Create the printer entity Go to the “Output Folder” section and click on the “...” button to navigate to our hot folder. Now that we have the hot folder configured, lets create a print manager entity wich, when printed to, will deposit PostScript files into this newly created folder. If not already opened, open the “Configure Inputs” dialog by clicking the “Inputs” button on the main dialog. Click the “Configure PowerRIP Printer Entities” tab.
Once you select the proper driver, you will see the PPD name appear in the box next to the driver name in this example the PPD is “IPEP1290.PPD”. Almost done. The last two settings are always the same (unless you have a VERY creative configuration). The last step is to enter the Application Path and App to launch settings. This tells the printer entity what application to launch when a job is received. Click the navigation button (“...
Managing Outputs Chapter 8 PowerRIP ImageSet is designed to support printing to multiple printers connected to multiple ports. It employs “output queues” which are actually Windows print queues that are used to send rasterized page data to the printer(s). output queue allowing all the waiting pages to print. Upon installation, one output queue is created for each printer selected. The default name for the output queues are “PowerRIP Output Queue 1”, “PowerRIP Output Queue 2”, etc.
Pausing & Resuming output queues To pause or resume an output queue, select the queue by clicking its name in the list then click the “Pause” or “Resume” buttons. If the queue is paused, the only the “Resume” button will be enabled. If the queue is not paused, only the “Pause” button will be enabled. Keep in mind that when you pause a queue, it will not send any “additional” pages but if there’s a page already printing it will continue to print until its completion.
Deleting an Output Queue. Care must be used when deleting an output queue. If there are hot folder configurations using an output queue and this queue is deleted without first changing the hot folder configuration, the hot folder mechanism will pick the first available output queue at print-time instead. The pages might end up going to the wrong port. Before deleting an output queue, be sure no hot folders are using it. To delete an output queue, just select it’s name and click the Delete button.
The PDF Generator Appendix A Most of this manual makes mention of the “output device” in terms of a printer. PowerRIP ImageSet is also capable of outputting to a PDF file instead of a printer. This is useful for proofing, sharing documents, etc. PDF is the most widely used format for sharing and publishing electronic documentation. PDF-Generator Settings. As with any other output device, the device-specific settings are set by clicking the “Specify Settings” button which launches the configuration dialog.
Output Folder: Lets you define the folder where PDF files will be placed when created. To change this setting, click the Change button below. View File: When this checkbox is selected, after creation of the PDF file, PowerRIP will issue a “shell command” to the operating system to launch the PDF. If you’ve associated PDF files with a certain application (ie, you’ve loaded Acrobat Reader). It will automatically launch and display the file. Resolution: Specifies the resolution of the PDF.
The “Fonts” Section. This section deals with the way fonts are handled when creating the PDF Subset fonts: When selected, uses the “font subsets” specified in the “Never embed” and “Always embed” windows. Embed All Fonts: Embeds all document fonts in the PDF. This will ensure proper viewing on any system regardless of the fonts loaded on the viewing system. This is recommended when sharing the PDF with others. Never embed these fonts: Allows you to create a list of fonts to never embed in the PDF.
The TIFF Generator Appendix B Most of this manual makes mention of the “output device” in terms of a printer. PowerRIP ImageSet is also capable of outputting to a TIFF file instead of a printer. This is useful for rasterizing a page and then including it as part of another document. Also, some pre-press systems accept tiff files for final output. TIFF-Generator Settings.
Output Folder: Lets you define the folder where TIF files will be placed when created. To change this setting, click the “Change” button below. View File: When this checkbox is selected, after creation of the TIF file, PowerRIP will issue a “shell command” to the operating system to launch the TIF. If you’ve associated TIF files with a certain application (ie, you’ve loaded Photoshop). It will automatically launch and display the file.
the same way, same restrictions apply. Makes a separation TIFF (one plate per file) from a composite PostScripfile. There is one additional feature. If you select “All Plates In Black” it will reproduce all plates (C, M, Y & K) in black. If you do not select “All Plates In Black” the plates will be rendered in their plate color (Yellow plate in yellow, cyan plate in cyan, etc.
Appendix C Adding ICM/ICCs to PowerRIP ImageSet At install-time, PowerRIP ImageSet installs all necessary ICMs for proper color output on any supported device. These ICMs have been created and calibrated for each printer at each resolution/media combination. For thsi reason, PowerRIP ImageSet gives you accurate color “out of the box”. The ability exists, however, to add support for other ICC/ICMs.
When finished adding profiles, click Exit. If the new options do not appear in the print dialog, restart your system. Once the ICM options have been added to the PPD, they will be available to choose at print-time from your applications. list. The screen shot above shows the Output Profile entries section and in the window below you can see the entry we just added. Select the entries you wish to remove. When done, click Save. Distributing the edited PPDs to connected remote clients .
Copyright(c) 2003 Digital Graphics Imaging Inc. All rights reserved. PowerRIP and PowerRIP ImageSet are registered trademarks of iProof Systems Inc.