
User`s guide


13
Printing from Mac OS 9.x
As mentioned before, it is necessary to load “Services For
Macintosh” on the server system (the PC running PowerRIP).
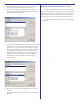
1) Open the Chooser and select LaserWriter or AdobePS.
Select the desired PowerRIP ImageSet printer (the 1290 in
this example)
2) In your application’s print dialog, select “Printer Specific
Options” to set the PowerRIP ImageSet options
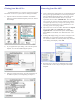
3) Select the desired print settings. For more information on
the different options, see the beginning of Chapter 2
Connecting from Mac OSX
1) Create a Printer Description folder on your OS X Macintosh
and copy the appropriate PPDs (see Connecting from Mac
OS 9 for filename/model descriptions). The folder can be
anywhere on the OS X hard disk. There is no special
requirement for its location. IMPORTANT: Mac OS X does
not regognize the option-restrictions defined in the PPD. It
is therefore imperative that you impose the printing restric-
tions yourself (resolution/paper-type combinations) as the
operating system will not flag conflicts.
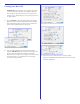
2) Open Print Center on the OS X Mac. Hold down the Option
key and click Add. Select AppleTalk. Select Local
AppleTalk Zone. The name of the printer should display.
Select Other in Print Model. Note: DO NOT select “Auto
Select”
3) A dialog will display asking you to choose. Navigate to the
PPD folder you created and copied the proper PPD files
into. Select the PPD for the selected printer entity. The Print
Center dialog will redisplay. Click Add
4) Repeat the above steps for any additional printer entities.
Your OS X Mac is now ready to send jobs to PowerRIP
ImageSet.