
User`s guide


19
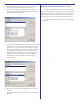
Output To:
In this drop-down, you can select the proper output queue.
Output queues are created at install-time (or manually by the
user). The output queue is simply a printer entity which is used
for PowerRIP to send data to the printer. The output queue you
select should be outputting to the port that the selected printer is
connected to. To view/configure the output queues, click the
“Outputs” button on the main PowerRIP dialog window.
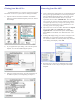
Job Priority
The priority slide-control allows you to set the priority of
the job(s). The range is 1 thru 99 (just like Windows) where 1 is
lowest and 99 is highest priority. You can slide the handle on the
slide control to change the priority or enter the priority number
desired in the text box to the right.
Use Settings Specified at Print Time checkbox
When this control is checked, the job settings will be
controlled by the options the user selected when the job was
printed from the application. If the box is un-checked, it allows
the user to select the printing options and override the settings
used at print time. When this control is checked, the “Output
Configuration” and “Default Settings” buttons are disabled.
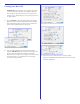
Specify Settings
This button is only active if “Use Settings Specified at
Print Time” is NOT checked. Clicking this button will display
the device-specific configuration options. These options will
vary between output devices. See the “Specifying Job Settings”
section later in this chapter
Default Settings
This button is only active if “Use Settings Specified at
Print Time” is NOT checked. Clicking this button will load the
pre-defined defaults for the selected printer (usually plain paper
at low-resolution)
Apply Custom Calibration
When this button is checked, custom cablibration will be
used. To define the density calibration curves to use, click the
“Adjust Custom Calibration” button. This will launch the “Q-
Curve” application which enables you to define the density
curves. See chapter 6
Adjust Custom Calibration
Clicking this button will launch the “Q-Curve” application
which enables you to define the density curves. Each color
channel can be adjusted individually. See Chapter 6