
User`s guide

23
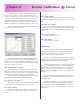
Color
This section of the dialog does not change much between
different models of printers as it contains mostly PowerRIP-
specific color features.
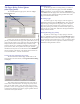
Color Mode:
This section lets you specify color or monochrom output.
Spot Colors:
This section lets you specify the use of the “True Spot”
feature. This feature recognizes named spot color in a job and
applies a proprietary function to make the spot color appear as
close as possible to it’s true color.
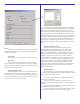
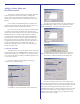
Edit/Define Spot Colors:
This button displays the spot color configuration dialog
which will let the user define spot color definitions. This is
sometimes necessary as PostScript separation files don’t always
contain the definition of a spot color. This can also be used to
override a spot color with a certain name.
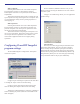
The Spot Color Configuration dialog allows the addition/
deletion and modification of user-defined spot colors in CMYK,
RGB or Lab color spaces. Simply select the color space you
wish to work in by clicking one of the radio buttons on the upper
right. This will display all user-defined spot colors (if any) that
were defined in that particular mode. As you select the spot color
name in the name window, the values will appear in the appro-
priate boxes on the right. These can then be edited. To delete a
spot color, select it and click the delete button. To add a spot
color, click the “Add Spot Color” button and follow the instruc-
tions.
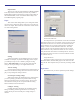
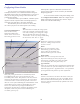
Output Profile (ICC/ICM)
This lets you select the profile to use when printing.
PowerRIP ImageSet ships with all necessary ICMs for all
supported printers and resolution/paper type combinations.
These are used automatically by setting this option to “Auto
Select”. This drop-down contains all the CMYK (in this case)
ICMs that were found in the system. If you have created a
custom profile you would like to use, you can select it here. To
be able to select it at print-time from your applications, it must
be added to the PPD. To do this, use the “Add ICM to PPD”
utility which is located in the PowerRIP ImageSet program
group. This utility is documented elsewhere in this manual. The
best thing to remember when using this feature is: When in
doubt, use Auto Select.
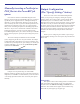
Rendering Intent
This drop-down lets you select which rendering intent to
use when printing. The default is Perceptual. Following is a brief
description of each rendering intent:
Perceptual: Maintains contrast. Creates natural-looking
images (this is the default)
Absolute Saturation: Maintains saturation. Good for
business charts and other situations where un-dithered colors are
required.
Relative Colorimetric: Maintains colorimetric match. Used
for graphic designs and named colors.
Absolute Colorimetric: Maintains the white-point, matches
the colors to their nearest color in the destination gamut.