
User`s guide


29
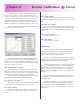
Configuring Printer Entities
It is not necessary to change these settings to print
normally. Furthermore, it is recommended that the settings for
the default printer entities not be modified unless you are sure of
what you are doing. Wrong settings in this section will cause
problems when printing.
As mentioned before, upon installation, a Windows printer
(appears in the list of printers unders start/settings/printers) is
created for each output device selected at install-time.
These Windows printers are refered to as “Printer Enti-
ties”. When you print to one of these printers, the resulting
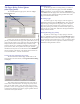
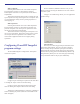
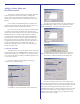
Current PowerRIP Printers:
These are the currently
defined PowerRIP printer
entities. These can be seen in
Start/settings/printers as well.
Output Folder:
This is where the selected printer entity will
deposit its PostScript jobs when you print a job.
There must be a hot folder entry telling PowerRIP
to scan this folder. Since this printer entity was
Application Path:
Part of the printing mechanism is to automatically launch
PowerRIP ImageSet when a job is printed to one of the
PowerRIP printer entities. This parameter tells the system the
location of the application’s executable file. The reason this is
selectable is because it is theoretically possible to have more
than one version of PowerRIP ImageSet loaded and this would
enable different printer entities to launch different versions.
This is a very advanced setup though and should not be
attempted by the faint of heart. Normally, this should be left at
the default, which is the path to the PowerRIP ImageSet
executable (powerrip.exe)
App To Launch:
This is the executable that will be automatically launched when
a job is printed to one of the PowerRIP printer entities. It will
launch this app from the “Application Path”. See explanation
of the Application Path parameter for more information.
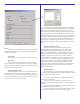
Edit:
When this button is clicked, the setting options
below will switch from read-only mode to read-
write mode, enabling you to change the settings.
When in edit mode, this button will change to
“Cancel Edit”. To save any changes made during
the edit session, click “OK” or “Apply”
PostScript file is placed in a Hot Folder (described in the
previous section) which is in turn scanned by the PowerRIP
ImageSet application.
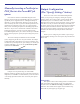
To access the Printer Entities configuration dialog, select
the “Configure Printer Entities” tab of the Configure Inputs
dialog. If this dialog is not already open, click the “Inputs”
button on the main PowerRIP dialog.
Add:
Enables the creation of a new Printer
Entity. See “adding an input tutorial”
in the next section.
Delete:
Deletes the selected printer entity.
When deleting a printer entity, don’t
forget to delete the hot folder entry
associated with it (if one was created)
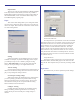
Driver/PPD:
The driver selected here is the driver that will be used by the
printer entity. You MUST use one of the “PowerRIP” drivers
and it must match the destination printer. The PPD box will
always be read-only and automatically updated as the driver
selection changes.