
User`s guide


30
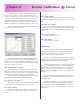
Adding a Printer Entity and
Hot Folder tutorial
The previous 2 sections describes the operation of the Hot
Folder Configuration and the Printer Entity Configuration
dialogs. This section will walk you through the creation of a
printer entity/hot folder to help you understand how they work
together.
In our example, PowerRIP ImageSet was installed with
support for the Epson Stylus Photo 1290, the Epson Stylus Pro
9600, the TIFF Generator and the PDF Generator.
Lets say we want to add a printer entity that, when printed
to, outputs to the Epson Stylus Photo 1290, ignoring the job
settings at print-time and processing every job for “Professional
Media Photo Paper” at 1440x720 dpi using 85-line halftone
screening. We’ll call this printer entity “Epson1290Halftones”.
The object in this scenario is to have a printer entity that will
always print the same way regardless of the print settings the
user specified when he/she printed the job. This will also leave
us with a hot folder where you can deposit virtually any
PostScript or PDF file and have it print on the 1290 using the
settings we “hard-wired”.
Create the hot folder
The first step is to create the hot folder. We like to keep all
the hot folders in the “PowerRIPHotFolders” folder. This is just
to keep things organized... a hot folder can be anywhere on the
server system (the machine running PowerRIP ImageSet Server)
or even on the network.
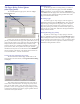
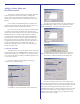
Open the “configure inputs” dialog by clicking the
“Inputs” button on the main dialog.
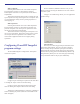
Click Add, the “Choose Hot Folder” dialog will appear:
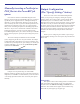
You will notice that the dialog comes up by default to the
“PowerRIPHotFolders” folder. Lets give the folder the name
“EPSON1290HRHT”. Type that in the Folder Name box:
Click OK
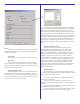
A dialog will apear asking you if you wish to create this
folder (assuming the folder doesn’t already exist). Click Yes.
The folder is created and added to the hot folders list.
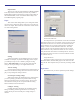
With the new folder selected, lets set the output options.
First, set the target output device, in this case, the Epson 1290. In
the “Intended Output” section select the EPSON Stylus Pro 1290
as the printer and the appropriate output queue. In this case,
PowerRIP Output Queue 1 (which is pointed at the port the 1290
is connected to). If you want to assign a higher priority to the
jobs that arrive in this hot folder, you may change that now by
using the “Job Priority” settings.