
User`s guide

34
Chapter 8
Managing Outputs
PowerRIP ImageSet is designed to support printing to
multiple printers connected to multiple ports. It employs “output
queues” which are actually Windows print queues that are used
to send rasterized page data to the printer(s).
Upon installation, one output queue is created for each
printer selected. The default name for the output queues are
“PowerRIP Output Queue 1”, “PowerRIP Output Queue 2”, etc.
Assuming you selected the correct ports when prompted during
the installation, you shouldn’t “need” to touch the output queue
configuration.
It is possible, however, to add additional output queues for
special purposes. Below are two examples of how additional
output queues might be used
In the previous chapter, there is a tutorial that creates an
input (Print Manager entity/hot folder setup) for printing to an
Epson 1290 with hard-wired print settings.
Example 1:
Lets say that a user, currently running with our example
setup (an Epson 1290 and an Epson 9600) aquired a second
Epson 1290 for printing only high-resolution screened color
proofs on Professional Photo Paper. Lets say that the original
Epson 1290 is connected to USB port 1 and the Epson 9600 is
connected to USB port 2 and he plugs the additional Epson 1290
printer to USB port 3. This printer is always loaded with
Professional Photo Paper so we want all the jobs printed to the
Windows printer “Epson1290Halftones” (see end of previous
chapter) to print to this printer instead of the first Epson 1290.
All the user would have to do is create a new output queue
which prints to USB port 3 and change the hot-folder settings for
the the “EPSON1290HRHT” hot folder entry to output to this
new output queue instead of its currently selected output queue.
Example 2:
Another example using the new printer entity we created
in the exercise at the end of the last chapter:
Lets say that the user of this ficticious system did NOT
aquire an additional Epson 1290 but he/she doesn’t want these
high-res jobs from the Epson1290Halftones printer entity which
are supposed to print on Photo paper sneaking in while there’s
plain paper loaded in the printer.
The user could create an additional output queue which
prints to THE SAME port as PowerRIP Output Queue 1, modify
the EPSON1290HRHT hot folder configuration to output to this
new output queue, and keep this new output queue paused while
the printer is loaded with different media. This way, all jobs
printed to Epson1290Halftone will process and the pages will
wait in this new ouput queue until it is released. When the printer
is loaded with the high quality media, he/she can then release the
output queue allowing all the waiting pages to print.
These examples might give you ideas as to how to custom-
ize your PowerRIP ImageSet configuration.
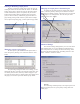
Working with Output Queues
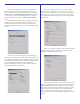
To launch the Configure Output Queues dialog click the
“Outputs” button on the PowerRIP main dialog.
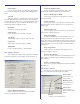
This dialog allows you to manage the jobs in the different
queues as well as modify the queues themselves. You can, of
course, add and delete queues.
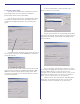
The current output queues are listed in the section labled
“Current PowerRIP Output Queues”. The name, status, port and
jumber of jobs currently in the queue are plainly displayed
Below the list of queues are the control buttons which let
you control and edit the different output queues.
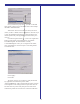
Controlling the output queue and its jobs.
From this dialog you can pause and resume an output
queue. You can also open the queue and list the jobs that are in a
queue and pause/resume/restart/delete individual pages. You can
do this from the “Pages Being Printed” tab in the main
PowerRIP dialog but this dialog is more “direct” as you can list
the pages in a particular output queue, as the “Pages Being
Printed” displays all pages being printed in all queues. For
example if you wanted to purge all pages from only from
“PowserRIP Output Queue 1” it is much easier to do it from
here.