
User`s guide

36
Driver:
The driver used makes little difference on an output queue.
The jobs (pages) arrive here already rasterized and ready to send
directly to the printer. The driver does nothing but pass the data
through to the output port. In some rare cases, it is advantageous
to use the printer’s native driver as the driver for the output
queue. Most of the time, however, this setting is irrelevant.
Spool print documents to disk:
This enables page spooling. If this is not selected, the data
is sent directly to the output port and the “start printing after
page is spooled” and “start printing immediately” features are
disabled. It is preferable to have this selected.
Start printing after page is spooled:
When selected, Windows will not start sending the page
data to the printer until the entire page has been spooled.
Start printing immediately:
When selected, Windows will start sending page data to
the printer as soon as the page starts to spool.
Print directly to the printer:
When selected, Windows will not spool page data to disk.
It will send the data directly to the output port. This is discour-
aged.
Keep printed pages, do not delete after printing:
After the page is printed, it remains in the output queue
with a status of “Printed”. This is handy for re-pritning pages by
just issuing a “restart” from the output queue dialog or the
“Pages Being Printed” queue. NOTE: Keep in mind that as long
as there are pages from a job in the Page Queue (output queue)
the job will not expire, running like that all the time might cause
you to run out of disk space.
Deleting an Output Queue.
Care must be used when deleting an output queue. If there
are hot folder configurations using an output queue and this
queue is deleted without first changing the hot folder configura-
tion, the hot folder mechanism will pick the first available output
queue at print-time instead. The pages might end up going to the
wrong port. Before deleting an output queue, be sure no hot
folders are using it.
To delete an output queue, just select it’s name and click
the Delete button.
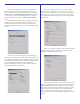
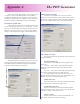
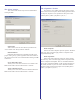
Adding an output queue
To add a
new output
queue, click the
“Create New”
button. The
dialog will go
into “edit mode”.
Select the name,
port and any
advanced
options you wish
and click Apply.
NOTE: When setting
advanced options it is
necessary to click Apply
when exiting the Advanced
menu and then again to
save the new output queue.