Epson Stylus Photo R340 Printer Parts Control Panel Print photos from memory cards and external devices Press and hold for 2 sec.
Epson Stylus Photo R340 Accessories Ink Cartridges Cartridge Part number Paper name Size Part number Epson Ink Jet Transparencies Letter (8.5 x 11 inches) S041064 Epson Iron-On Transfer Paper Letter (8.5 x 11 inches) S041153 Black T048120 T048320 Epson Glossy Photo Greeting Cards Letter (8.5 x 11 inches), perforated edges S041606 Magenta Cyan T048220 Epson Photo Stickers A6 (4.1 x 5.
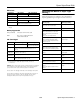
Epson Stylus Photo R340 Electrical Specification 120 V Model Input voltage * 99 to 132 V Rated frequency Selecting the Media or Paper Type Setting 220−240 V Model 198 to 264 V When printing from your computer, select the following Paper Type/Media Type settings in the driver software. 50 to 60 Hz Input frequency 49.5 to 60.5 Hz Rated current 0.4 A 0.2 A Power consumption Approx. 13 W (ISO10561 Letter Pattern) Approx.
Epson Stylus Photo R340 When printing without a computer (in stand-alone mode), select the following Paper Type settings from the printer’s control panel.
Epson Stylus Photo R340 3. Slide the left edge guide against the paper. Make sure it is snug, but not so tight that the paper is bent. (For letter-size paper, you may not need to move the edge guide over.) Borderless Photos BorderFree™ printing is available for a variety of paper types and sizes, whether you’re printing from your computer or in stand-alone mode.
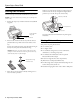
Epson Stylus Photo R340 Slide the tray under the tab and the two rollers. Push it in until the arrows on the tray and guide are aligned. Don’t push the tray in too far; line up the arrows exactly. Loading CDs and DVDs Follow these steps to load CDs and DVDs into your printer: Load tray under tab Caution: If you don’t insert the tray correctly, you may damage the printer or tray. 1. Push in the output tray extension and lower the CD/DVD tray guide.
Epson Stylus Photo R340 Inserting a Memory Card Connecting a Digital Camera or External Storage Device 1. Press the P power button to turn on your Epson Stylus Photo R340. If you have one of the following devices, you can connect it directly to your printer using a USB cable: 2. Open the memory card door. ❏ Digital camera with PictBridge® or USB DP (USB Direct Print™) support 3. Insert the memory card into one of the three slots, as shown below. ❏ USB thumb drives (see http://support.epson.
Epson Stylus Photo R340 3. Press the Print Settings button and choose your print settings (see page 9). 3. Turn on the printer and your camera or storage device. After a moment, the printer reads and counts the number of images. When it’s done, your images are available for printing. 4. Press the x Start button to print your photos. Note: To cancel printing, press the y Stop button.
Epson Stylus Photo R340 Printing a Proof Sheet 7. Select one of the following layout options, then press OK. Print a proof sheet showing thumbnail images and photo numbers for all the photos on your card. Prints one photo per sheet, borderless; fits the photo lengthwise on the paper. Prints one photo per sheet with borders around the edges. 1. Press l or r to choose Print Proof Sheet, then press OK. Prints a photo on the top half of the sheet. 2.
Epson Stylus Photo R340 Use these Epson ink cartridges within six months of installing them and before the expiration date on the package: itself is fine. The problem probably lies with the printer driver settings, the application settings, the interface cable (be sure to use a shielded cable), or the computer itself. If the check page does not print satisfactorily, as shown below, or if it doesn’t print at all, there is a problem with the printer.
Epson Stylus Photo R340 4. Press in the tab on the back of the cartridge and lift the cartridge out of the printer. Dispose of it carefully. Cleaning the Print Head If your printouts are unexpectedly light or faint, or dots or lines are missing from the image, you may need to clean the print head. This unclogs the nozzles so they can deliver ink properly. Print head cleaning uses ink, so clean it only if quality declines. Warning: Keep ink cartridges out of the reach of children and do not drink the ink.
Epson Stylus Photo R340 If you don’t see any improvement after cleaning three or four times, check the solutions in your Printer Basics. You can also turn the printer off and wait overnight—this allows any dried ink to soften—and then try cleaning the print head again. Caution: To avoid damage, always leave the ink cartridges installed when transporting the printer. 1. Turn on the printer, wait until the print head locks in the far right position, then turn off the printer. 2.