
User`s guide


5. The EPSON RC+ 5.0 GUI
EPSON RC+ 5.0 (Ver.5.4) User's Guide Rev.4 107
5.11.3 I/O Label Editor Command (Tools Menu)
The I/O label editor lets you define meaningful names for inputs, outputs, and memory I/O
for each project. The labels can be used in your programs, from the Command window, or
in macros. They are also displayed in the I/O Monitor window.
To open the I/O Label Editor
Select I/O Label Editor from the Tools Menu.
Or
Type Ctrl + L.
Or
Click on the
button on the toolbar.
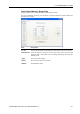
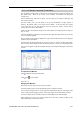
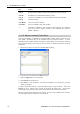
The I/O Label Spreadsheet
When you select I/O Label Editor from the Tools Menu, a window opens that contains a
tree and a spreadsheet editor.
The tree on the left side of the window shows the various types of I/O for the controller.
For each type of I/O you can view and edit labels for bits, bytes (8 bits), and words (16
bits).
The first column of the spreadsheet shows the bit, byte, or word number, depending on
which type of I/O you are viewing.
The second column contains the label for each bit, byte, or word in column 1. You can
type in up to 16 characters for a label. Label characters can be alphanumeric or underscore.
The third column contains the description associated with the label.
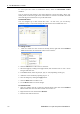
If you add a description to an I/O point, then the description will be displayed as a tool tip
on the I/O Monitor.
All I/O types are shown in the I/O Label Editor, but some may not be available on your
controller. For example, you can edit Fieldbus I/O labels, but you may not have a Fieldbus
board installed in the controller. This allows you to edit labels when you are disconnected
from a controller. Verify that the controller to be used with the project has the hardware
installed for the I/O you are using.
)
NOTE