
User`s guide


5. The EPSON RC+ 5.0 GUI
108 EPSON RC+ 5.0 (Ver.5.4) User's Guide Rev.4
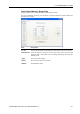
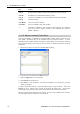
To add or edit a label
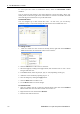
Select the type of I/O you want to label in the tree. After you select the I/O type, the
spreadsheet will be refreshed to display the labels for that type. The number of rows in the
spreadsheet equals the number of bits, bytes, or words available for the type you have
selected.
Use the mouse to scroll through the spreadsheet and put the cursor in the Label field next
to the bit, bytes, or words number that you want to add a label to. Type in the label, which
can be up to 16 alphanumeric characters without any spaces. Optionally, you can type a
description for the label in the Description field.
After adding or editing labels, save the changes by executing Save from the File Menu or
by clicking on the Save Project
toolbar button. If any duplicate labels are detected, an
error message will be displayed and the save operation will be aborted. You must correct
the duplication before you can save the labels successfully.
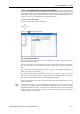
To cut and paste labels and descriptions
You can cut and paste labels and descriptions by selecting with the mouse, then executing
Copy, Cut, and Paste from the Edit Menu.
You can also cut and paste entire rows using the following steps:
1. Select one or more rows by using the row selectors on the left and execute either the
Cut or Copy command from the Edit Menu. When selecting multiple rows, hold down
the shift or control key while selecting rows with the mouse.
2. Select the destination I/O type, if required.
3. Select the row where you want to start the paste by clicking the row selector on the left
of the row.
4. Execute the Paste command from the Edit Menu.