RP-300 / 310 ::: Receipt Printer User’s manual ::: All specifications are subjected to change without notice
TABLE OF CONTENTS 1. Parts Identifications 2 2. Setting up the printer 3 2.1 Unpacking 3 2.2 Connecting the cables 4 2.3 Loading the roll paper 7 2.4 Dip switch setting 9 3. Control panel and other functions 13 3.1 Control panel 13 3.2 Error Indicating 13 4. Self Test 14 5. Hexadecimal Dump 14 6. Specifications 15 6.1 Environmental Conditions 15 6.2 Reliability 15 6.3 Certification 15 7.
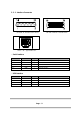
1.
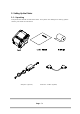
2. Setting Up the Printer 2-1. Unpacking Your printer box should include these items. If any items are damaged or missing, please contact your dealer for assistance.
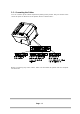
2-2. Connecting the Cables You can connect up the cables required for printing to the printer. They all connect to the connector panel on the back of the printer, which is shown below : Before connecting any of the cables, make sure that both the printer and the computer are turned off.
2-2-1.
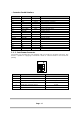
- Centronics Parallel interface PIN 1 2~9 10 11 12 13 14 15 16 17 18 19~30 31 32 33 34 35 36 SIGNAL STROBEDATA0~7 ACKBUSY PE SELECT AUTO FEEDGROUND GROUND NC LOGIC-H GROUND INITERRORGROUND NC +5V SELLECT IN- I/O Input Input/Output Output Output Output Output Input Input Output Input DESCRIPTION Synchronize signal Data received Data bit Transmitted 0 ~7 Data receiving completed.
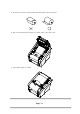
2-3. Loading the Roll Paper Notes: Be sure to use paper rolls that meet the specifications. Do not use paper rolls that have the paper glued to the core because the printer cannot detect the paper end correctly. (Turn off power switch) ? Turn off power switch. 1. Make sure that the printer is not receiving data; Otherwise, data may be lost. 2. Open the paper roll cover by pulling down the cover-open lever. 3. Remove the used paper roll core if there is one inside. 4. Insert new paper roll as shown.
5. Be sure to note the correct direction that the paper comes off the roll. 6. Pull out a small amount of paper, as shown. Then, close the cover. 7. Tear off the paper as shown.
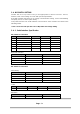
2-4. DIP SWITCH SETTING The RP-300 is set up at the factory to be appropriate for almost all users. It does, however, offer some settings for users with special requirements . It has DIP switches that allow you to change communication setting, such as handshaking and parity check, as well as print density. Your printer has two sets of DIP switches. The functions of the switches are shown in the following tables. ? Note : Power off. And open the cover of Dip Switch and change setting. 2-4-1.
Paper low detect (? 1) SW 6 FUNCTIONS Paper Low ON Detect OFF Do not Detect (? 1) The detecting function of [Paper Low] is an option. Please set Dip Switch (2-6) [OFF] if you don ’t need any option. If Dip Switch is [ON] without any special option purpose. Printer detects [Paper is Low] and it could cause error. 2-4-2.
Emulation FUNCTIONS SW-4 SW-5 Epson (TM-88) OFF OFF Paper low detect (? 1) SW 6 FUNCTIONS Paper Low ON Detect OFF Do not Detect (? 1) The detecting function of [Paper Low] is an option. Please set Dip Switch (2-6) [OFF] if you don ’t need any option. If Dip Switch is [ON] without any special option purpose. Printer detects [Paper is Low] and it could cause error. ? CAUTION: Turn off the printer while removing the DIP switch cover to prevent an electric short, which can damage the printer. 1.
The new settings take e ffect when you turn on the printer. ? CAUTION: When the paper is jammed with cutter, the top cover might be stuck. In this case, repeat power on and off several times. If the top cover is still stuck, please follow the steps to release the papers from jamming. 1. Make sure the printer is turned off. 2. Take out cutter cover as shown. 3. Turn screw with drivers to a direction until paper is released from the cutter.
3. Control panel and other functions. 3-1. Control panel You can control the basic paper feeding operations of the printer with the button on the control panel. The indicator lights help you to monitor the printe r ’s status. Control Panel POWER ERROR PAPER FEED Button The button can be disabled by the ESC c 5 command. Press the FEED button once to advance paper one line. You can also hold down the FEED button to feed paper continuously. 3-2.
4. Self Test The self-test lets you know if your printer is operating properly. It checks the control circuits, printer mechanisms, print quality, ROM version and DIP switch settings. This test is independent of any other equipment or software. Running the self test 1. Make sure the printer is turned off and the printer cover is closed properly. 2. While holding down the FEED button, turn on the printer using the switch on the front of the printer to begin the self-test.
6. Specifications Important! When using a printer power supply other than optional AC adaptor (HT -U1135, LSE 9901B2460), be sure that the following cautions are observed. Use a power supply of DC 24V ± 10% and more than 1.5A. Be careful about installing the printer in an area where there is noise. Take the appropriate measure to protect against electrostatic AC line noise, etc. 6-1.
7. Command List No.
49 50 51 52 53 54 55 56 57 58 59 60 61 62 GS H GS I GS L GS P GS V GS W GS \ GS a GS f GS h GS k GS r GS v 0 GS w Select printing position of HRI characters Transmit printer ID Set left margin Set horizontal and vertical motion units Cut paper Set printing area width Set relative vertical print position in page mode Enable/disable Automatic Status Back (ASB) Select font for HRI characters Set bar code height Print bar code Transmit status Print raster bit image Set bar code width 1 2 3 4 5 6 7 8 9 10 <
:: MEMO :: Page - 18-
:: MEMO :: Page - 19-
:: MEMO :: Page - 20-