
User Manual
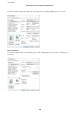
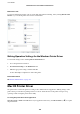

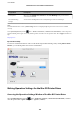

Table Of Contents
- Copyright
- Trademarks
- Contents
- About This Manual
- Important Instructions
- Printer Basics
- Network Settings
- Network Connection Types
- Connecting to a Computer
- Connecting to a Smart Device
- Making Wi-Fi Settings from the Printer
- Checking the Network Connection Status
- Replacing or Adding New Wireless Routers
- Changing the Connection Method to a Computer
- Changing to an Ethernet Connection on the Printer's Control Panel
- Changing the Wi-Fi Direct (Simple AP) Settings
- Disabling Wi-Fi from the Control Panel
- Disconnecting Wi-Fi Direct (Simple AP) Connection from the Control Panel
- Restoring the Network Settings from the Control Panel
- Loading Paper
- Placing Originals
- Inserting a Memory Card
- Loading a CD/DVD for Printing
- Printing
- Printing from the Print Photos Menu on the Control Panel
- Printing from the Various prints Menu on the Control Panel
- Printing Design Paper
- Printing Photos with Handwritten Notes
- Printing Photos onto a CD/DVD Label
- Printing Photos onto a Jewel Case Jacket
- Printing Original Calendars with a Photo
- Printing a Schedule
- Printing Lined Paper
- Printing Original Writing Paper
- Printing an Original Message Card
- Printing a Coloring Book
- Printing from a Computer
- Printing Basics - Windows
- Printing Basics - Mac OS
- Printing on 2-Sides
- Printing Several Pages on One Sheet
- Printing to Fit the Paper Size
- Printing Multiple Files Together (for Windows Only)
- Printing One Image on Multiple Sheets to Create a Poster (for Windows Only)
- Printing Using Advanced Features
- Printing Photos Using Epson Easy Photo Print
- Printing a CD/DVD Label with Epson Print CD
- Printing from Smart Devices
- Printing from a Digital Camera
- Canceling Printing
- Copying
- Scanning
- Replacing Ink Cartridges
- Maintaining the Printer
- Menu Options for Settings
- Menu Options for Ink Levels
- Menu Options for Basic Settings
- Menu Options for Printer Settings
- Menu Options for Network Settings
- Menu Options for Web Service Settings
- Menu Options for File Sharing
- Menu Options for Camera Print Settings
- Menu Options for Guide Functions
- Menu Options for Firmware Update
- Menu Options for Restore Default Settings
- Network Service and Software Information
- Epson Connect Service
- Application for Configuring Printer Operations (Web Config)
- Windows Printer Driver
- Mac OS Printer Driver
- Application for Scanning Documents and Images (Epson Scan 2)
- Application for Configuring Scanning Operations from the Control Panel (Epson Event Manager)
- Application for Laying Out Photos (Epson Easy Photo Print)
- Application for Printing Text or Images on a Disc (Epson Print CD)
- Application for Printing Web Pages (E-Web Print)
- Application for Scanning and Transferring Images (Easy Photo Scan)
- Software Update Tools (EPSON Software Updater)
- Installing Applications
- Updating Applications and Firmware
- Uninstalling Applications
- Solving Problems
- Checking the Printer Status
- Removing Jammed Paper
- Paper Does Not Feed Correctly
- Power and Control Panel Problems
- Cannot Print from a Computer
- When You Cannot Make Network Settings
- Cannot Print from an iPhone or iPad
- Printout Problems
- Printout is Scuffed or Color is Missing
- Banding or Unexpected Colors Appear
- Colored Banding Appears at Intervals of Approximately 2.5 cm
- Blurry Prints, Vertical Banding, or Misalignment
- Print Quality is Poor
- Paper Is Smeared or Scuffed
- Paper is Smeared During Automatic 2-Sided Printing
- Printed Photos are Sticky
- Images or Photos are Printed in Unexpected Colors
- Colors Differ from What You See on the Display
- Cannot Print Without Margins
- Edges of the Image are Cropped During Borderless Printing
- The Position, Size, or Margins of the Printout Are Incorrect
- Multiple Originals are Copied onto a Single Sheet
- Printing Position of Photo Stickers is Incorrect
- The Printing or Copying Position on a CD/DVD is Incorrect
- Printed Characters Are Incorrect or Garbled
- The Printed Image Is Inverted
- Mosaic-Like Patterns in the Prints
- Uneven Colors, Smears, Dots, or Straight Lines Appear in the Copied Image
- Moiré (Cross-Hatch) Patterns Appear in the Copied Image
- An Image of the Reverse Side of the Original Appears in the Copied Image
- The Printout Problem Could Not be Cleared
- Other Printing Problems
- Cannot Start Scanning
- Scanned Image Problems
- Uneven Colors, Dirt, Spots, and so on Appear when Scanning from the Scanner Glass
- Straight Lines Appear when Scanning from ADF
- The Image Quality Is Rough
- Offset Appears in the Background of Images
- Text is Blurred
- Moiré Patterns (Web-Like Shadows) Appear
- Cannot Scan the Correct Area on the Scanner Glass
- Cannot Preview in Thumbnail
- Text is Not Recognized Correctly when Saving as a Searchable PDF
- Cannot Solve Problems in the Scanned Image
- Other Scanning Problems
- Other Problems
- Appendix
- Technical Specifications
- Printer Specifications
- Scanner Specifications
- Interface Specifications
- Network Function List
- Wi-Fi Specifications
- Ethernet Specifications
- Security Protocol
- Supported Third Party Services
- External Storage Device Specifications
- Supported Data Specifications
- Dimensions
- Electrical Specifications
- Environmental Specifications
- System Requirements
- Regulatory Information
- Transporting and Storing the Printer
- Accessing a Memory Card From a Computer
- Where to Get Help
- Technical Specifications

Adding the Network Scanner
Before using Epson Scan 2, you need to add the network scanner.
1. Start the soware, and then click Add on the Scanner Settings screen.
Note:
❏ If Add is grayed out, click Enable Editing.
❏ If the main screen of Epson Scan 2 is displayed, it has already been connected to the scanner. If you want to connect
to another network, select Scanner > Settings to open the Scanner Settings screen.
2. Add the network scanner. Enter the following items, and then click Add.
❏ Model: Select the scanner you want to connect to.
❏ Name: Enter the scanner name within 32 characters.
❏ Search for Network: When the computer and the scanner are on the same network, the IP address is
displayed. If it is not displayed, click the
button. If the IP address is still not displayed, click Enter
address, and then enter the IP address directly.
3. Select the scanner on the Scanner Settingsscreen, and then click OK.
Application for
Conguring
Scanning Operations
from the Control Panel (Epson Event Manager)
Epson Event Manager is an application that allows you to manage scanning from the control panel and save images
to a computer. You can add your own settings as presets, such as the document type, the save folder location, and
the image format. See the application's help for details.
Starting on Windows
❏ Wi n d o w s 1 0
Click the start button, and then select Epson Soware > Event Manager.
❏ Windows 8.1/Windows 8
Enter the application name in the search charm, and then select the displayed icon.
❏ Wi n d o w s 7 / Wi n d ow s Vis t a / Wi n d ow s X P
Click the start button, and then select All Programs or Programs > Epson Soware > Event Manager.
Starting on Mac OS
Go > Applications > Epson
Soware
> Event Manager.
Related Information
&
“Scanning to a Computer” on page 142
& “Installing Applications” on page 202
User's Guide
Network Service and Software Information
199