
User`s guide


Maintenance and Transportation
5-2
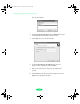
Using the Head Cleaning Utility
Follow these steps to run the utility from a Windows computer
or a Macintosh:
1. Make sure the printer is turned on but not printing.
2. Make sure all the
Ink Out B lights are off.
3. Access the Main printer settings dialog box as described in
Chapter 1.
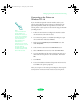
4. Click the
Utility tab (Windows) or the Utility button
(Macintosh). You see the Utility menu.
5. Click the
Head Cleaning icon.
6. Follow the instructions on the screen to clean the print
heads. You can clean the black or color print head
separately, or you can clean both. Cleaning each head takes
up to three minutes, during which the printer makes some
noise and the
Operate and Pause lights flash.
When the lights stops flashing, you need to run a nozzle
check to test the print quality and reset the cleaning cycle.
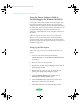
7. Make sure paper is loaded in the printer and click
Print
nozzle check pattern
(Windows) or Confirmation
(Macintosh), and then click
Next. See page 5-4 for
instructions on examining the nozzle check pattern.
If your print quality has not improved, repeat the steps above. If
you don’t notice any improvement after doing this four or five
times, check the print quality solutions in Chapter 6.
Note:
If any Ink Out lights
are flashing or on, you
need to replace the ink
cartridge instead. See
page 5-4 for instructions.
If you were printing when
you started cleaning the
print heads, the Pause
light may still be on. Press
the Pause button to turn
off the light and resume
printing.
Caution:
Never turn off the printer
while the Pause light is
flashing.
If, however, the Pause
light is still flashing after
10 minutes and the
printer is not moving or
making any noise, you
may turn off the printer.
Loire-PLUS.BK.book Page 2 Friday, May 2, 2003 2:56 PM