front.fm5 Page i Tuesday, July 29, 1997 2:33 PM User’s Guide Printed on recycled paper with at least 10% post-consumer content.
inside.
front.fm5 Page ii Tuesday, July 29, 1997 2:33 PM All rights reserved. No part of this publication may be reproduced, stored in a retrieval system, or transmitted in any form or by any means, electronic, mechanical, photocopying, recording, or otherwise, without the prior written permission of SEIKO EPSON CORPORATION. The information contained herein is designed only for use with this EPSON printer. EPSON is not responsible for any use of this information as applied to other printers.
front.fm5 Page iii Tuesday, July 29, 1997 2:33 PM FCC Compliance Statement For United States Users This equipment has been tested and found to comply with the limits for a Class B digital device, pursuant to Part 15 of the FCC Rules. These limits are designed to provide reasonable protection against harmful interference in a residential installation.
front.
fiji.
fiji.
fiji.toc Page vii Thursday, July 24, 1997 2:57 PM Contents 4 Managing Print Jobs and Network Printing Managing Print Jobs in Windows 95 or 3.1 Using the Spool Manager Using the Status Monitor Managing Print Jobs with Windows NT 4.0 Managing Print Jobs on a Macintosh Using Monitor2 Using the Macintosh Status Monitor Network Printing on a PC Network Printing with Windows NT 4.
fiji.
intro.fm5 Page 1 Tuesday, July 29, 1997 3:02 PM / Introduction Your EPSON Stylus® COLOR 600 printer is the ideal output device for business graphics, single-page layout proofs, digital photography—or any project you create on your computer. With resolutions up to 1440 by 720 dpi, you get amazingly realistic photographic images and vivid graphics in color, superb grayscale images, and laser-sharp black printing for crisp text and detailed line art.
intro.fm5 Page 2 Tuesday, July 29, 1997 3:02 PM Introduction Windows System Requirements To use your printer and its software with a PC, your system should have: ◗ An IBM® compatible PC with at least a 386/25 MHz or faster processor ◗ DOS, Windows 3.1x, Windows for Workgroups 3.11, Windows 95, or Windows NT® 4.
intro.fm5 Page 3 Tuesday, July 29, 1997 3:02 PM Introduction Macintosh System Requirements To use your printer and its software with a Macintosh, your system should have: ◗ Any Macintosh or Power Macintosh model except the Macintosh +, Macintosh 512, Performa® 410, PowerBook® 100, and some early versions of the Macintosh, such as the II or Classic ◗ System 7.
intro.fm5 Page 4 Tuesday, July 29, 1997 3:02 PM Introduction How To Use Your Manuals To set up your printer and install your printer software, see the Setup Guide. This User’s Guide contains the following information: Chapter 1, “Basic Printing,” covers the basics of printing with Windows or Macintosh. Chapter 2, “Custom Printing,” tells you how to print special projects with custom settings for print quality and color management.
intro.fm5 Page 5 Tuesday, July 29, 1997 3:02 PM Introduction Warnings, Cautions, Notes, and Tips You’ll find this information throughout your manual: Warnings must be followed carefully to avoid bodily injury. Cautions must be observed to avoid damage to your equipment. Notes contain important information about your printer. Tips contain additional hints for great printing.
intro.fm5 Page 6 Tuesday, July 29, 1997 3:02 PM Introduction Automated telephone services Service EPSON SoundAdvice Access ™ Pre-recorded answers to commonly asked questions about EPSON products 24 hours a day, seven days a week, call (800) 442-2110. EPSON FaxAdvice™ Access EPSON’s technical information library by calling (800) 442-2110. You must provide a return fax number to use this service.
intro.fm5 Page 7 Tuesday, July 29, 1997 3:02 PM Introduction The EPA ENERGY STAR Office Equipment program is a voluntary partnership with the computer and office equipment industry to promote the introduction of energy-efficient personal computers, monitors, printers, fax machines, and copiers in an effort to reduce air pollution caused by power generation.
intro.fm5 Page 8 Tuesday, July 29, 1997 3:02 PM Introduction ◗ Connect all equipment to properly grounded power outlets. Avoid using outlets on the same circuit as photocopiers or air control systems that regularly switch on and off. ◗ Place the printer near a wall outlet where the plug can be easily unplugged. Placez l’imprimante près d’une prise de contacte où la fiche peut être débranchée facilement. ◗ Do not let the power cord become damaged or frayed.
intro.fm5 Page 9 Tuesday, July 29, 1997 3:02 PM Introduction ◗ Do not dismantle the ink cartridges or try to refill them. This could result in damage to the print head. ◗ Once you install an ink cartridge, do not open the clamp or remove the cartridge except to replace it with a new one. The cartridge may become unusable otherwise. ◗ Install the ink cartridge immediately after you remove it from its package. Leaving the cartridge unpacked for a long time before use may result in reduced print quality.
basic.fm5 Page 1 Thursday, July 24, 1997 2:59 PM 1 Basic Printing It’s easy to print all your color and black and white documents with your new EPSON Stylus COLOR 600. First you have to set up your printer and install the software, following the instructions in the Setup Guide.
basic.fm5 Page 2 Thursday, July 24, 1997 2:59 PM Basic Printing Setting Printer Options from Windows Applications Note: The settings you select through your Windows application apply only until you exit that application. Then the driver settings return to the driver’s default values or the values selected through the Windows 95 or Windows NT Printer Properties or Windows 3.1 Control Panel. This section describes the preferences you’ll need to set for all your everyday printouts.
basic.fm5 Page 3 Thursday, July 24, 1997 2:59 PM Basic Printing 3. If you do not see the dialog box shown in step 2, click the Main tab. 4. Make sure the Mode option is set to Automatic. The printer software determines the best settings according to the Media Type and Ink settings you make. This is the easiest way to get good printing results for all kinds of documents, on all types of paper. 5. Choose the Media Type you want to print on from the following list (you may need to scroll through the list).
basic.fm5 Page 4 Thursday, July 24, 1997 2:59 PM Basic Printing 8. If necessary, click the Paper tab and choose your paper size, number of copies, orientation, and printable area. If your software application lets you control these settings, you don’t need to use the Paper tab. Note: To cancel your changes and exit the driver, click the Cancel button at the bottom of the menu at any time. 9. Click OK when you’re finished checking your settings. The dialog box closes. 10.
basic.fm5 Page 5 Thursday, July 24, 1997 2:59 PM Basic Printing 3. Select Properties. Then click the Main tab. You see the Main printer settings dialog box, as shown on page 1-2. 4. Change the settings you want and click OK. Any changes you make will become the default settings for all your applications and documents. Setting Default Options in Windows 3.1 Follow these steps: 1. Double-click the Control Panel icon in the Main group. 2. Double-click the Printers icon. 3.
basic.fm5 Page 6 Thursday, July 24, 1997 2:59 PM Basic Printing Checking Printer Status While your document is printing, the EPSON Despooler dialog box appears on your screen: Note: If you don’t want the Despooler dialog box to appear each time you print, you can turn it off. To do this, start Spool Manager, open the View menu, and select Show Despool Popup; the checkmark next to the option disappears.
basic.fm5 Page 7 Thursday, July 24, 1997 2:59 PM Basic Printing Printing from a Macintosh When you set up a new printer for your Macintosh, you need to check the printer driver settings for documents in each application you use. After you click the print icon or choose Print from the File menu, you see dialog boxes that let you choose the settings that describe your print job—such as whether you want to use color or black ink or the number of copies.
basic.fm5 Page 8 Thursday, July 24, 1997 2:59 PM Basic Printing 5. Make sure the Mode option is set to Automatic. The printer software determines the best settings according to the Media Type and Ink settings you make. This is the easiest way to get good printing results for all kinds of documents, on all types of paper. 6. Choose the Media Type you want to print on from the following list. The type of media you choose determines the print quality or resolution you can use.
basic.fm5 Page 9 Thursday, July 24, 1997 2:59 PM Basic Printing Printing from DOS Most DOS software programs include software for EPSON ESC/P 2™ printers. You need to select the correct printer software to take advantage of your printer’s advanced built-in scalable fonts and graphics handling. Most DOS programs require you to select from a list of printers to install the printer software. If EPSON Stylus COLOR 600 is not included in the list, contact your software manufacturer to obtain updated software.
basic.fm5 Page 10 Thursday, July 24, 1997 2:59 PM Basic Printing Choosing Paper and Other Media You can use most plain paper with your printer and achieve good results. For better results, use EPSON specially coated ink jet paper because it provides the best surface for the ink used in your printer. EPSON offers specially designed media for EPSON ink jet printers, available in a choice of sizes. See Chapter 3 for more information on using special media.
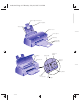
basic.fm5 Page 11 Thursday, July 24, 1997 2:59 PM Basic Printing What To Do When the Printer Lights Flash load/eject button power light paper light black ink out light color ink out light cleaning button power button The four lights on your printer’s control panel show the printer’s status and alert you to problems like paper jams. S When the paper light comes on, your paper ran out or is incorrectly loaded. Load paper in the feeder and then press the E load/eject button.
basic.fm5 Page 12 Thursday, July 24, 1997 2:59 PM Basic Printing Using the Control Panel Buttons Follow these guidelines when using the control panel buttons: P Turns the printer on and off. Resets the printer (clears its memory) if pressed twice within 10 seconds while the power is on. E R Loads or ejects paper if pressed and released within two seconds. Resumes printing if pressed after a paper out error is corrected.
basic.fm5 Page 13 Thursday, July 24, 1997 2:59 PM Basic Printing You can also access online help when you’re not using the driver, as described below. Accessing Help from Windows 95 Click the Start button, point to Programs, and Epson, and then click EPSON Stylus COLOR 600 Help. If you need instructions for how to use help, read the online “Quick Guide to Using Help.
custom.fm5 Page 1 Thursday, July 24, 1997 3:02 PM 2 Custom Printing When you want to print presentation graphics, photographs, or other special projects, you can use the custom settings in your EPSON Stylus COLOR 600 software. You can choose predefined settings or adjust individual options like brightness, contrast, saturation, and halftoning. For professional-quality color accuracy, you can use Image Color Matching (ICM) under Windows 95 or ColorSync on the Macintosh.
custom.fm5 Page 2 Thursday, July 24, 1997 3:02 PM Custom Printing 2. Access the Main printer settings dialog box as described on page 1-2 (Windows) or page 1-7 (Macintosh). You see one of the following dialog boxes: Click Advanced, then click here to see a list of project types Note: When you use advanced settings, the Quality/Speed slider disappears. Windows Macintosh Click Advanced, then click here to see a list of project types 3. Select Color or Black Ink.
custom.fm5 Page 3 Thursday, July 24, 1997 3:02 PM Custom Printing 4. Click Advanced, and then Custom Settings. You see the list of project types. 5. Follow these guidelines to choose the right one for your project: Note: Always choose your Ink setting before you select a project setting from the Custom Settings list. ◗ For printing scanned photographs. Increases contrast in the image. ◗ Selecting PhotoEnhance, ICM, or ColorSync automatically sets the Ink option to Color.
custom.fm5 Page 4 Thursday, July 24, 1997 3:02 PM Custom Printing Customizing Print Quality and Special Effects Note: After you customize your print settings for a special project, you can save them as a group. Then you can reuse them whenever you print a similar project. See page 2-11 for instructions. If you need the maximum control over your project, or you want to experiment with special effects, you can adjust individual settings in your printer software. Follow these steps: 1.
custom.fm5 Page 5 Thursday, July 24, 1997 3:02 PM Custom Printing Some of these options are automatically set or disabled by other settings you choose Macintosh 4. Choose one of the following Print Quality options: ◗ Economy For low-resolution rough drafts on plain paper. Saves ink. Note: The Print Quality is selected automatically depending on the current Media Type. If you choose a Print Quality setting that is not appropriate for your media, the driver changes the Media Type setting.
custom.fm5 Page 6 Thursday, July 24, 1997 3:02 PM Custom Printing 6. Choose one of the following Halftoning options: ◗ No Halftoning For printing black text only. ◗ Note: In Automatic mode, the Halftoning setting is selected based on the data in your print job. In Advanced mode, Halftoning is preselected for each document type setting. No Halftoning is available only when you select Black as the Ink setting. Error Diffusion For printing photographic or video/digital camera images.
custom.fm5 Page 7 Thursday, July 24, 1997 3:02 PM Custom Printing Customizing Color Settings You can choose from several color adjustment modes or manually adjust brightness, contrast, and saturation. For professional color correction, you can set individual CMY color values. To achieve the maximum color accuracy, you can use Image Color Matching (ICM) under Windows 95, ColorSync on the Macintosh, or PhotoEnhance (Windows and Macintosh). Follow these steps to customize your color settings: 1.
custom.fm5 Page 8 Thursday, July 24, 1997 3:02 PM Custom Printing 2. Choose one of the following Color Adjustment Modes: ◗ Automatic Analyzes the color information in your project and optimizes color correction accordingly. ◗ Photo-realistic For printing color photographs. ◗ Vivid For printing graphics-intensive documents like presentation pages with charts and graphs. Intensifies colors and lightens the midtones and highlights.
custom.fm5 Page 9 Thursday, July 24, 1997 3:02 PM Custom Printing 4. For even more fine-tuning, choose PhotoEnhance, ICM (Windows 95), or ColorSync (Macintosh). ◗ Note: When you choose PhotoEnhance, ICM, or ColorSync, all the other color options are preset. The availability of ICM depends on your Print Quality, Media Type, and Halftoning settings. PhotoEnhance Produces sharper images and more vivid colors by automatically adjusting the contrast, saturation, and brightness.
custom.fm5 Page 10 Thursday, July 24, 1997 3:02 PM Custom Printing ColorSync uses profile information from each device— including your EPSON Stylus COLOR 600—to achieve accurate color matching. First you have to make sure your monitor’s profile is set. Then you can use your printer software to specify the exact method of color matching you want to use. Follow these steps to set your monitor’s ColorSync profile and use your printer software’s ColorSync features: 1.
custom.fm5 Page 11 Thursday, July 24, 1997 3:02 PM Custom Printing Saving Custom Settings Note: You can save up to 10 groups of settings. If you change the Media Type or Ink setting when your customized setting is selected, the setting selected in the list changes to Custom Settings. This does not affect your customized setting. To return to your customized setting, simply reselect it.
custom.fm5 Page 12 Thursday, July 24, 1997 3:02 PM Custom Printing Redefining Custom Settings To change the options in a customized setting group but keep the same name for it, follow these steps: 1. Select Advanced mode. 2. Select the name of the custom settings group you want to redefine in the Custom Settings list. 3. Change the printer settings as necessary.
media.fm5 Page 1 Thursday, July 31, 1997 4:39 PM 3 Printing on Special Media Your EPSON Stylus COLOR 600 lets you print on just about any kind of paper you want to use. You can get great results printing on various sizes of plain paper, letterhead, and envelopes. You’ll get even better results with specially coated ink jet paper. For the best output, use EPSON’s photo quality media: ink jet paper, glossy paper, glossy film, index cards, and photo paper.
media.fm5 Page 2 Thursday, July 31, 1997 4:39 PM Printing on Special Media Media Loading and Software Settings Guidelines Whether you print on plain paper or special media, you need to load it according to the guidelines in the table below. You must also be sure to select the correct Media Type setting in your printer software to match the media you loaded. See page 3-3 for additional guidelines. When you load media with this name . . . Load a maximum of this many sheets . . .
media.fm5 Page 3 Thursday, July 31, 1997 4:39 PM Printing on Special Media When you load media with this name . . . Load a maximum of this many sheets . . . Then select this Media Type setting in your printer software . . .
media.fm5 Page 4 Thursday, July 31, 1997 4:39 PM Printing on Special Media unused sheets and envelopes to their original packages as soon as possible. See the Appendix for more media storage information. ◗ Some EPSON media include a cleaning sheet. Do not use the cleaning sheets with this printer. They may damage the printer. Letterhead, Pre-printed Forms, and Legal-size Paper Always load the top edge first.
media.fm5 Page 5 Thursday, July 31, 1997 4:39 PM Printing on Special Media EPSON Photo Quality Glossy Paper, Film, and Transparencies To print on transparencies, remove the paper support and reinstall it in the rear paper support slot. For glossy paper and film, leave the paper support in the normal position. Before you load glossy film or transparencies, put a support sheet (packed with the media) or a plain paper sheet beneath the stack. Do not use a support sheet with Photo Quality Glossy Paper.
media.fm5 Page 6 Thursday, July 31, 1997 4:39 PM Printing on Special Media EPSON Photo Paper You can use these cards to print photographs that look almost as good as the ones you get from film processing. EPSON Photo Paper (4 × 6 inches) is perforated around the edges, so you can trim your printouts and “bleed” the photo—extend it to the edge of the paper—on all sides. You can load up to 20 sheets of EPSON Photo Paper at a time.
media.fm5 Page 7 Thursday, July 31, 1997 4:39 PM Printing on Special Media ◗ Choose EPSON Photo Paper 4 × 6 in as the Paper Size setting and Maximum as the Printable Area setting. ◗ Choose Photo Quality Glossy Paper as the Media Type setting. ◗ After you print your picture, fold the paper back and forth along the perforations and carefully tear the margins off. You can use the EPSON Photo Paper like a postcard.
media.fm5 Page 8 Thursday, July 31, 1997 4:39 PM Printing on Special Media EPSON Iron-On Transfer Paper For iron-on transfers, make sure you reverse your image before you print it, especially if it includes text. Then the text will read correctly when it’s transferred. You can use the Flip Horizontal option in your printer software, as described in Chapter 2. You can print photos, company logos, or anything else you want on this paper, and then transfer your images to T-shirts or other cloth items.
media.fm5 Page 9 Thursday, July 31, 1997 4:39 PM Printing on Special Media If ink smears when you print on envelopes or other thick media, set the adjust lever to the + position. Open the printer cover and position the lever as shown below. Then close the cover and print. (Make sure you return the lever to the 0 position before you print on thin media.) Note: Be sure to load the envelope flap edge first and printable side up. In the printer driver, set the Paper Size to the correct envelope size.
media.fm5 Page 10 Thursday, July 31, 1997 4:39 PM Printing on Special Media 2. Insert the paper in the printer as shown. The right edge of the paper should be against the right edge guide: right edge guide 3. Slide the left edge guide next to the left edge of the paper. 4. Follow the instructions in the next sections to print your banner on either a Windows computer or a Macintosh. Printing a Banner from Windows Follow these steps to print a banner or other custom-size document on a Windows computer: 1.
media.fm5 Page 11 Thursday, July 31, 1997 4:39 PM Printing on Special Media 4. Click the Paper tab. You see a dialog box like the following: Click to display list of paper sizes 5. Choose the paper you want to use from the Paper Size list. If you want to print a banner or other custom-size document, choose User Defined. If you choose User Defined, the following dialog box appears: For banner printing, type any size up to 44 inches 6. To print a banner, type 8.
media.fm5 Page 12 Thursday, July 31, 1997 4:39 PM Printing on Special Media 8. Click the Main tab to return to the Main printer settings dialog box. Make sure you choose Plain paper and the other settings you want to use, and then click OK. 9. Click Close, OK, or Print to print your banner. You may need to click a combination of these buttons. Printing a Banner from a Macintosh Follow these steps to print a banner or other custom-size document on a Macintosh: 1.
media.fm5 Page 13 Thursday, July 31, 1997 4:39 PM Printing on Special Media 4. Choose the paper you want to use from the Paper Size list. If you want to print a banner or other custom-size project, click the Customize button. The following dialog box appears: Click to create a new paper size 5. Click the New button. The dialog box changes: Type a name for your size here You can create up to eight custom paper sizes.
printjob.fm5 Page 1 Thursday, July 24, 1997 3:05 PM 4 Managing Print Jobs and Network Printing Your printer software includes several utilities for managing print jobs. You can use them to monitor your printer’s status, set up large jobs to print later, and handle network printing. If you’re using your printer on a network, you need to follow the special setup procedures in this chapter. This chapter provides instructions for the following: ◗ Managing print jobs in Windows 95 or 3.
printjob.fm5 Page 2 Thursday, July 24, 1997 3:05 PM Managing Print Jobs and Network Printing ◗ Note: The Status Monitor doesn’t appear if you’re printing over a network. In Windows 3.1, you may not see the Spool Manager icon if the Program Manager or current window is maximized. Make the window smaller to see the Spool Manager icon. The Status Monitor, which is available only if you’re using Windows 95, also starts automatically when you send a job to the printer.
printjob.fm5 Page 3 Thursday, July 24, 1997 3:05 PM Managing Print Jobs and Network Printing For information about any of these procedures, use the Spool Manager Help menu. ◗ Select the information you want to see in the Spool Manager window ◗ Prevent the Despooler popup window from appearing on your screen whenever you print ◗ Change your default spool directory Deleting a Stalled Print Job If you’re having trouble printing, it may be because of a stalled print job.
printjob.fm5 Page 4 Thursday, July 24, 1997 3:05 PM Managing Print Jobs and Network Printing 4. Make sure the spool directory is the one you created in step 1. Also make sure Use Print Manager for this port is checked. Then click OK. (If you are using Windows 95 and don’t see the Status Monitor when you print, make sure it’s unchecked.) 5. Choose Default Spool Directory from the Options menu. 6. In the dialog box, change the spool directory to the one you created in step 1. Then click OK. 7.
printjob.fm5 Page 5 Thursday, July 24, 1997 3:05 PM Managing Print Jobs and Network Printing 3. Click the EPSON Status Monitor icon. You see the Despooler window with the Status Monitor at the bottom: 4. Check the amount of ink you have left. For more information about the Despooler window, see page 1-6. Managing Print Jobs with Windows NT 4.0 Windows NT 4.0 servers and workstations include a messenger service to alert you to printer errors or let you know when a print job is finished.
printjob.fm5 Page 6 Thursday, July 24, 1997 3:05 PM Managing Print Jobs and Network Printing Managing Print Jobs on a Macintosh Your Macintosh printer software includes two management utilities: Monitor2 and Status Monitor. ◗ If you’re using background printing, Monitor2 starts automatically when you send a job to the printer. It handles printing while you continue to work on your Macintosh and lets you track documents that are waiting to be printed.
printjob.fm5 Page 7 Thursday, July 24, 1997 3:05 PM Managing Print Jobs and Network Printing 4. Choose Get Info from the File menu. 5. Set the Memory Requirements to 2000K or 3000K, depending on your system’s available RAM. 6. While you’re printing, click the EPSON Monitor2 icon on the Application menu at the right end of the menu bar. You see a dialog box like the following: Job currently printing Jobs queued for printing appear here 7.
printjob.fm5 Page 8 Thursday, July 24, 1997 3:05 PM Managing Print Jobs and Network Printing 2. Click the Utility button. You see the Utility menu: For information about these three utilities, see Chapter 5 3. Click the EPSON Status Monitor icon.
printjob.fm5 Page 9 Thursday, July 24, 1997 3:05 PM Managing Print Jobs and Network Printing 4. If you want to change printer messages and warnings, click the Configuration button. You see the following dialog box: 5. Choose the options you want and click OK. Network Printing on a PC You can use your printer on a network under Windows NT, Windows 95, or other network operating systems.
printjob.fm5 Page 10 Thursday, July 24, 1997 3:05 PM Managing Print Jobs and Network Printing Using the Printer Software’s Built-in Network Support To use your printer software’s built-in network support, you first need to install the printer driver software on all the network computers that will use the printer. See the Setup Guide for instructions.
printjob.fm5 Page 11 Thursday, July 24, 1997 3:05 PM Managing Print Jobs and Network Printing Setting Up Remote Systems Follow these steps to set up the client computers on the network: 1. Open the Spool Manager window as described on page 4-2. 2. In the Spool Manager window, double-click the EPSON Stylus COLOR 600 print queue. The Queue Setup dialog box appears. 3. Click the Spool to remote printer button. 4.
printjob.fm5 Page 12 Thursday, July 24, 1997 3:05 PM Managing Print Jobs and Network Printing 4. Click the Details tab. The following dialog box appears: Note: If you want to print from DOS applications as well as from Windows applications, click the Capture Printer Port button instead of the Add Port button. In the Device box, select the printer port your printer is connected to, then specify the network path to the printer. Make sure Reconnect at logon is selected, then click OK. 5.
maintran.fm5 Page 1 Thursday, July 24, 1997 3:08 PM 5 Maintenance and Transportation It’s easy to keep your EPSON Stylus COLOR 600 printer working at its best. Just follow the simple instructions in this chapter for replacing ink cartridges, moving the printer, and performing routine maintenance.
maintran.fm5 Page 2 Thursday, July 24, 1997 3:08 PM Maintenance and Transportation Using the Head Cleaning Utility Follow these steps to run the utility from a Windows computer or a Macintosh: Note: Wait until your printer has finished printing before using this utility. Do not use this utility with printers on a network. 1. Make sure the printer is turned on but not printing, and the B black and A color ink out lights are off. 2. Access the Main printer settings dialog box as described in Chapter 1. 3.
maintran.fm5 Page 3 Thursday, July 24, 1997 3:08 PM Maintenance and Transportation Using the Control Panel 1. Make sure the printer is turned on and not printing, and that the B black and A color ink out lights are off. 2. Press the R cleaning button and hold it for three seconds. Cleaning takes about two minutes, during which the printer makes some noise and the Ppower light flashes. 3.
maintran.fm5 Page 4 Thursday, July 24, 1997 3:08 PM Maintenance and Transportation Examining the Nozzle Check Pattern Examine the nozzle check pattern you print. It should look something like this, with the lower pattern colored cyan, magenta, and yellow: W0186B Each staggered horizontal and straight vertical line should be complete, with no gaps in the dot pattern. If your printout looks okay, you’re done. If any dots are missing, clean the print heads again, as explained in the previous sections.
maintran.fm5 Page 5 Thursday, July 24, 1997 3:08 PM Maintenance and Transportation Removing an Empty Ink Cartridge You can replace a cartridge when the B black or A color ink out light is either flashing or on. Follow these steps: Caution: If you press the R cleaning button when no ink out light is flashing or on, the printer cleans the print heads as described on page 5-8.
maintran.fm5 Page 6 Thursday, July 24, 1997 3:08 PM Maintenance and Transportation Installing the New Cartridge Once you have removed the empty cartridge, you’re ready to install the new one. Follow these steps: 1. Remove the new ink cartridge from its packaging. 2. Remove the yellow tape seal as shown: Caution: You must remove the yellow tape seal from the top of the cartridge; leaving the tape on will permanently damage it. Do not remove the clear seal from the bottom of the cartridge; ink will leak.
maintran.fm5 Page 7 Thursday, July 24, 1997 3:08 PM Maintenance and Transportation 5. If you need to replace the other ink cartridge, remove it as described in “Removing an Empty Ink Cartridge” on page 5-5. Then follow steps 1 through 4 in this section. Caution: Never turn off the printer while the P power light is flashing. If however, the Ppower light is still flashing after 10 minutes and the printer is not moving or making noise, you may turn off the printer. 6.
maintran.fm5 Page 8 Thursday, July 24, 1997 3:08 PM Maintenance and Transportation Aligning the Print Heads If your printouts contain misaligned vertical lines, you may need to align the print heads. Follow these steps: Caution: Load paper that’s at least 8.3 inches wide so ink doesn’t spray onto the platen. 1. Make sure the printer is turned on and paper is loaded. 2. Access the Main printer settings dialog box as described in Chapter 1. 3.
maintran.fm5 Page 9 Thursday, July 24, 1997 3:08 PM Maintenance and Transportation Cleaning the Printer To keep your printer working at its best, you should clean it several times a year, following these steps: Caution: Don’t touch the gears inside the printer. Never use alcohol or thinner for cleaning; they can damage the printer components and case. Don’t use a hard or abrasive brush. 1. Turn off the printer, unplug the power cord, and disconnect the printer cable. 2.
maintran.fm5 Page 10 Thursday, July 24, 1997 3:08 PM Maintenance and Transportation Transporting the Printer Caution: To avoid damage, always leave the ink cartridges installed when transporting the printer. If you want to move your printer some distance, you need to prepare it for transportation and repack it in the original box. Follow these steps: 1. Turn on the printer and wait until the print heads lock in the far right position. Then turn off the printer. 2.
trouble.fm5 Page 1 Thursday, July 24, 1997 3:10 PM 6 Troubleshooting As you use your printer, you may occasionally experience a paper jam or other problem. The first thing you should do is diagnose the problem, following the guidelines in this chapter. Then try the most likely solutions until the problem is fixed.
trouble.fm5 Page 2 Thursday, July 24, 1997 3:10 PM Troubleshooting ◗ To determine whether the problem is caused by the printer itself, run a printer operation check. See “Running a Printer Check” for instructions. ◗ For the latest information, check the EPSON Stylus COLOR 600 Help program and the ReadMe file in the EPSON program group or folder. ◗ If none of the suggested solutions in this chapter solve your problem, contact EPSON as described under “Where to Get Help” in the Introduction.
trouble.fm5 Page 3 Thursday, July 24, 1997 3:10 PM Troubleshooting The printer prints one page containing a nozzle check pattern and the printer’s ROM version. The following sample is in black and white, but the actual printout is in color. W0186 02BB 5. After it prints the page, turn off the printer. Remember to reconnect the interface cable, then turn on the printer and your computer.
trouble.fm5 Page 4 Thursday, July 24, 1997 3:10 PM Troubleshooting Here are some detailed solutions to specific print quality problems. Printed image has horizontal banding Possible cause Solution The Media Type setting doesn’t match the loaded paper. Make sure the Media Type setting matches the loaded paper or other media. Then the printer software can automatically select other settings for the best quality. See Chapters 1 and 3. The printable side of the paper is face down.
trouble.fm5 Page 5 Thursday, July 24, 1997 3:10 PM Troubleshooting Possible cause Solution The Halftoning and Color Adjustment Mode options are set incorrectly for your document type. Use the correct settings for the project you are printing, following the instructions in Chapter 2. The print head nozzles are clogged. Clean the print heads. See Chapter 5 for instructions. The ICM (Windows 95) or ColorSync (Macintosh) settings are incorrect for your document.
trouble.fm5 Page 6 Thursday, July 24, 1997 3:10 PM Troubleshooting The printed image is blurry or smeared Possible cause Solution The printer’s adjust lever is in the 0 position. Set the adjust lever to the + position and try printing again. See Chapter 3 for instructions. The paper is damp or the printable side is face down. Remove the paper and reload a new stack with the printable side face up. See Chapter 3 for instructions. You loaded special media without a support sheet.
trouble.fm5 Page 7 Thursday, July 24, 1997 3:10 PM Troubleshooting Color documents print in black and white Possible cause Solution Your printer is not selected in your application. Select your printer and port in your software application. Color printing is not selected. Select color printing in your application and the printer driver. Solving Printing Problems If the printer won’t print, first check that: ◗ The printer is turned on and the Ppower light is on. ◗ Paper is loaded in the printer.
trouble.fm5 Page 8 Thursday, July 24, 1997 3:10 PM Troubleshooting Possible cause Solution Your printer or application software is installed incorrectly. If the printer check prints correctly, check your printer and application software for correct installation. If you’re printing on a Windows 95 network, you may need to set up your printer for network printing, as described in Chapter 4. Your computer doesn’t have enough memory to handle the data in the file you are printing.
trouble2.fm5 Page 9 Thursday, July 24, 1997 3:11 PM Troubleshooting The S paper and P power lights are flashing Possible cause Solution A carriage error has occurred. Remove any paper in the printer. Press the E load/eject button for about 30 seconds. Then press it again. Turn the printer off, wait a few seconds, and then turn it on and try printing again. If the error is not cleared, contact EPSON as described in the Introduction.
trouble2.fm5 Page 10 Thursday, July 24, 1997 3:11 PM Troubleshooting After you install your printing software, you see the Windows 95 New Hardware Found window Possible cause Solution An operating system error has occurred. Click Do not install a driver, and then click OK. You see a spooling error message (Windows) Possible cause Solution Spooling error messages or very slow printing may be caused by temporary files.
trouble2.fm5 Page 11 Thursday, July 24, 1997 3:11 PM Troubleshooting A portion of your image doesn’t print (Macintosh) Possible cause Solution Your system doesn’t have enough available memory. Close any other applications you are running or turn off background printing. You may need to increase the memory allocation for your application, EPSON Monitor2, or both. Choose Get Info from the File menu when your application is active and increase the memory requirements. See Chapter 4 for more information.
trouble2.fm5 Page 12 Thursday, July 24, 1997 3:11 PM Troubleshooting The “Sorry, EPSON Stylus COLOR cannot be used” message appears (Macintosh) Possible cause Solution The printer driver has been corrupted. Remove and reinstall the driver: 1. From the printer software CD-ROM or floppy disk, click Installer, click Continue, and select Custom Remove from the pop-up list that displays “Easy Install.” 2. Select EPSON Stylus Series Printer Driver, and click Remove.
trouble2.fm5 Page 13 Thursday, July 24, 1997 3:11 PM Troubleshooting Paper doesn’t feed Try this Then do this Remove the stack of paper from the sheet feeder. Check that the paper: ◗ Isn’t curled or creased. ◗ Isn’t too old (see Chapter 3 or your paper packaging for more information). ◗ Isn’t loaded above the arrow on the left edge guide. ◗ Isn’t jammed inside the printer. (If the S paper out light is flashing, paper is jammed.
trouble2.fm5 Page 14 Thursday, July 24, 1997 3:11 PM Troubleshooting Paper doesn’t eject fully or is wrinkled Possible cause Solution If the paper doesn’t eject fully, you may have set the wrong paper size. Press the E load/eject button to eject the paper. Then make sure you select the correct paper size in your application or printer software. (See the paper specifications in the Appendix for the paper sizes you can print with.) If it’s wrinkled when it comes out, the paper may be damp or too thin.
trouble2.fm5 Page 15 Thursday, July 24, 1997 3:11 PM Troubleshooting The margins are incorrect Possible cause Solution Margins are set incorrectly in your software application. Check your software documentation for instructions on selecting the correct margins for your paper size. Make sure the margins are within the printable area of the page. See the Appendix for more information. Paper settings in the printer software are incorrect for your paper size.
specs.
specs.fm5 Page 2 Thursday, July 24, 1997 3:12 PM Specifications Fonts Bitmap fonts Font 10 cpi 12 cpi 15 cpi Proportional EPSON Roman x x x x EPSON Sans Serif x x x x EPSON Courier x x x EPSON Prestige x x x EPSON Script x x x Select other font/pitch combinations using ESC/P 2 commands. See the Command List on page A-9.
specs.fm5 Page 3 Thursday, July 24, 1997 3:12 PM Specifications Paper Paper type Size Paper types Thickness Single sheets Letter (8.5 × 11 inches) A4 (210 × 297 mm) A5 (148 × 210 mm) B5 (182 × 257 mm) Legal (8.5 × 14 inches) Statement (5.5 × 8.5 inches) Executive (7.5 × 10 inches) Plain bond paper and 0.003 to 0.004 inch special ink jet papers (0.08 to 0.11 mm) distributed by EPSON Transparencies, Glossy film, Glossy paper, Photo paper Letter (8.
specs.fm5 Page 4 Thursday, July 24, 1997 3:12 PM Specifications Printable area A B-L A B-R B-R B-L C C Single sheet A: Envelope The minimum top margin is 0.12 inch (3.0 mm). When loading multiple sheets of EPSON Photo Quality Glossy Film, the minimum top margin is 1.2 inches (30 mm). B–L: The minimum left margin is 0.12 inch (3.0 mm). B–R: The minimum right margin for single sheet paper is 0.12 inch (3.0 mm) except for letter and legal size paper.
specs.
specs.fm5 Page 6 Thursday, July 24, 1997 3:12 PM Specifications Electrical Specification 120V Model Input voltage range 220−240V Model 103.5 to 132V Rated frequency range 198 to 264V 50 to 60 Hz Input frequency range 49.5 to 60.5 Hz Rated current 0.4A Power consumption 0.2A Approx. 15W (ISO/IEC 10561 Letter Pattern) Note: Check the label on the back of the printer for the voltage of your printer.
specs.fm5 Page 7 Thursday, July 24, 1997 3:12 PM Specifications Handshaking: Refer to the IEEE-1284 specification Signal level: IEEE-1284 Level 1 device Data transmission timing: Refer to the IEEE-1284 specification Serial interface The printer’s built-in serial interface is based on the RS-423 standard. This interface has the following characteristics: Standard: Based on RS-423 Synchronization: Synchronous Bit rate: Approx.
specs.fm5 Page 8 Thursday, July 24, 1997 3:12 PM Specifications Default Settings The table below shows the default settings that take effect when the printer is initialized. To change these settings, follow the instructions in “Built-in Fonts and Character Tables.
specs.fm5 Page 9 Thursday, July 24, 1997 3:12 PM Specifications 4. Press the E load/eject button to print the default font and character table and the next page of instructions. The instruction sheet lists all of the fonts and character tables you can select. 5. Select the font and character table you want to use. 6. Exit the default setting mode by turning off the printer.
gloss.fm5 Page 1 Thursday, July 24, 1997 3:13 PM Glossary banding buffer The horizontal lines that sometimes appear when printing graphics. See also MicroWeave. The portion of the printer’s memory used to store data before printing it. character table A collection of letters, numbers, and symbols that provides you with the characters used in a particular language. characters per inch (cpi) A measure of the size of text characters, sometimes referred to as pitch.
gloss.fm5 Page 2 Thursday, July 24, 1997 3:13 PM Glossary Error Diffusion ESC/P ESC/P 2 Finest Detail font This halftoning setting smooths out edges by randomly placing dots of varying colors. This has the opposite effect of the Finest Detail setting. Abbreviation for Epson Standard Code for Printers. This system of commands gives you control of your printer from your computer. It is standard for all EPSON printers and supported by most application programs for personal computers.
gloss.fm5 Page 3 Thursday, July 24, 1997 3:13 PM Glossary media Materials upon which data is printed, such as envelopes, plain paper, special paper, and transparencies. MicroWeave Printing technology that produces images in fine increments to reduce the possibility of banding. See also banding. monochrome This means printing with only one color of ink, which is generally black ink. parallel interface See interface.
gloss.fm5 Page 4 Thursday, July 24, 1997 3:13 PM Glossary serial interface spool See interface. The process by which the printer driver converts the print data into codes that your printer understands. This data is then sent to the printer directly or to the print server. Spool Manager An EPSON software program that converts print data into codes that your printer understands. See also spool.
fiji.
fiji.
fiji.
fiji.
fiji.