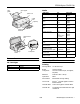
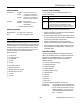
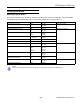
EPSON Stylus COLOR 740 edge guides Media paper support printer cover control panel output tray output tray extensions paper thickness lever ink cartridge holders control panel Media name Size Part number EPSON 360 dpi Ink Jet Paper Letter A4 S041060 S041059 EPSON High Quality Ink Jet Paper Letter A4 S041111 S041117 EPSON Photo Quality Ink Jet Paper Letter A4 Legal S041062 S041061 S041067 EPSON Photo Quality Glossy Paper Letter A4 S041124 S041126 EPSON Photo Quality Glossy Film Lette
EPSON Stylus COLOR 740 Bitmap fonts Ink Cartridges EPSON Roman (proportional) EPSON Sans Serif (proportional) EPSON Courier EPSON Prestige EPSON Script All bitmap fonts are available in 10, 12, and 15 cpi. You can select other font/pitch combinations using ESC/P 2 commands. Scalable fonts EPSON Roman EPSON Sans Serif EPSON Roman T EPSON Sans Serif H All scalable fonts are available in sizes from 8 to 32 points, in 2 point increments, and four styles: normal, bold, italic, and bold italic.
EPSON Stylus COLOR 740 Paper Paper type Size Paper types Thickness Weight Single sheets Letter (8.5 × 11 inches) Legal (8.5 × 14 inches) Half letter (statement, 5.5 × 8.5 inches) Executive (7.5 × 10 inches) A4 (210 × 297 mm) A5 (148 × 210 mm) B5 (182 × 257 mm) Plain paper and special ink jet papers distributed by EPSON 0.003 to 0.004 inch 17 to 24 lb (0.08 to 0.11 mm) (64 to 90 g/m2) for plain bond paper Transparencies, Glossy film, Glossy paper Letter (8.
EPSON Stylus COLOR 740 Printable area A A B-L B-R B-R B-L C Envelopes C Single sheets and cards B-L EPSON Panoramic Photo Paper A C B-R A The minimum top margin is 0.12 inch (3.0 mm). When printing multiple sheets of EPSON Photo Quality Glossy Film, the minimum top margin is 1.2 inches (30 mm). BL The minimum left margin is 0.12 inch (3.0 mm). BR The minimum right margin is: 0.35 inch (9.0 mm) for Letter and Legal 1.10 inches (28 mm) for #10 envelopes 0.28 inch (7.0 mm) for DL envelopes 0.12 inch (3.
EPSON Stylus COLOR 740 Environmental Control Panel Settings Temperature You can change the following default settings from the printer’s control panel: Humidity Operation: 50 to 95 °F (10 to 35 °C) Storage*: –4 to 104 °F (–20 to 40 °C) 1 month at 104 °F (40 °C) Transit*: –4 to 140 °F (–20 to 60 °C) 120 hours at 140 °F (60 °C) Operation: 20 to 80% RH Storage*: 5 to 85% RH (without condensation) * Stored in shipping container Setting Options Font Courier, Roman, Sans Serif, Prestige, Script, Roman T,
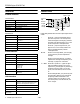
EPSON Stylus COLOR 740 Interfaces Control Panel power button Parallel interface Forward channel Specification Description Data format 8-bit parallel, IEEE-1284 compatibility mode Synchronization STROBE pulse Handshake timing BUSY and ACKNLG signals Signal level TTL compatible Connector 57-30360 Amphenol connector or equivalent paper out light black ink out light color ink out light cleaning button Description Transmission mode IEEE-1284 Nibble mode Adaptable connector 57-30360 Amphenol c
EPSON Stylus COLOR 740 4. Press the P power button to turn on the printer.The P power light flashes and the B black and A color ink out lights come on. The ink cartridge holders move into loading position. Installing an Ink Cartridge for the First Time Follow these steps to install ink cartridges for the first time: Caution: Always use the power button to turn the printer on or off. Never use an external switch, such as a power strip switch. 1. Plug the printer’s power cord into a grounded outlet.
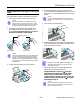
EPSON Stylus COLOR 740 3. Make sure paper is loaded in the printer. Loading Paper Caution: Load paper that’s at least 8.27 inches (210 mm) wide. This prevents ink from spraying inside the printer and smudging your printouts. 1. Open the output tray and its extensions. Slide the left edge guide right until it is a little wider than your paper. 4. Hold down the E load/eject button and press the P power button. Hold down the E load/eject button until the P power light starts to flash, then release it.
EPSON Stylus COLOR 740 Using Special Media Selecting Special Media When you print on special media, you need to choose the correct Media Type and Paper Size settings in your printer software. The table below lists the available EPSON media and the corresponding Media Type setting for each one.
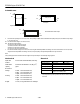
EPSON Stylus COLOR 740 Media Loading and Handling Guidelines If your media has a cut corner, position it in the printer as shown here. The following tips help you get the best results on any type of paper: cut corner ❏ Always handle sheets by the edges, and don’t touch the printable surface. ❏ When you load paper, make sure the printable side is facing up. printable side up ❏ You can load paper up to the arrow mark on the left edge guide.
EPSON Stylus COLOR 740 ❏ If you’re loading 4 × 6-inch Photo Paper, follow these steps: If ink smears when you print on envelopes or other thick media, set the paper thickness lever to the + position as shown below. (Return the lever to the 0 position before printing on other media.) 1. Position the perforated margins as shown and load up to 20 sheets with support sheets A and B beneath the stack. 2. When you create the image you’ll print in your application software, size it to 4.25 × 6.
EPSON Stylus COLOR 740 Make sure you reverse your image before you print it— especially if it includes text—so it will read correctly when it’s transferred. You can use the Flip Horizontal setting in your printer software to do this (see the Printer Basics book for instructions). EPSON Photo Quality Ink Jet and Note Cards You can load up to 30 cards at a time. Always place the included support sheet under the cards and load them as shown below.
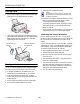
EPSON Stylus COLOR 740 8. Press down the ink cartridge clamp until it locks in place. Caution: You must remove the yellow tape from the top of the cartridge or you will permanently damage it. Do not remove the clear seal from the bottom of the cartridge; ink will leak out. 9. If you need to replace the other ink cartridge, repeat the preceding steps before going on to step 10. 10. Press the R cleaning button and close the printer cover. To avoid damaging the printer, never move the print head by hand.
EPSON Stylus COLOR 740 Using the Control Panel Cleaning the Print Head Follow these steps to clean the print head: If your printed image is unexpectedly light or faint, or dots are missing from the image, you may need to clean the print head. This unclogs the nozzles so they can deliver ink properly. 1. Make sure the printer is turned on and not printing, and that the B black and A color ink out lights are off. 2. Press the R cleaning button and hold it down for three seconds.
EPSON Stylus COLOR 740 Each staggered horizontal and straight vertical line should be complete, with no gaps in the dot pattern. If your printout looks okay, you’re done. If any dots are missing, as shown below, clean the print head again; see “Cleaning the Print Head” on page 14 for instructions. Caution: Don’t touch the gears inside the printer. Never use alcohol or thinner for cleaning; they can damage the printer components and case. Don’t use a hard or abrasive brush.
EPSON Stylus COLOR 740 16 - EPSON Stylus COLOR 740 7/98