Front.
Front.fm5 Page ii Wednesday, October 15, 1997 3:53 PM All rights reserved. No part of this publication may be reproduced, stored in a retrieval system, or transmitted in any form or by any means, electronic, mechanical, photocopying, recording, or otherwise, without the prior written permission of SEIKO EPSON CORPORATION. The information contained herein is designed only for use with this EPSON printer. EPSON is not responsible for any use of this information as applied to other printers.
QuikSet2TOC.
QuikSet2.fm Page 1 Wednesday, October 15, 1997 3:49 PM Setup Guide Congratulations on purchasing your new EPSON Stylus® COLOR 800N printer. This guide summarizes the process of setting up your printer and configuring it to work with your network. For more information, see the User’s Guides for your printer, the Ethernet card, and EPSON Status Monitor 2. Note: The Stylus COLOR 800 User’s Guide contains some information that does not apply to your Ethernet-ready Stylus COLOR 800N.
QuikSet2.fm Page 2 Wednesday, October 15, 1997 3:49 PM Setup Guide ◗ EPSON Type B Ethernet Interface Card Supplement Contains instructions for configuring and using the Ethernet card with a Macintosh network, initializing the card, using the card with NetWare on a WAN, and using TCP/IP with Windows 95. ◗ EPSON Status Monitor 2 for Windows Allows you to monitor your printer over the network and configures Windows 95 peer-to-peer printing environments (2 diskettes).
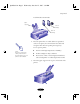
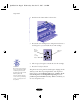
QuikSet2.fm Page 3 Wednesday, October 15, 1997 3:49 PM Setup Guide You’ll find these items inside: paper support color ink cartridge black ink cartridge 2. Place the printer flat on a stable desk near a grounded outlet. Leave plenty of room in back for the cables and enough room in front for opening the output tray. Do not put the printer: Note: Be sure to follow the Safety Instructions in the Introduction of your printer User’s Guide.
QuikSet2.fm Page 4 Wednesday, October 15, 1997 3:49 PM Setup Guide 4. Before you plug in the printer, make sure the power is off. Check the Ppower button; it’s off when its surface is raised above the printer surface. Caution: Do not plug the printer into an outlet controlled by a wall switch or timer, or on the same circuit as a large appliance. This may disrupt the power, which can erase memory and damage the power supply. power 5. Plug the power cord into a properly grounded outlet.
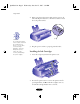
QuikSet2.fm Page 5 Wednesday, October 15, 1997 3:49 PM Setup Guide 3. Lift up the black ink cartridge clamp. Note: It’s OK if the tape does not completely tear off along the dotted line. 4. Open the black ink cartridge package. Remove only the yellow part of the tape. Do not remove the white part. Also, do not remove the clear seal on the bottom of the cartridge. color ink cartridge black ink cartridge 5.
QuikSet2.fm Page 6 Wednesday, October 15, 1997 3:49 PM Setup Guide 6. Push down the clamp until it locks in place. 7. Press the X color cleaning button. The print heads move to the left again so you can install the color ink cartidge. black cleaning button load/eject button color cleaning button 8. Follow steps 3 through 6 to install the color ink cartridge. Caution: Never turn off the printer when the P power light is flashing.
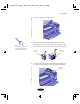
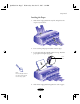
QuikSet2.fm Page 7 Wednesday, October 15, 1997 3:49 PM Setup Guide Loading the Paper 1. Slide the left edge guide all the way left and pull out the output tray extensions. 2. Fan a stack of plain paper and then even the edges. 3. Load a stack with the printable surface face up. Push the paper against the right edge guide. arrow mark Note: Don’t load paper above the arrow mark inside the left edge guide. 4. Slide the left edge guide back against the stack of paper.
QuikSet2.fm Page 8 Wednesday, October 15, 1997 3:49 PM Setup Guide Testing the Printer If you want, you can run a test on your printer to see how it’s working. Follow the steps in Chapter 6 of your printer User’s Guide. Turn off the printer to stop test printing. Connecting the Printer to Your Network You can connect your Ethernet-ready printer to either an Ethernet Thin Coaxial (10BASE2) or an Ethernet Twisted-Pair (10BASE-T) network connection. You can only attach one cable at a time.
QuikSet2.fm Page 9 Wednesday, October 15, 1997 3:49 PM Setup Guide You can now install the EPSON Net! utility software, which configures the Ethernet card. Installing EPSON Net! If you are using NetWare or TCP/IP, install EPSON Net! on a workstation in the same segment as the printer. If you are using AppleTalk, install EPSON Net! for Macintosh on a Macintosh computer on your network. Do not install EPSON Net! if you are using DLC with Windows NT. Installing in Windows 1.
QuikSet2.fm Page 10 Wednesday, October 15, 1997 3:49 PM Setup Guide Installing in Macintosh 1. Create a folder for EPSON Net! on your hard drive. 2. Insert the EPSON Net! for Macintosh installation diskette. 3. Copy the program from the disk to the folder. After you install EPSON Net!, you use it to configure your printer for AppleTalk. See page 22 for instructions.
QuikSet2.fm Page 11 Wednesday, October 15, 1997 3:49 PM Setup Guide If you use NetWare 4.x, menus will differ slightly from the menus described in the following procedure, and you must select Bindery Emulation. Follow these steps: 1. At the DOS prompt, type PCONSOLE. 2. From the Available Options menu, select Print Server Information. 3. Select the name of a print server from the Print Servers list and press Enter. 4. From the Print Server Information list, select Print Server Configuration. 5.
QuikSet2.fm Page 12 Wednesday, October 15, 1997 3:49 PM Setup Guide Using EPSON Net! for NetWare Windows Follow these steps: 1. Start EPSON Net! for NetWare. After a few seconds, the following dialog box appears: 2. Highlight your EPSON Stylus COLOR 800N printer and click Open.
QuikSet2.fm Page 13 Wednesday, October 15, 1997 3:49 PM Setup Guide 3. Click Edit to configure the printer. The NetWare Config dialog box appears: 4. Choose the operating mode you want to use: ◗ Print Server ◗ Remote Printer ◗ Auto PrintServer/Remote 5. Follow the instructions for the operating mode you chose: ◗ If you selected Remote Printer, change the port number and enable or disable hunting if you want. Then click Save to complete the configuration process.
QuikSet2.fm Page 14 Wednesday, October 15, 1997 3:49 PM Setup Guide 6. Click Add at the bottom of the dialog box to assign a print queue to your print server. The Add Queue dialog box appears: This list indicates which queues are available on this NetWare file server. 7. For Print Server mode, select the file server where the print queue will reside, then select a print queue from the list. You can create a new queue by entering its name in the Queue box. Then continue with step 8.
QuikSet2.fm Page 15 Wednesday, October 15, 1997 3:49 PM Setup Guide Configuring for TCP/IP You can configure the Ethernet card for TCP/IP if you are using a UNIX TCP/IP network, a Windows 95 peer-to-peer network, or Windows NT. Installing TCP/IP in Windows 95 Windows 95 does not come with LPR, so in addition to installing TCP/IP, as described below, you need to install the EPSON TCP/IP printer protocol.
QuikSet2.fm Page 16 Wednesday, October 15, 1997 3:49 PM Setup Guide Assigning the IP Address Note: If you don’t know what IP address to use for the computer or the Ethernet card, ask your network administrator. Or, follow the instructions on page 19. For a Windows 95 peer-to-peer network you need to set the card’s IP address. Make sure the Ethernet card and printer are on the same segment of the network as the computer you are using to configure the card.
QuikSet2.fm Page 17 Wednesday, October 15, 1997 3:49 PM Setup Guide If you receive 4 lines that say “Request Timed Out,” the card is not set up correctly. Check to make sure the card is on the same segment of the network as the workstation you are using to configure it and that you typed in the correct IP and hardware addresses. Before you can print using TCP/IP, you still need to install the Status Monitor (see page 24) and add a printer port (see page 27).
QuikSet2.fm Page 18 Wednesday, October 15, 1997 3:49 PM Setup Guide 6. Follow the instructions on the screen, inserting the requested diskette or CD-ROM if necessary. When setup is complete, the Network Services tab or Network Settings dialog box reappears. 7. In Windows NT 4.x, make sure Microsoft TCP/IP Printing appears in the Network Services list, select it, and click Properties. The Microsoft TCP/IP Properties dialog box appears. In Windows NT 3.
QuikSet2.fm Page 19 Wednesday, October 15, 1997 3:49 PM Setup Guide 3. Set the following options in the IP Config dialog box: ◗ IP address Determine and assign an IP address. Check with your network administrator or see the note below for information about assigning IP addresses. ◗ Subnet mask Assign the subnet mask. Check with your network administrator or see the note below for information about assigning subnet masks.
QuikSet2.fm Page 20 Wednesday, October 15, 1997 3:49 PM Setup Guide Installing DLC in Windows NT Make sure Windows NT is running, and follow these steps to install DLC: 1. Open the Control Panel. 2. Double-click the Network icon. 3. In Windows NT 4.x, click the Protocols tab and then click Add. In Windows NT 3.5x, click the Add Software button. 4. In Windows NT 4.x, select DLC Protocol from the Select Network Protocol list, and click OK. In Windows NT 3.
QuikSet2.fm Page 21 Wednesday, October 15, 1997 3:49 PM Setup Guide 6. Type a name for the port in the Name box. Make sure the name is not the same as an existing port, such as LPT1. 7. Select the target node address from the Card Address list. Make sure this address matches the one listed under Node Number on the status sheet. 8. Click the Timers button and select the Job Based option. Then click Close. 9. Click Next, then follow the instructions on the screen for printer driver installation.
QuikSet2.fm Page 22 Wednesday, October 15, 1997 3:49 PM Setup Guide 8. Click OK to exit the Create Printer dialog box. A dialog box from the selected model’s device driver appears. 9. Set any printer-specific options, and click OK. Configuring for AppleTalk To use your printer on an AppleTalk network, you need to configure the Ethernet card for AppleTalk. Follow these steps to configure your card using EPSON Net!: 1. Open the EPSON Net! utility. You see a window like the following: 2.
QuikSet2.fm Page 23 Wednesday, October 15, 1997 3:49 PM Setup Guide 3. Click a zone to select it. To select multiple zones, press and hold the Shift key while clicking the zones, or click Select All. Then click OK. EPSON Net! sends a packet to the selected zones and detects the current printer’s status. The EPSON Net! window shows the latest information about the printers located in that zone. 4. Select your EPSON Stylus COLOR 800N printer. 5. Click Open. You see the Configuration dialog box: 6.
QuikSet2.fm Page 24 Wednesday, October 15, 1997 3:49 PM Setup Guide 7. Set the following options in the AppleTalk Configuration dialog box: ◗ Available Zone Select the network zone where you want the printer to appear. ◗ Printer name You can use your printer’s default name or change it. If you have more than one printer of the same type on your network, be sure to give them unique names. ◗ Entity Type EPSON Net! shows the printer’s Entity type on an AppleTalk network.
QuikSet2.fm Page 25 Wednesday, October 15, 1997 3:49 PM Setup Guide In Windows NT 3.5x, choose Run from the File menu in the Program Manager. 3. Type A:\SETUP and click OK. If you’re not using drive A, substitute the appropriate letter. 4. Read the on-screen instructions and click Next. 5. Click Next, or if you want to change the destination directory, click Browse and select your directory.
QuikSet2.fm Page 26 Wednesday, October 15, 1997 3:49 PM Setup Guide 10. Check the current settings and click Next. Follow the instructions on the screen. Select Yes and click Finish to restart Windows when you see the prompt. You now need to install the printer driver and set up your printer in Windows. Installing the Printer Driver Your driver software is on the EPSON printer software CD-ROM that came with your printer.
QuikSet2.fm Page 27 Wednesday, October 15, 1997 3:49 PM Setup Guide 3. If you inserted the CD-ROM and Windows starts the installation program automatically, go to step 4. If it doesn’t start automatically (or if you’re using Windows NT 3.5x), click Start, select Run, and type D:\Setup (substitute the correct drive letter if necessary). Then click OK. Go to step 4. If you’re installing from diskettes, click Start, select Run, and type A:\Setup (substitute the correct drive letter if necessary).
QuikSet2.fm Page 28 Wednesday, October 15, 1997 3:49 PM Setup Guide 5. Click Add Port. 6. In Windows 95, click Browse and choose the server or EPSON_TCPIP_Printer that your printer is set up on. Then click OK. In Windows NT 4.x, click LPR Port, then type in the printer’s IP address and the name you want to assign. Click OK, Close, and OK again. Installing on a Macintosh 1. Turn on your Macintosh and turn off any virus protection programs you may have. 2. Turn on your printer. 3.
QuikSet2.fm Page 29 Wednesday, October 15, 1997 3:49 PM Setup Guide Making Macintosh Diskettes from the CD-ROM Before you follow these steps, name the formatted diskettes you’ll use Disk1 and Disk2 (using a capital “D” and no space before the number). If they’re not named correctly, the diskettes won’t work. 1. Turn on the Macintosh and turn off any virus protection programs you may have. 2. Insert the EPSON printer software CD-ROM. 3. Insert the diskette you named Disk1. 4.