® Epson Stylus CX9400Fax Series Quick Guide Basic Printing, Copying, Scanning, and Faxing Maintaining Your All-in-One Solving Problems
Contents Loading Paper . . . . . . . . . . . . . . . . . . . . . . . . . . . . . . . . . . . . . . . . . 4 Using Special Papers . . . . . . . . . . . . . . . . . . . . . . . . . . . . . . . . . . . . . . . . 5 Placing Originals for Copying, Scanning, or Faxing . . . . . . . . 7 Using the Scanner Glass . . . . . . . . . . . . . . . . . . . . . . . . . . . . . . . . . . . . . 7 Using the Automatic Document Feeder . . . . . . . . . . . . . . . . . . . . . . . . . . . 8 Copying a Document or Photo . . . . . .
Maintaining Your All-in-One . . . . . . . . . . . . . . . . . . . . . . . . . . . 32 Checking the Print Head Nozzles . . . . . . . . . . . . . . . . . . . . . . . . . . . . . . Cleaning the Print Head . . . . . . . . . . . . . . . . . . . . . . . . . . . . . . . . . . . . Checking the Ink Cartridge Status . . . . . . . . . . . . . . . . . . . . . . . . . . . . . Purchasing Epson Ink Cartridges . . . . . . . . . . . . . . . . . . . . . . . . . . . . . . Replacing Ink Cartridges . . . . . . . . . . . . . . .
Loading Paper You can load up to 100 sheets of plain paper, 100 sheets of Epson® Presentation Paper Matte, or 80 sheets of Epson Bright White Paper. Load Premium Presentation Paper Matte and most photo papers 20 sheets at a time. Load transfer paper and adhesive sheets one sheet at a time. 1. Open the paper support and extend the output tray. 2. Insert the paper, glossy or printable side up, short edge first, against the right side. Then slide the edge guide against the paper.
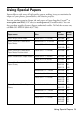
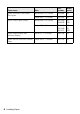
Using Special Papers Epson offers a wide array of high quality papers, making it easy to maximize the impact of your photos, presentations, and creative projects. You can purchase genuine Epson ink and paper at Epson Supplies CentralSM at www.epson.com/ink3 (U.S. sales) or www.epson.ca (Canadian sales). You can also purchase supplies from an Epson authorized reseller. To find the nearest one, call 800-GO-EPSON (800-463-7766). Paper name Size Part number Sheet count Epson Bright White Paper Letter (8.
Paper name Size Part number Sheet count Epson Premium Photo Paper Semi-gloss Borderless 4 × 6 inches S041982 40 Letter (8.5 × 11 inches) S041331 20 Epson Photo Paper Glossy Borderless 4 × 6 inches S041809 S042038 50 100 Letter (8.5 × 11 inches) S041141 S041649 S041271 20 50 100 Epson Photo Quality Selfadhesive Sheets A4 (8.3 × 11.7 inches) S041106 10 Epson Iron-on Cool Peel Transfer Paper Letter (8.
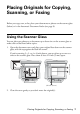
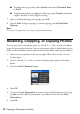
Placing Originals for Copying, Scanning, or Faxing Before you copy, scan, or fax, place your documents or photos on the scanner glass (below) or in the Automatic Document Feeder (see page 8). Using the Scanner Glass You can place two photos or a document up to letter-size on the scanner glass to make color or black and white copies. 1. Open the document cover and place your original face-down on the scanner glass, with the top against the back left corner.
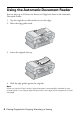
Using the Automatic Document Feeder You can place up to 30 letter-size sheets or 10 legal-size sheets in the Automatic Document Feeder. 1. Tap the originals on a flat surface to even the edges. 2. Move the edge guides aside. 3. Insert the originals face-up. 4. Slide the edge guides against the originals. Note: When you use the Copy function, letter-size paper is automatically selected for your printed copies. If you copy a legal-size document, the image will be cropped to fit lettersize paper.
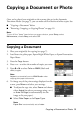
Copying a Document or Photo Once you’ve placed your originals on the scanner glass or in the Automatic Document Feeder (see page 7), you can make color or black and white copies. See: ■ “Copying a Document” below ■ “Restoring, Cropping, or Copying Photos” on page 10 Note: To turn off the “beep” heard when you press a button, press Setup, select Maintenance, choose Beep, and select Off. Copying a Document 1. Place your original(s) for copying (see page 7). 2.
■ To change the copy quality, select Quality and choose Standard, Best, or Draft. ■ To adjust the darkness or lightness of the copy, select Density and choose a higher (darker) or lower (lighter) setting. 7. After you finish selecting your settings, press OK. 8. Press x Start to begin copying. To cancel copying, press y Stop/Clear Settings. Note: Do not pull out paper as it is printing; it ejects automatically.
7. Press OK to prescan your photos. You see these settings: 8. Press l or r to view your photos. To print more than 1 copy of a photo, press + or – to select the number. 9. If you want to crop a photo and enlarge the resulting image area to fit onto your paper, press Display/Crop. ■ To resize the image area, press + or –. ■ To move the image area, use the arrow buttons. ■ To check the zoomed image, press OK. 10. After you finish cropping, press OK. 11.
■ Select Paper Type and choose the type of paper you loaded. Paper Type Paper Type setting Epson Premium Photo Paper Glossy Epson Premium Photo Paper Semi-gloss Prem. Glossy Epson Ultra Premium Photo Paper Glossy Ultra Glossy Epson Photo Paper Glossy Photo Paper Epson Premium Presentation Paper Matte Matte ■ Select Paper Size and choose the size of paper you loaded. Note: Availability of options depends on the Paper Type setting you choose.
Faxing a Document or Photo Your CX9400Fax Series lets you send faxes by entering fax numbers or selecting entries from a speed dial list. Using the Automatic Document Feeder, you can fax up to 30 pages at a time. See these sections: ■ “Connecting a Phone or Answering Machine” below ■ “Setting Up Fax Features” on page 14 ■ “Sending a Fax” on page 19 ■ “Receiving Faxes” on page 21 For more information on faxing and fax settings, see the on-screen User’s Guide.
2. To use a telephone or answering machine, you need a second phone cable. Connect one end of the cable to the telephone or answering machine, and connect the other end to the EXT. port on the back of the CX9400Fax Series (or to another wall jack on the same line). If your answering machine is set to pick up on the fourth ring, you should set the CX9400Fax Series to pick up on the fifth ring or later: 1. Press Setup. 2. Select Fax Settings, then press OK. 3. Select Communication, then press OK. 4.
Entering Fax Header Information You should enter fax header information before sending faxes so that recipients can identify their source. Note: If you leave the CX9400Fax Series unplugged for a long period of time, the date and time settings may get lost. See the Start Here sheet or on-screen User’s Guide for instructions on setting the date and time. Entering Your Sender Name 1. Press Setup. 2. Select Fax Settings, then press OK. You see this screen: 3. Select Header & Time, then press OK. 4.
Using the Keypad to Enter Numbers and Characters Follow these guidelines to enter numbers and characters. ■ To move the cursor, add a space, or delete a character: Button Function l or r Moves the cursor to the left or right. Auto Answer/Space Inserts a space and moves the cursor one character to the right. Speed Dial/Backspace Deletes a character and moves the cursor one space to the left. ■ To enter a fax number, use the numeric keypad.
4. Adjust any of the following settings: Setting and options Description Resolution Standard Fine Photo Sets the scan resolution of outgoing faxes and the print quality of received faxes. Contrast -4 to +4 Sets the contrast when sending and receiving faxes. Paper Size Letter (default) Legal A4 Indicates the size of paper loaded in the CX9400Fax Series.
3. Select Speed Dial Setup, then press OK. 4. Select Add Entry, then press OK. You see the list of available entries. Note: To edit or delete an entry from an existing list, select Edit Entry or Delete Entry instead. 5. Select or type the number of the speed dial entry you want to add, then press OK. 6. Use the numeric keypad to enter the fax number (see page 16), then press OK. 7. Use the numeric keypad to enter a name to identify the speed dial entry (see page 16), then press OK.
Sending a Fax You can send a fax by manually entering a fax number, redialing the previous fax number, or selecting an entry from your speed dial list (see page 17). 1. Place your original(s) for faxing (see page 7). 2. Press the Fax button. 3. Do one of the following to dial the fax number: ■ Enter the fax number manually Use the numeric keypad to enter the fax number. You can enter up to 64 digits.
6. Press Menu, if necessary, to adjust any of the following settings: ■ Resolution to increase the scanning resolution of a faxed document ■ Contrast to change the contrast of the faxed document ■ Fax Delay to specify a different time to send your fax. (You cannot send another fax until the delayed fax has been sent or cancelled.) ■ Fax Mode to select Polling mode to receive a fax from another fax machine to which you have dialed (such as a fax information service).
Receiving Faxes Before receiving faxes, make sure you load plain paper and select the Paper Size setting that matches the size of paper you’ve loaded (see “Select Scan and Print Settings” on page 16). If the incoming fax pages are larger than the paper size you loaded, the fax size is reduced to fit or printed on multiple pages, depending on the Automatic Reduction setting you select (see page 16). If you run out of paper during printing, you see the error message Paper out.
Printing From Your Camera’s Memory Card The CX9400Fax Series lets you print photos directly from your digital camera’s memory card. Once your card is inserted, you can also print photos using an index sheet or your camera’s DPOF settings, or transfer files to and from the card. You can also print by connecting your camera directly. See the on-screen User’s Guide. Inserting Your Camera’s Memory Card 1. Insert the card into the correct slot, as shown. Insert just one card at a time.
The image files on your card must meet these requirements: File format JPEG with the Exif version 2.21 standard Image size 80 × 80 pixels to 9200 × 9200 pixels Number of files Up to 999 2. To remove the card, make sure the memory card access light is not flashing, then pull the card straight out of its slot. Caution: Do not remove the card or turn off the CX9400Fax Series while the memory card access light is flashing; you may lose data on the card. Selecting Photos From the Screen 1.
Printing From Your Computer This section describes basic printing from your Windows® or Macintosh® computer. To install your software, see the Start Here sheet. For detailed instructions, see the on-screen User’s Guide. Tip: It’s a good idea to check for updates to your CX9400Fax Series software. See “Checking for Software Updates” on page 38 for instructions. Printing in Windows 1. Open a photo or document in a printing program, open the File menu, and select Print.
3. On the Main tab, select the basic print settings. Make sure you choose the correct paper Type setting for your paper (see page 30). Select the type of document you’re printing (choose Photo or Best Photo for photos) Select your paper Type Select your paper Size Click here for borderless photos Select your document or photo Orientation Note: For the best quality printing, select PhotoEnhance (also known as Auto Photo Correction).
7. Click OK or Print to start printing. This window appears and shows the progress of your print job. Check ink cartridge status Cancel printing Pause or resume printing Printing With a Macintosh See the section below for your Mac® operating system. Mac OS X 10.5 1. Open a photo or document in a printing program, open the File menu, and select Print. 2. Select EPSON Stylus CX9400Fax as the Printer setting. Select EPSON Stylus CX9400Fax Click to expand 3.
4. Select the basic copy and page settings. For borderless photos, choose a Paper Size setting with a Sheet Feeder - Borderless option. Note: If the setting you want isn’t shown (for example, Scale), check for it in your application before printing. Or check for it in the settings for your application at the bottom of this window. (If you’re printing from Preview, you see the settings shown below.) Copy and page settings Application settings 5.
7. Click Print. 8. To monitor your print job, click the printer icon in the dock. Cancel printing Pause or resume printing Select the print job Mac OS X 10.2 to 10.4 1. Open a photo or document in a printing program, open the File menu, and select Page Setup. 2. Select the basic page settings. For borderless photos, choose a Paper Size setting with a Sheet Feeder - Borderless option. Select Stylus CX9400Fax Select your Paper Size Select your document or image orientation 3. Click OK. 4.
5. Select Stylus CX9400Fax, choose Print Settings from the pop-up menu, and select the following print settings: Pop-up menu Select your Media Type (see page 30) Select Color or Grayscale output Select higher quality or faster printing (if available) Select Automatic mode Note: In certain programs, you may need to select Advanced before you can select Print Settings. For more information about printer settings, click the ? button. 6. Choose any other printing options you may need from the pop-up menu.
Selecting the Correct Paper Type Select the correct Type (see page 25) or Media Type (see page 29) setting in your printer software so the ink coverage can be adjusted accordingly.
Scanning Multiple Pages You can scan a document and save it on your computer in PDF or another format. With the Automatic Document Feeder, you can scan up to 30 pages at a time. Note: For detailed scanning instructions, see the on-screen User’s Guide. 1. Place your document in the Automatic Document Feeder (see page 8). 2. Do one of the following to start Epson Scan: ■ Windows: Double-click the EPSON Scan icon on your desktop. ■ Macintosh: Double-click EPSON Scan in the Applications folder. 3.
Maintaining Your All-in-One Follow the steps here to check and clean the print head, and replace ink cartridges. To align the print head, if necessary, see the on-screen User’s Guide. Checking the Print Head Nozzles If your printouts are faint or have gaps in them, the print head nozzles may be clogged. Follow these steps to check the print head nozzles: 1. Load letter-size plain paper in the sheet feeder. 2. Press the Setup button. 3. Select Maintenance and press OK. 4. Select Nozzle Check and press OK.
Cleaning the Print Head If print quality has declined and the nozzle check indicates clogged nozzles, you can clean the print head. Print head cleaning uses ink, so clean it only if necessary. Note: You cannot clean the print head if an ink cartridge is expended, and may not be able to clean it when a cartridge is low. You must replace the cartridge first (see page 36). 1. Load letter-size plain paper in the sheet feeder. 2. Press the Setup button. 3. Select Maintenance and press OK. 4.
Checking the Ink Cartridge Status Your CX9400Fax Series will let you know when an ink cartridge is low or expended by displaying a message on its display screen or your computer. Note: You cannot print or copy when an ink cartridge is expended even if the other cartridges are not expended. Replace any expended cartridges before printing or copying. To check ink cartridge status from the display screen anytime, follow these steps: 1. Press the Setup button. 2. Select Ink Levels and press OK. 3.
Purchasing Epson Ink Cartridges You can purchase genuine Epson ink and paper at Epson Supplies Central at www.epson.com/ink3 (U.S. sales) or www.epson.ca (Canadian sales). You can also purchase supplies from an Epson authorized reseller. To find the nearest one, call 800-GO-EPSON (800-463-7766).
Replacing Ink Cartridges Make sure you have a new ink cartridge before you begin. You must install new cartridges immediately after removing the old ones. Caution: Do not open ink cartridge packages until you are ready to install the ink. Cartridges are vacuum packed to maintain reliability. Leave the expended cartridge(s) installed until you have obtained a replacement, or the ink remaining in the print head nozzles may dry out. 1. Turn on the CX9400Fax Series.
4. Shake the cartridge several times, then remove it from the package. Do not to touch the green chip on the side. 5. Remove the yellow tape from the bottom of the ink cartridge. Caution: Do not remove any other labels or seals, or ink will leak. 6. Insert the new ink cartridge into the holder and push it down until it clicks into place. 7. Once you replace all the cartridges that need replacing, close the cartridge cover and push it down until it clicks into place. 8. Close the scanner. 9.
Solving Problems Check the messages on the display screen to diagnose the cause of most problems. You can also check the basic troubleshooting suggestions beginning on page 38 or see the on-screen User’s Guide for more detailed help. Checking for Software Updates Periodically, it’s a good idea to check Epson’s support website for free updates to your Epson CX9400Fax Series software. Open your on-screen User’s Guide and select Download the Latest Software or visit Epson’s support website at epson.
■ Make sure the type of paper you loaded matches the paper size and paper type settings on the control panel when copying (see page 12), when faxing (see page 21), or in your printer software (see page 30). ■ Use the Automatic Document Feeder to fax or scan legal-size documents, but not to copy them. Letter-size paper is automatically selected for copying. If you copy a legal-size document, your image will be cropped.
2. Press OK to clear any messages on the display screen. 3. Reload the paper. Faxing Problems ■ Make sure the recipient’s fax machine is turned on and working. ■ Make sure the LINE port on the CX9400Fax Series is connected to a telephone wall jack. Verify that the telephone wall jack works by connecting a phone to it. ■ If the line has static, press Setup, select Fax Settings, select Communication, and turn off the V.34 and ECM (Error Correction Mode) settings.
Where To Get Help Epson Technical Support Internet Support Visit Epson’s support website at epson.com/support and select your product for solutions to common problems. You can download drivers and documentation, get FAQs and troubleshooting advice, or e-mail Epson with your questions.
Notices Important Safety Instructions Before using your all-in-one, read and follow these safety instructions: ■ Be sure to follow all warnings and instructions marked on the product. ■ Use only the type of power source indicated on the product label. ■ Use only the power cord that comes with the product. Use of another cord may cause fires or shock. Do not use the cord with any other equipment. ■ Place the product near a wall outlet where the plug can be easily unplugged.
■ Do not use aerosol products that contain flammable gases inside or around the printer. Doing so may cause fire. ■ Do not press too hard on the document table when placing the originals. ■ Do not open the scanner section while the product is in use. ■ Do not touch the flat white cable inside the product. ■ Do not spill liquid on the product. ■ Adjust only those controls that are covered by the operating instructions.
Telephone Equipment Safety Instructions When using telephone equipment, you should always follow basic safety precautions to reduce the risk of fire, electric shock, and personal injury, including the following: ■ Do not use the Epson product near water. ■ Avoid using a telephone during an electrical storm. There may be a remote risk of electric shock from lightning. ■ Do not use a telephone to report a gas leak in the vicinity of the leak. Caution: To reduce the risk of fire, use only a No.
What This Warranty Does Not Cover: This warranty covers only normal use in the United States and Canada. Using this product for continuous production or similar high duty purposes is not considered normal use; damage, maintenance or service from such use will not be covered under this warranty. This warranty is not transferable. This warranty does not cover any color change or fading of prints or reimbursement of materials or services required for reprinting.
To find the Epson Authorized Reseller nearest you, visit our website at: http://www.epson.com. To find the Epson Customer Care Center nearest you, visit: http://support.epson.com. You can also write to: Epson America, Inc., P.O. Box 93012, Long Beach, CA 90809-3012 Declaration of Conformity According to 47CFR, Part 2 and 15 for: Class B Personal Computers and Peripherals; and/or CPU Boards and Power Supplies used with Class B Personal Computers: We: Located at: Epson America, Inc.
FCC Compliance Statement For United States Users This equipment complies with Part 68 of the FCC rules and the requirements adopted by the ACTA. On the back side is a label that contains, among other information, the FCC registration number and the ringer equivalence number (REN) for this equipment. You must, upon request, provide this information to your local telephone company. The information associated with the services the equipment is to be connected are REN: 0.2B, Jack type: RJ-11C.
A plug and jack used to connect this equipment to the premises wiring and telephone network must comply with the applicable FCC Part 68 rules and requirements adopted by the ACTA. A compliant telephone cord and modular plug is provided with this product. It is designed to be connected to a compatible modular jack that is also compliant. See installation instructions for details.
WARNING The connection of a non-shielded equipment interface cable to this equipment will invalidate the FCC Certification of this device and may cause interference levels which exceed the limits established by the FCC for this equipment. It is the responsibility of the user to obtain and use a shielded equipment interface cable with this device. If this equipment has more than one interface connector, do not leave cables connected to unused interfaces.
Copyright Notice All rights reserved. No part of this publication may be reproduced, stored in a retrieval system, or transmitted in any form or by any means, electronic, mechanical, photocopying, recording, or otherwise, without the prior written permission of Seiko Epson Corporation. The information contained herein is designed only for use with this Epson product. Epson is not responsible for any use of this information as applied to other equipment.
CPD-24114R1 Printed in XXXXXX XX.