
Operation Manual


20 Maintenance
Checking and Cleaning the
Print Head
If your printouts are unexpectedly light, colors are
missing, or you see light or dark lines across the
page, you may need to clean the print head. This
clears the print head nozzles, which can become
clogged if you do not use the product for a long time.
Tip:
We recommend that you turn on the product at least once a month
to maintain good print quality.
Checking the print head
You can print a nozzle check pattern to see if any
print head nozzles are clogged, or to check the results
after cleaning the print head.
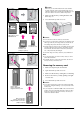
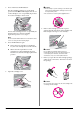
1. Turn off the product.
2. Load A4-size plain paper (& page 8).
3. While holding down the B ink button, press and
hold down the P On button for about three
seconds.
The product turns on and prints a test pattern. It
also shows the percentage of ink left in each
cartridge:
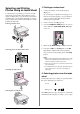
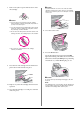
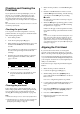
4. Examine the nozzle check pattern you printed.
Each staggered line should be solid, with no
gaps, as shown.
■ If your printout looks okay, the print head
does not need to be cleaned yet.
■ If you see any gaps, as shown below, clean
the print head as described in the next
section.
Cleaning the print head
Follow these steps to clean the print head so it can
deliver ink properly. Before cleaning the print head,
run a nozzle check to see if the print head needs
cleaning (& “Checking the print head” on page 20).
Note:
❏ Print head cleaning uses ink, so clean it only if quality declines.
❏ If the B ink light comes on or flashes, you cannot clean the print
head. You must first replace the appropriate ink cartridge
(& “Replacing Ink Cartridges” on page 17).
1. Make sure the product is on and the B ink light is
off.
2. Hold down the B ink button for three seconds
until the On light starts flashing. A head cleaning
cycle begins and the On light stays flashing.
c Caution:
Never turn off the product while head cleaning is in progress.
You may damage it.
3. When the On light stops flashing, print a nozzle
check pattern to check the results (& “Checking
the print head” on page 20).
If there are still gaps or the test patterns are faint,
run another cleaning cycle and check the nozzles
again.
Note:
If you do not see any improvement after cleaning three or four
times, turn off the product and wait overnight. This lets any
dried ink soften. Then try cleaning the print head again. If
quality still does not improve, one of the ink cartridges may be
old or damaged and needs to be replaced (& “Replacing Ink
Cartridges” on page 17).
Aligning the Print Head
If you notice that vertical lines are not aligned
properly on the nozzle check printout, you may be
able to solve this problem by aligning the print head.
You can align the print head by pressing the buttons,
or you can run the Print Head Alignment utility from
your computer. For the most accurate alignment, the
utility is recommended.
Follow these steps to align the print head using the
buttons:
1. Make sure the product is turned off.
2. Load A4-size plain paper (& page 8).
3. While holding down the k [Copies] button,
press and hold down the P On button for about
three seconds.
Four rows of alignment patterns are printed.
4. Look at pattern #1 and find the patch that is most
evenly printed, with no noticeable streaks or
lines.
5. Press the k [Copies] button until the number for
that patch appears in the k [Copies] window.
6. Press the x Start D [B&W] button.
7. Repeat steps 5 and 6 for each of the other
alignment patterns.