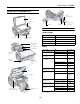
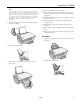
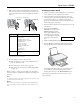
Epson Stylus CX5800F Epson Stylus CX5800F Parts LINE phone line port Document cover LINE USB EXT.
Epson Stylus CX5800F Envelopes Specifications Printing Printing method On-demand ink jet Nozzle configuration Black: 90 nozzles Color: 270 nozzles (90 each cartridge: cyan, magenta, yellow) Print direction No. 10 (4.1 × 9.5 inches) Paper type Plain bond paper Thickness 0.016 to 0.02 inch (0.40 to 0.52 mm) Weight 20 lb (75 g/m²) to 24 lb (90 g/m²) Note: Poor quality paper may reduce the print quality and cause paper jams or other problems.
Epson Stylus CX5800F Scanning USB Interface Scanner type Flatbed color Standard Based on Universal Serial Bus Specifications Revision 2.0, Universal Serial Bus Device Class Definition for Printing Devices Version 1.1, Universal Serial Bus Mass Storage class Bulk-Only Transport Revision 1.0 Photoelectric device CIS Effective pixels 10,200 × 14,040 pixels at 1200 dpi Document size 8.5 × 11.
Epson Stylus CX5800F Memory Stick/ MemoryStick PRO card slot Compatible with Memory Stick Standard version 1.3 or Memory Stick Standard Memory Stick PRO Format Specifications version 1.0 cards SD/MMC card slot Compatible with SD Memory Card Specifications / PART1. Physical Layer Specification Version 1.0 cards and MultiMediaCard Standard cards xD-Picture card Slot Compatible with xD-Picture card Card Specification Version 1.00 cards 3. Slide the left edge guide to the left.
Epson Stylus CX5800F Follow these guidelines when loading paper: Note: The type of paper you choose affects the way your printout looks, so be sure to select the correct paper for your job. If you are just making a copy or printing a rough draft of an image, plain paper is fine. However, for the best results, you’ll want to use one of Epson’s special ink jet papers designed for your printer. For example, your photos will look great printed on Premium Glossy Photo Paper.
Epson Stylus CX5800F 3. Slide the left edge guide to the left. Select the following settings when printing on envelopes: ❏ Envelope as the paper Type or Media Type setting ❏ The correct envelope size as the Size or Paper Size setting ❏ Landscape as the Orientation setting Paper Loading Capacity When loading Epson ink jet papers, follow these capacity guidelines: 4. Load up to 10 envelopes at a time, flap edge left, printable side up, against the right edge guide.
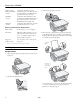
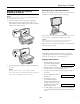
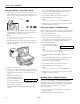
Epson Stylus CX5800F Placing Large or Thick Documents Placing Originals for Copying, Scanning, or Faxing When you scan a large or thick document, you can remove the document cover. Just open it and pull it straight up. Caution: Do not place heavy objects on the document table glass and do not press the glass with too much force. 1. Open the document cover and place your original facedown on the glass, in the upper left corner. Move your original about 0.
Epson Stylus CX5800F 9. To make a color copy, press the x Start Color button. Note: If you need to cancel the number of copies selected, press the y Cancel/Back button. To exit Copy mode, press the y Cancel/ Back button again. To make a black and white copy, press the x Start B&W button. 7. Press the paper type button to select Plain Paper. The light indicates which type is selected. Printing appears on the display and the Epson Stylus 8. Press the paper size button to select Letter.
Epson Stylus CX5800F 3. Make sure the memory card access light is off and that no cards are in any of the slots. Then insert your card into the correct slot. The memory card access light flashes and then stays on. Printing an Index Sheet 1. Make sure your Epson Stylus CX5800F is not connected to your computer (or your computer is turned off). 2. Load several sheets of letter-size plain paper. (Use only letter-size paper to print the index sheet.
Epson Stylus CX5800F If you select Plain Paper, the photo(s) print with a white border. If you select Photo Paper, the photos print borderless, to the edge of the paper. Selecting Photos on the Index Sheet 1. Once you have printed the index sheet, use a dark pen or pencil to fill in one of the ovals beneath each photo you want to print to indicate how many copies you want (1, 2, or 3). 7. Select Letter, 4”x 6”, or 5”x 7” for the paper size. 8. Press the OK button to start printing.
Epson Stylus CX5800F 3. Load the type of paper you want to use (see page 4). Load enough sheets for the number of photos you’ll be printing. The EPSON Scan software provides three scanning modes for progressive levels of control over your scanned image: 4. Select Plain Paper or Photo Paper (whichever you loaded). If you select Photo Paper, the photos print borderless, to the edge of the paper. ❏ Full Auto Mode scans quickly and easily using automatic settings.
Epson Stylus CX5800F 4. You see the File Save Settings window: Restoring Color While Scanning Photos Using the Color Restoration feature in EPSON Scan, you can automatically transform an old, faded, or badly exposed photo into one with true-to-life color and sharpness as you scan. 1. Place your original photo on the document table as described on page 7. 2. Start EPSON Scan. See page 11 for instructions. 3.
Epson Stylus CX5800F 4. Press the OK button. You see this display: Connecting the Epson Stylus CX5800F to a Phone Line 1.Fax Header Set 5. Press the OK button again. The display goes blank except for the cursor (_). If you are connecting a phone line to the Epson Stylus CX5800F for faxing, connect the phone cable leading from the wall jack to the LINE port, as shown below. 6. Press the keys on the numeric keypad to enter up to 40 digits of header information.
Epson Stylus CX5800F 18. Press the keys on the numeric keypad to enter your fax number. You can enter the numbers 0 to 9, and the characters * and #; up to 64 digits total. Setting Options and descriptions 4.Scan&Print Setup To change various settings, press the OK button, then select one of these options. Press the OK button to select the option, then press the u or d button to change the setting. 19. Press the OK button. 20. Press the y Cancel/Back button until you return to the first screen. 1.
Epson Stylus CX5800F Setting Options and descriptions 5.Communication (continued) 3.ECM: On/Off Note: If you need to change a character to the left, press the l button to delete the character and re-enter it. Press the r button if you need to move the cursor to the right. Indicates whether you use Error Correction Mode to automatically request retransmission of fax data that is received with detected errors. On (default) Off 8. Press the OK button again.
Epson Stylus CX5800F 7. To delete a speed dial entry, press the OK button. Then press the u or d button, or the 3 key on the numeric keypad, to display this option: 3. To send a black-and-white fax, press the x Start B&W button. To send a color fax, press the x Start Color button. (If the receiving fax machine cannot print in color, the fax prints in black-and-white.) 3.Delete Entry 8. Press the OK button. You see the first speed dial entry number (such as [1]) and name displayed.
Epson Stylus CX5800F To send a color fax, press the x Start Color button. (If the receiving fax machine cannot print in color, the fax prints in black-and-white.) You see this display during faxing: Selecting the Answer Mode The Epson Stylus CX5800F tells you whether Auto Answer is turned on or not on the first screen: Scanning 001 98% Note: If you need to cancel faxing at any time, press the y Cancel/Back button. 6.
Epson Stylus CX5800F 5. Press the OK button. The Epson Stylus CX5800F prints a test pattern like this: 5. When the display returns to 4.Head Cleaning, run a nozzle check to verify that the print head is clean. See the left column for details. Print head does not need to be cleaned: 6. If there are still gaps or lines, or the test patterns are faint, run another cleaning cycle and check the nozzles again.
Epson Stylus CX5800F 5. Make sure that the document cover is closed, then open the scanner. Replacing Ink Cartridges If you see a message like this on the display, one or more cartridges are low on ink: Cyan ink low->Pr When you see a message like this on the display, you need to replace one or more cartridges: Cyan ink out->Pr You cannot print when a cartridge is empty. Note: You’ll also see a low ink or ink out message on your computer screen when you print from your computer.
Epson Stylus CX5800F 12. Close the scanner. 8. Before you open the new ink cartridge package, shake it four or five times. Then remove it from the package. Caution: Do not touch the green chip on the front of the cartridge. This can damage the ink cartridge. 13. Press the OK button. The Epson Stylus CX5800F begins charging ink and Charging appears on the display. Start Color OK 9. Place the new ink cartridge into the cartridge holder and push it down until it clicks into place.
Epson Stylus CX5800F 7. Look at the printout and select the pattern with no gap or line between the rectangles. Enter the number for that pattern in the box on the screen and click Next. 1. Turn on the Epson Stylus CX5800F. 2. Load several sheets of paper. 3. Windows: Right-click the printer icon on your taskbar (in the lower right corner of your screen). Select Print Head Alignment. If you can’t find an aligned pattern, choose the one that looks the best.
Epson Stylus CX5800F 5. Secure the ink cartridge holder (print head) to the case with tape. Caution: Be sure to remove the tape after installing the printer in its new location. 6. Close the scanner section, push in the output tray extension, and close the output tray. 7. Repack the Epson Stylus CX5800F in the original box using the protective materials that came with it. Display message Cause and solution [Cyan, Magenta, Yellow, Black] Ink cartridge error -> Cartridge replacement is necessary.