L R4C725/726 Setup Guide Rev.E A5 size 12/4/00 SETUP.FM Printing Your First Page Proof Sign-off: K.Gazan CRE Tsukada N.
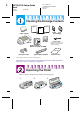
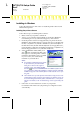
L R4C725/726 Setup Guide Rev.E A5 size 12/4/00 Proof Sign-off: K.Gazan CRE Tsukada N.Nomoto Lipsett SETUP.FM Checking the Package Contents Daily Use PhotoQuicker Setup Guide paper support black color ink cartridges paper manuals roll paper printer printer software & Reference Guide CD-ROM roll paper holder power cord* * The power cord may come attached to the printer in certain locations. paper support adapter protective film The package contents may vary in certain locations.
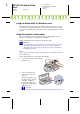
Proof Sign-off: K.Gazan CRE Tsukada N.Nomoto Lipsett R4C725/726 Setup Guide Rev.E A5 size 12/4/00 SETUP.FM Attaching the Paper Support Adapter, Roll Paper Holder and Paper Support Hold the paper support adapter so that the arrows on the adapter facing toward the front of the printer, and insert the adapter into the slot at the rear of the printer.
L R4C725/726 Setup Guide Rev.E A5 size 12/4/00 SETUP.FM Proof Sign-off: K.Gazan CRE Tsukada N.Nomoto Lipsett Plugging In and Connecting the Printer Your printer connects to your computer via the parallel or USB interface. Macintosh computers can only be connected via the USB interface. Depending upon your geographic location, you may need to obtain the appropriate cable. See “Options and Consumable Products” in the Daily Use guide for details.
R4C725/726 Setup Guide Rev.E Proof Sign-off: K.Gazan CRE Tsukada N.Nomoto Lipsett A5 size 12/4/00 SETUP.FM ❏ If your computer has more than one USB port, you may plug the cable in wherever is convenient. 1. Make sure that both the printer and the computer are turned off. Plug the power cord into a properly grounded electrical outlet. 2. Plug the appropriate end of the cable into the USB port on the back of the printer.
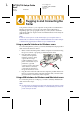
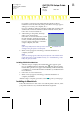
L R4C725/726 Setup Guide Rev.E A5 size 12/4/00 SETUP.FM Proof Sign-off: K.Gazan CRE Tsukada N.Nomoto Lipsett Installing in Windows Follow the instructions in this section to install the printer software and EPSON PhotoQuicker. Installing the printer software Follow these steps to install the printer software. 1. Make sure that your printer is turned off. 2. Turn on your computer and start Windows. If the New Hardware Found dialog box or any other Wizard appears, click Cancel.
Proof Sign-off: K.Gazan CRE Tsukada N.Nomoto Lipsett R4C725/726 Setup Guide Rev.E A5 size 12/4/00 SETUP.FM For printers connected via the USB cable, the USB device driver installation starts automatically at this point. When a message appears asking you to restart your computer, do so. If you are a Windows 2000 user and using parallel cable, click the Stop Search button when the USB device driver installation starts, then follow the on-screen instructions. 6.
L R4C725/726 Setup Guide Rev.E A5 size 12/4/00 SETUP.FM ? Proof Sign-off: K.Gazan CRE Tsukada N.Nomoto Lipsett Caution: Turn off all virus protection programs before you install the printer software. Installing the printer software Follow these steps to install your printer software. 1. Turn on your Macintosh and insert the software CD in the CD-ROM drive. The EPSON printer software CD-ROM opens automatically. 2.
R4C725/726 Setup Guide Rev.E Proof Sign-off: K.Gazan CRE Tsukada N.Nomoto Lipsett A5 size 12/4/00 SETUP.FM 1. Choose Chooser from the Apple menu. Then, select the icon for your printer and the port that your printer is connected to. 2. Select the appropriate Background Printing radio button to turn background printing on or off. When background printing is on, you can use your Macintosh while it is preparing a document for printing.
L R4C725/726 Setup Guide Rev.E A5 size 12/4/00 SETUP.FM Proof Sign-off: K.Gazan CRE Tsukada N.Nomoto Lipsett Using the Setup utility for Windows users The Setup utility should open automatically when your printer software installation is complete. Follow the on-screen instructions. If you cannot access the Setup utility, refer to the next section, “Using the printer’s control panel”.
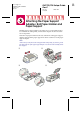
Proof Sign-off: K.Gazan CRE Tsukada N.Nomoto Lipsett R4C725/726 Setup Guide Rev.E A5 size 12/4/00 SETUP.FM 3. Push back the release tabs and lift up the ink cartridge clamps. 4. Open the ink cartridge packages. Next, remove only the yellow tape seals from each cartridge. Caution: ❏ You must remove the yellow tape seals from the cartridges before installing them; otherwise, the cartridges will become unusable and you will be unable to print.
L R4C725/726 Setup Guide Rev.E A5 size 12/4/00 SETUP.FM ? Proof Sign-off: K.Gazan CRE Tsukada N.Nomoto Lipsett Caution: Make sure that the ink cartridge tabs are not under the tabs protruding from the base of the opened ink cartridge clamps, as this can damage the clamps. Note: Install both ink cartridges. If either of the cartridges is not installed, the printer will not work. 6. 7. Lower the ink cartridge clamps until they lock into place. Press the A ink cartridge replacement button.
R4C725/726 Setup Guide Rev.E Proof Sign-off: K.Gazan CRE Tsukada N.Nomoto Lipsett 3. A5 size 12/4/00 Load the stack of paper in the sheet feeder with the printable side up and the right edge of the paper resting against the right edge guide. Then, slide the left edge guide against the left edge of the paper. SETUP.FM printable side up Note: ❏ Always load paper into the sheet feeder short edge first. ❏ Make sure that the paper stack fits under the arrow mark inside the edge guide.
L R4C725/726 Setup Guide Rev.E A5 size 12/4/00 SETUP.FM 2. Proof Sign-off: K.Gazan CRE Tsukada N.Nomoto Lipsett Hold down the > maintenance button for three seconds. The printer starts cleaning the print head and the 2 power light begins flashing. Print head cleaning takes about thirty seconds to complete. ? Caution: Never turn off the printer while the 2 power light is flashing. Doing so may damage the printer.
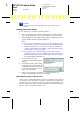
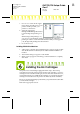
Proof Sign-off: K.Gazan CRE Tsukada N.Nomoto Lipsett 2. 3. 4. R4C725/726 Setup Guide Rev.E A5 size 12/4/00 SETUP.FM Insert the printer software CD in the CD-ROM drive. If the Installer dialog box appears, click Quit. Double-click the My Computer icon. Then right-click the CD-ROM drive icon and click Open on the menu that appears. Double-click the sample.bmp file to open it. To change the printer software settings, click Print on the File menu. A Print dialog box similar to the one on the right opens.
L R4C725/726 Setup Guide Rev.E A5 size 12/4/00 SETUP.FM 2. 3. Proof Sign-off: K.Gazan CRE Tsukada N.Nomoto Lipsett 4. Insert the printer software CD in the CD-ROM drive. Open the Install Printer Driver/Utility folder in the EPSON folder and then double-click the README file. Click Page Setup on the File menu. The following dialog box appears. 5. 6. 7. Select the paper size that is loaded in the printer from the Paper Size list. Select Portrait as the Orientation setting.