
Installation Instructions

R4C725/726 Setup Guide
Rev.E
A5 size SETUP.FM
12/4/00
L
Proof Sign-off:
K.Gazan CRE Tsukada
N.Nomoto
Lipsett
?
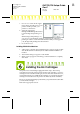
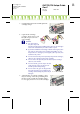
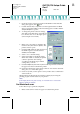
Caution:
Make sure that the ink cartridge tabs are not under
the tabs protruding from the base of the opened ink
cartridge clamps, as this can damage the clamps.
Note:
Install both ink cartridges. If either of the cartridges is not
installed, the printer will not work.
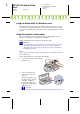
6. Lower the ink cartridge clamps until they lock into place.
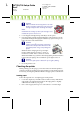
7. Press the A ink cartridge replacement button. The printer moves the
print head and begins charging the ink delivery system. This process
takes about two and a half minutes.
?
Caution:
Always press the A ink cartridge replacement
button to move the print head. Do not move the
print head by hand. Doing so may damage the
printer.
While the ink is charging, the 2 power light
flashes and the printer produces a variety of
mechanical sounds. These sounds are normal.
When the ink delivery system has been charged, the print head returns
to the home (far right) position and the 2 power light comes on.
?
Caution:
Never turn off the printer while the 2 power light is flashing.
8. Close the printer cover.
Checking the printer
Before printing your first page, you need to make sure that the printer is
working correctly by loading paper, then printing a nozzle check page and,
if necessary, cleaning the print head. Refer to the appropriate section below.
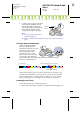
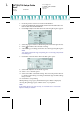
Loading paper
Follow the steps below to load plain paper in the printer.
1. Lower the output tray and slide out the extention. Next, slide the left
edge guide so that the distance between the edge guides is slightly
wider than the width of your paper.
2. Fan a stack of paper, then tap it on a flat surface to even the edges.