
Installation Instructions

R4C725/726 Setup Guide
Rev.E
A5 size SETUP.FM
12/4/00
R
Proof Sign-off:
K.Gazan CRE Tsukada
N.Nomoto
Lipsett
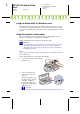
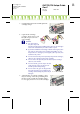
2. Insert the printer software CD in the CD-ROM drive. If the Installer
dialog box appears, click Quit.
3. Double-click the My Computer icon. Then right-click the CD-ROM
drive icon and click Open on the menu that appears. Double-click the
sample.bmp file to open it.
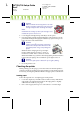
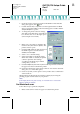
4. To change the printer software settings,
click Print on the File menu. A Print dialog
box similar to the one on the right opens.
(This example is from Paint).
5. Make sure your printer is selected in the
Name list box, then click Properties. The
printer software opens.
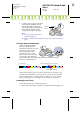
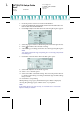
6. Click the Main tab, then click anywhere in
the Media Type box and select Photo
Quality Ink Jet Paper.
7. Select Color as the Ink setting.
8. Select Automatic as the Mode setting.
When Automatic is selected, the printer
software optimizes other settings
according to the Media Type and Ink
settings that you make.
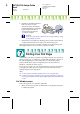
9. Click the Paper tab, then click anywhere in the Paper Size box and select
the paper size that is loaded in the printer.
10. Click OK at the bottom of the printer software. You return to the Print
dialog box (or a similar dialog box).
11. Click Close, Print, or OK to print. You may need to click a combination
of these buttons.
While printing, the EPSON Progress Meter is displayed, showing the
printing progress and the status of your printer.
Note:
If the sample file does not print correctly, see “Problem Solver” in the online
Reference Guide for solutions.
For Macintosh users
Follow these steps to print the sample file.
1. Make sure that A4 or Letter size paper is loaded in the printer.