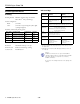
EPSON Stylus Photo 700 paper support extension edge guides Accessories paper support Ink Cartridges printer cover control panel output tray extensions paper out load/eject light button thickness lever black ink out light color ink out light cleaning button Part number Black S020093 Color S020110 Media output tray ink cartridge clamp Cartridge power button Media name Size Part number EPSON 360 dpi Ink Jet Paper Letter A4 S041060 S041059 EPSON High Quality Ink Jet Paper Letter A4
EPSON Stylus Photo 700 Ink Cartridge Printer Specifications Printing Printing method EPSON’s exclusive drop-on-demand Micro Piezo™ ink jet technology Specification Black ink cartridge (S020093) Color ink cartridge (S020110) Color(s) Black Cyan, Magenta, Yellow, Light Magenta, Light Cyan Print capacity* 540 pages/A4 (ISO/IEC 10561 Letter Pattern at 360 dpi) Nozzle configuration 220 pages (A4, 360 dpi, 5% duty each color) Black 32 nozzles Cartridge life Color 32 nozzles × 5 (cyan, magenta, yel
EPSON Stylus Photo 700 Paper Paper type Size Paper types Thickness Weight Single sheets Letter (8.5 × 11 inches) Legal (8.5 × 14 inches) Statement (5.5 × 8.5 inches) Executive (7.5 × 10 inches) A4 (210 × 297 mm) A5 (148 × 210 mm) B5 (182 × 257 mm) Plain bond paper and special ink jet papers distributed by EPSON 0.003 to 0.004 inch 17 to 24 lb (64 to 90 g/m2) for plain (0.08 to 0.11 mm) for plain bond paper bond paper Transparencies, Glossy film, Glossy paper Letter (8.
EPSON Stylus Photo 700 Printable area A A B-L B-R B-L C B-R EPSON Panoramic Photo Paper A: The minimum top margin is 0.12 inch (3.0 mm). B-L, The minimum left margin is 0.12 inch (3.0 mm). B-R: The minimum right margin is 0.54 inch (14.0 mm). C: The minimum bottom margin is 0.12 inch (3.0 mm). C single sheets/index cards Note: Always load paper into the sheet feeder short edge first. However, envelopes should be loaded long edge first.
EPSON Stylus Photo 700 Electrical Hardware initialization Specification 120 V Model 220−240 V Model* Input voltage range** 99 to 132 V 198 to 264 V Rated frequency range 50 to 60 Hz Input frequency range 49.5 to 60.5 Hz Rated current 0.4 A Power consumption Approx. 15 W (ISO/IEC 10561 Letter Pattern) Approx. 5 W in standby mode (120 V model) Approx. 5.
EPSON Stylus Photo 700 Serial interface The printer’s built-in serial interface is based on the RS-423 standard. This interface has the following characteristics: Standard: Based on RS-423 Synchronization: Synchronous Bit rate: Approx. 1.
EPSON Stylus Photo 700 The printer moves the print head and begins charging the ink delivery system. Charging can take up to two minutes. During this time, the P power light flashes, and the printer makes various sounds. Don’t turn off the printer or interrupt the charging process or you’ll use more ink than necessary. Charging is complete when the P power light stops flashing and is continually lit. 4. Press the P power button to turn on the printer.
EPSON Stylus Photo 700 Printing on Special Media Whether you print on plain paper or special media, you need to load it according to the guidelines in the table below. For this media name... Load a maximum of this many sheets...
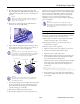
EPSON Stylus Photo 700 Warning: If ink gets on your hands, wash them thoroughly with soap and water. If ink gets into your eyes, flush them immediately with water. Replacing an Ink Cartridge Caution: To ensure good results, use genuine EPSON cartridges and do not refill them. Other products may cause damage to your printer not covered by EPSON’s warranty. Installing the New Cartridge Once you have removed the empty cartridge, you’re ready to install the new one.
EPSON Stylus Photo 700 Replacing an Outdated Ink Cartridge 2. Access the printer settings dialog box. If an ink cartridge is more than six months old, you may need to replace it. How can you tell? You may notice that your printouts don’t look as good as they used to. If print quality doesn’t improve after cleaning and aligning the print head, you may need to replace one or both cartridges. 3. Click the Utility tab (Windows) or the Utility button (Macintosh). You see the Utility menu. 4.
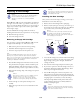
EPSON Stylus Photo 700 Examining the Nozzle Check Pattern 1. Turn off the printer, unplug the power cord, and disconnect the printer cable. Examine the nozzle check pattern after printing it. It should look something like this, with each of the six sections showing one of the ink colors: 2. Remove all the paper from the sheet feeder. 3. Clean the exterior of the printer with a soft, damp cloth. Keep the printer cover closed so water doesn’t get inside. 4.
EPSON Stylus Photo 700 12 - EPSON Stylus Photo 700 3/98