Contents Welcome! Everything You Need for Photo-Quality Prints What Is Your Printer Software? What Is EPSON Digital PhotoLab? Printer Setup Unpack the Printer Attach the Paper Support Install the Ink Cartridges Connect the Printer to Your Computer Load Paper Install the Software Register Your Printer EPSON Digital PhotoLab Navigating Through EPSON Digital PhotoLab What Do You Get with EPSON Digital PhotoLab? Print a Page in Windows Print a Page in Macintosh Problems? Need Help? 1 1 1 1 2 2 3 3 5 6 7 15 15
Welcome! Your EPSON Stylus® Photo 700 is the ideal printer for optimum photo-quality printing—print any image from your favorite photos to letters and everyday documents. Everything You Need for Photo-Quality Prints The EPSON Stylus Photo 700 CD-ROM includes all the software you need for photo-quality output: your printer software and EPSON Digital PhotoLab™. What Is Your Printer Software? To print, you need some printer software (also known as a printer driver) to tell the printer how to print.
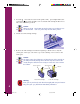
Printer Setup Setting up your printer is easy. Just follow the simple steps on the following pages. Before you set up your printer, make sure your system meets the requirements listed in the Introduction of your User’s Guide. 1 Unpack the Printer Remove any packing material from the printer. See the Notice Sheet in the box for details. Save all the packaging so you can use it if you need to transport the printer later.
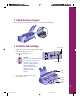
2 Attach the Paper Support Insert the paper support in the top slot on the back of the printer. 3 Install the Ink Cartridges power light 1. Plug the power cord into a grounded outlet. 2. Make sure the power is off (the power light is off). Caution: Don’t use an outlet controlled by a wall switch or timer, or one that uses the same circuit as a large appliance. This may disrupt the power, which can erase memory or even damage the power supply. power button printer cover 3.
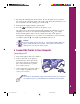
4. Press the power button to turn on the printer. The power light flashes, the black and color ink out lights come on, and the ink cartridge holders move left to the installation position. Caution: Always use the power button to turn the printer on or off. Never use an external switch—such as a power strip—to turn off the printer. 5. Lift the two ink cartridge clamps. 6. Remove the ink cartridges from their foil packages. Then remove only the yellow part of the tape seal on the top of each cartridge.
7. Insert the ink cartridges into their holders. Be sure the labels are face up and the arrows point toward the back of the printer. The black ink cartridge goes on the left and the color ink cartridge goes on the right. 8. Push down the clamps until they lock in place. 9. Press the cleaning button and close the printer cover. The printer moves the print head and begins charging the ink delivery system. Charging can take two to four minutes.
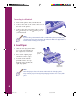
Connecting to a Macintosh 1. Turn off the printer and your Macintosh. 2. Connect the cable to the serial connector on the back of the printer. 3. Connect the other end of the cable to either the modem port or the printer port on your Macintosh. Note: If you’re using a PowerBook™ with a combination printer/modem port, use that port and select modem in the Chooser. Make sure AppleTalk® is inactive before turning on the printer. 5 Load Paper 1.
4. Slide the left edge guide against the paper stack. Don’t load paper above this mark. Note: If you like, you can run a test on your printer to see how it’s working. Follow the steps in Chapter 6 of your User’s Guide. 6 Install the Software Your EPSON Stylus Photo 700 CD-ROM includes printer software (also called a printer driver) and EPSON Digital PhotoLab for both Windows and Macintosh. You must install the printer software for the printer to work correctly.
Installing the Software for Windows 95 or Later 1. Make sure your printer is connected to the computer and that both are turned off. 2. Turn on your computer, but leave your printer turned off. Make sure Windows 95 is running (you should see the Windows Desktop icons). 3. Insert the EPSON Stylus Photo 700 CD-ROM or diskette 1 if you’re using diskettes. If Windows 95 launches the installation program automatically, you see the EPSON Setup CD window. Go to step 4.
5. Follow the instructions on screen to install the software. EPSON Digital PhotoLab is installed first. Click Finish when that installation is complete. At the next screen, click OK to install your printer software and Status Monitor. (There may be a brief pause before the installation begins; if you are installing the software from diskettes, only the printer software and Status Monitor are installed.) Be sure to click Next to install the Status Monitor.
Installing the Software for Windows 3.1 1. Make sure your printer is connected to the computer and your computer is turned on. 2. Make sure Windows Program Manager is running. Exit any open applications. 3. Insert the EPSON Stylus Photo 700 CD-ROM or diskette 1 if you’re using diskettes. 4. From the Program Manager File menu, select Run. 5. If you are installing from the CD-ROM, type D:\Setup700, click OK, and continue with step 6.
7. Follow the instructions on screen to install the software. EPSON Digital PhotoLab is installed first. Click Finish when that installation is complete. At the next screen, click OK to install your printer software. (There may be a brief pause before the installation begins; if you are installing the software from diskettes, only the printer software is installed.
3. Insert the EPSON Stylus Photo 700 CD-ROM or diskette 1 if you’re using diskettes. If Windows NT 4.0 launches the installation program automatically, you see the EPSON Setup CD window. Go to step 4. If it doesn’t launch automatically, click Start, select Run, and type D:\Setup700 (substitute the correct drive letter). Then click OK. You see the EPSON Setup CD window. Go to step 4. If you’re installing from diskettes, click Start, select Run, and type A:\SETUP. Then click OK. Go to step 5. 4.
5. Follow the instructions on screen to install the software. EPSON Digital PhotoLab is installed first. Click Finish when that installation is complete. At the next screen, click OK to install your printer software. (There may be a brief pause before the installation begins; if you are installing the software from diskettes, only the printer software is installed.) Your printer software icons appear in the EPSON folder and an icon for your printer appears in the Printers folder.
6. Click Install for the default installation (Easy Install) and follow the instructions on screen to install the printer software and utilities. After the printer software installation is complete, you must reboot your Macintosh. Then you can continue with the EPSON Digital PhotoLab installation. 7. Double-click the EPSON Digital PhotoLab Install icon and follow the instructions on screen to install it.
Register Your Printer Take a minute to register your printer with EPSON. Locate the registration card that came in your printer box. Then fill it out and mail it to us. EPSON Digital PhotoLab We’ve packed lots of fun and informative software in with your printer. EPSON Digital PhotoLab contains a collection of photo-editing, photo-organizing, and photo-layout software. Install any one or all of them, depending on your preferences and the space available in your computer.
Navigating Through EPSON Digital PhotoLab In the main menu, you can select from the following: ■ INSTALL ADDITIONAL PROGRAMS. This section contains a collection of award-winning software. ■ PHOTO WORKSHOP. See this section for cool project ideas and fun photo products. ■ PHOTOS ON THE NET. Check out this section to see the EarthLink® Internet service provider offer, learn how to navigate the net, and find photo-savvy web sites. Also includes the Kodak® Picture Network.
After you select an item from the main menu, you’ll see a submenu. To return to the main menu, click EPSON. To return to your desktop, click EXIT. Click to quit EPSON Digital PhotoLab and return to the desktop Click to return to the main menu Many of the submenus have tabbed sections. Select a section by clicking its tab. Click DONE to return to the submenu screen. (You cannot click EPSON or EXIT when you’re in a tabbed section.
What Do You Get with EPSON Digital PhotoLab? Select INSTALL ADDITIONAL PROGRAMS to install these great programs on your system: Windows 95 Windows 3.1 Windows NT 4.0 Macintosh Adobe® PhotoDeluxe® 2.0 EPSON Photo Sheet™ Extensis™ Portfolio™ 3.0 Pictureworks™ Spin™ Panorama DíAMAR® Learning to See Creatively LE Follow the instructions on screen to install the programs. For more information about a program, see its online help utility.
Print a Page in Windows Now that you’ve set up your printer and installed the software, you’re ready to print. Follow the steps below to use Adobe PhotoDeluxe on Windows 95 to print a color image. (If you haven’t installed Adobe PhotoDeluxe from the CD-ROM yet, go ahead and install it now.) Note: These printing instructions are for Windows 95, but you can use the same basic steps to print with most applications on other operating systems.
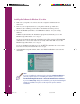
4. Adobe PhotoDeluxe contains a wide selection of sample images. Click Open File and highlight the file name for the image you want to print (you may need to navigate to the folder with your file) and click Open. Select your image here Click here 5. Click File in the menu bar and select Print from the list that appears. 6. You see the Print dialog box. Click the Setup button.
7. You see the Page Setup dialog box. Click the Properties button. Click here 8. You see the dialog box for your printer software. If necessary, click the Main tab to display the basic settings shown below.
9. Check the following settings: ■ Set the Mode option to Automatic; the printer software optimizes the other settings according to the media type and ink settings you make. Or you can click the Advanced button and select one of the predefined Custom Settings. See Chapter 2 in your User’s Guide for details. ■ Move the Quality/Speed slider to the Quality setting. This changes the print quality shown in the Current Settings box at the bottom of the window to Fine - 720 dpi.
Print a Page in Macintosh Now that you’ve set up your printer and installed the software, you’re ready to print. Follow the steps here to use Adobe PhotoDeluxe to print a color image. (If you haven’t installed Adobe PhotoDeluxe from the CD-ROM yet, go ahead and install it now.) If you are using a different program, the steps you need to print may vary from those below. 1. Make sure your printer and computer are turned on. Also make sure you’ve loaded 8.5 x 11-inch plain paper in the printer. 2.
5. Adobe PhotoDeluxe contains a wide selection of sample images. Highlight the file name for the image you want to print (you may need to navigate to the folder with your file) and click Open. 6. Now open your printer software to get ready to print the image. Click File in the menu bar and select Page Setup from the list that appears. 7. You see the page setup dialog box. Make any changes you want to the paper size or orientation, then click OK to close the dialog box.
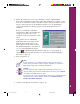
8. Click File again and select Print. You see the print dialog box. Move the slider to choose between higher resolution or faster printing Click Print after you select your settings This setting gives good printing results for most types of documents Click here to select the type of media you’ve loaded in the printer 9. Check the following settings: ■ Make sure the Mode option is set to Automatic; the printer software optimizes the other settings according to the media type and ink settings you make.
26 Comoro+ GS Booklet 30 3/17/98, 4:36 PM
Problems? Need Help? Here are some basic troubleshooting tips if you have any problems setting up your printer or using the software. You can also turn to Chapter 6,“Troubleshooting,” in your User’s Guide or look in your printer software online help. If you’re having problems installing your printer software . . . If you see the “New Hardware Found” screen in Windows 95, click Cancel. You cannot install your printer software that way.
If your printer makes noise when you turn it on or after it has been sitting for a while . . . Your printer is performing routine maintenance. If you can’t see the EPSON Progress Meter or Status Monitor 2 in Windows 95 . . . Make sure you installed the Status Monitor. If you didn’t, you can install the Status Monitor by reinstalling the printer software and making sure you choose to install the Status Monitor. If you installed the Status Monitor, make sure it is turned on.
If your printout contains incorrect characters . . . Your printer’s interface cable may not be securely connected. Check that the cable is locked firmly in place at both ends to ensure proper communication between your printer and computer. After adjusting the cable, try printing from an application again. Your printer may not be selected as the Windows default printer or as the current printer in the Macintosh Chooser.
Making PC Diskettes 1. Prepare two blank formatted diskettes and label them diskette 1 and diskette 2. 2. Make sure Windows is running. 3. Insert the EPSON Stylus Photo 700 CD-ROM. 4. In Windows 95 or Windows NT 4.0, the installer program starts automatically and you see the EPSON Setup CD window. (If it doesn’t start, click Start, select Run, and type D:\Setup700 [substitute the correct drive letter]; then click OK.) In Windows 3.1, select Run from the File menu.
How to order printer software diskettes from EPSON You can order printer driver software diskettes from EPSON by phone or fax for $9.95 shipping and handling (plus tax where applicable), or you can download the diskette image files. When you’re ready to install your printer software, see page 7 for Windows instructions or page 13 for Macintosh instructions. Download: ■ EPSON Web Page: Point your browser to http://www.epson.
How to Order EPSON Ink and Paper To order EPSON ink cartridges, paper and other printing media, contact your dealer or call EPSON Accessories at (800) 873-7766 (U.S. sales only). In Canada, please call (800) 873-7766 for dealer referral.