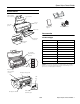
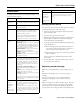
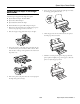
Epson Stylus Photo R2400 Printer Parts Paper support and extensions Sheet feeder Single sheet guide Printer cover Left edge guide Matte sheet support Roll paper holders Output tray Accessories Ink Cartridges Output tray extension Roll paper guides Ink cartridge holder (in home position) Cartridge Part number Light Light Black T059920 Light Magenta T059620 Light Cyan T059520 Light Black T059720 Photo Black T059120 Matte Black T059820 Cyan T059220 Magenta T059320 Yellow T059420
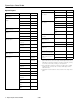
Epson Stylus Photo R2400 Epson Papers Paper name* Size Part number Epson Premium Semigloss Photo Paper Letter (8.5 x 11 inches) S041331 Paper name* Size Part number Epson Premium Bright White Paper Letter (8.5 x 11 inches) S041586 Super B (13 x 19 inches) S041327 Letter (8.5 x 11 inches) S041062 4 inches x 26 ft roll paper S041329 Epson Photo Quality Ink Jet Paper Legal (8.5 x 14 inches) S041067 Letter (8.5 x 11 inches) S041405 B (11 x 17 inches) S041070 A3 (11.7 x 16.
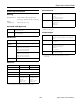
Epson Stylus Photo R2400 Environmental Printer Specifications Temperature Operation: 50 to 95°F (10 to 35°C) Storage: –4 to 104°F (–20 to 40°C) 1 month at 104°F (40°C) Humidity Operation: 20 to 80% RH Storage:*,** 5 to 85% RH Printing Printing method Advanced Micro Piezo pigment ink technology, optimized for photo printing Nozzle configuration 1440 nozzles (180 × 8) Standards and Approvals * Stored in a shipping container Safety UL 60950 CSA C22.2 No.
Epson Stylus Photo R2400 Roll paper Paper Single sheets Standard margins Letter (8.5 × 11 inches[216 × 279 mm]) Legal (8.5 × 14inches [216 × 356 mm]) A4 (210 × 297 mm) Size Pressing the z roll paper button after printing prints the cutting guideline. If you press the z roll paper button again and send print data, the margin between the printouts is about 65 mm. 4 x 6 inches (113.6 × 175.
Epson Stylus Photo R2400 Control Panel To diagnose printer problems, check the printer’s lights or run a printer check (see below). Lights Explanation Green P power light flashes The printer is receiving a print job, printing, replacing an ink cartridge, charging ink, or cleaning the print head. Red H ink light flashes An ink cartridge is low on ink. Make sure you have a replacement cartridge.
Epson Stylus Photo R2400 You can purchase ink cartridges, paper, manuals, and accessories from the Epson Store at (800) 873-7766 or visit http://www.epsonstore.com (U.S. sales only). In Canada, please call (800) 463-7766 for dealer referral. Caution: Don’t open Epson Status Monitor or respond to any ink messages when your printer is printing. This may cause your printer to pause and leave an uneven surface on your printout.
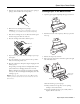
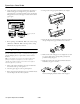
Epson Stylus Photo R2400 5. Shake the new cartridge four or five times before opening its package. (Don’t shake it after it’s unpacked.) Loading Paper in the Sheet Feeder 1. Open the paper support and pull up the support extensions. 6. Remove the new cartridge from its package. Caution: Don’t touch the green circuit board on the front of the cartridge; you may inhibit normal operation and printing. 2. Push in the bottom of the output tray. The tray opens and moves up. 7.
Epson Stylus Photo R2400 ❏ Load letterhead or preprinted paper into the printer top edge first. Loading Multiple Sheets of Matte Paper If you are loading multiple sheets of the following papers in sizes 11 inches wide or wider, attach the matte sheet support to the top of the sheet feeder to help separate the sheets of paper and prevent misfeeds: ❏ Don’t load paper above the arrow on the left edge guide. 5. Adjust the left edge guide to fit lightly against the paper.
Epson Stylus Photo R2400 5. Insert one sheet of paper against the right edge, then slide the left edge guide against the sheet. Loading Special Paper in the Single Sheet Guide Load these types of paper in the single sheet guide: ❏ Epson Watercolor Paper - Radiant White ❏ Epson Velvet Fine Art Paper ❏ Epson UltraSmooth Fine Art Paper ❏ PremierArt Matte Scrapbook Photo Paper for Epson 1. Remove the roll paper holder, if it’s installed (see page 10); and close the paper support and its extensions. 2.
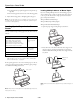
Epson Stylus Photo R2400 4. Swing out the roll paper guides until they are straight. 8. Open the printer cover and look down into the printer to make sure the paper is straight; if not, press the z roll paper button for 3 seconds to back the paper out. Press the ) paper button to clear the paper out error, then load the paper again. If crooked, reload paper 5. Place the roll paper on the holders as shown, then remove the tape and protective paper from the end of the roll. 9.
Epson Stylus Photo R2400 Then turn the roll paper holder knobs to roll up the paper. Press the ) paper button to clear the paper out error. Repeat steps 8 through 10 to reload the paper. 8. Insert the left roll paper holder (marked with an orange triangle) into the far left slot (also marked with an orange triangle). Then insert the other holder into the corresponding slot on the right. Follow the instructions in your User’s Guide to print on roll paper.
Epson Stylus Photo R2400 6. Insert the media two to three inches into the printer, and push the left edge guide against the media’s edge. Maintain slight pressure on the guide while inserting the media the rest of the way into the printer. Stop when the front edge of the media is aligned with the arrow on the right side.
Epson Stylus Photo R2400 4. Select the size of the paper you loaded with a Sheet Feeder - Borderless source as the Paper Size setting. Windows 5. Select one of the portrait or landscape orientation icons as the Orientation setting. 6. Click OK. 7. Click File > Print. 1. Start your printing application and open your photo file. 2. Open the File menu and click Print, then click Properties or Preferences. 3. Select Photo or Best Photo as the Quality Option. 4.
Epson Stylus Photo R2400 This section explains how to clean the print head using the Auto Nozzle Check and Cleaning utility and the Head Cleaning utility. Use the Auto Nozzle Check and Cleaning utility first, to let the printer check and clean the nozzles. If you still notice problems with quality, you can manually clean the print head. If you still have print quality problems, check the solutions in the User’s Guide.
Epson Stylus Photo R2400 If the pattern has white lines or gaps (as shown below), click Clean to clean the print head again. Manually Aligning the Print Head 1. Turn on the printer. 2. Load plain, letter-size paper. 3. Do one of the following: Windows: Right-click the icon on your taskbar (in the lower right corner of your screen). Select Print Head Alignment. If you don’t see any improvement after cleaning the print head three or four times, check the solutions in the User’s Guide.
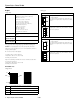
Epson Stylus Photo R2400 3. Clean the exterior of the printer with a soft, damp cloth. Keep the paper support and printer cover closed as you clean the printer. Caution: Be sure to remove the tape after installing the printer in its new location. 4. Remove any paper from the printer, then remove the roll paper holder, if it is installed. 4. If you need to clean ink out of the inside of the printer, use a soft cloth to clean only the black plastic area shown below: 5.