spr280_qg.
spr280_qg.book Page 2 Monday, June 4, 2007 2:20 PM Contents Introduction . . . . . . . . . . . . . . . . . . . . . . . . . . . . . . . . . . . . . . . . . . . 3 Loading Paper . . . . . . . . . . . . . . . . . . . . . . . . . . . . . . . . . . . . . . . . . 4 Using Special Papers . . . . . . . . . . . . . . . . . . . . . . . . . . . . . . . . . . . . . . . . 5 Basic Printing . . . . . . . . . . . . . . . . . . . . . . . . . . . . . . . . . . . . . . . . . . 7 Printing in Windows . . . . . . . . . . . . . .
spr280_qg.
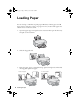
spr280_qg.book Page 4 Monday, June 4, 2007 2:20 PM Loading Paper You can load up to 120 sheets of plain paper, 100 sheets of matte paper, and 20 sheets of most other photo papers (see page 5 for a list). Load transfer paper and adhesive sheets one sheet at a time. 1. Open the paper support and pull out the extension. Then open the front tray and pull out the extensions. 4 5 2. Slide the edge guide left. 3. Insert the paper, glossy or printable side up, against the right side.
spr280_qg.book Page 5 Monday, June 4, 2007 2:20 PM Always load paper short edge first, even for landscape printing. Load letterhead or pre-printed paper top edge first, facing up. Make sure the paper stack fits under the r arrow mark inside the left edge guide. Note: The type of paper you choose affects the way your printout looks. If you are just printing a rough draft of an image, plain paper is fine.
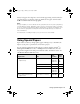
spr280_qg.book Page 6 Monday, June 4, 2007 2:20 PM Part number Sheet count Borderless 4 × 6 inches S041808 S041727 40 100 Borderless 5 × 7 inches S041464 20 Borderless 8 × 10 inches S041465 20 Letter (8.5 × 11 inches) S041286 S042183 S041667 20 25 50 Epson Premium Photo Paper Semi-gloss Borderless 4 × 6 inches S041982 40 Letter (8.5 × 11 inches) S041331 20 Epson Photo Paper Glossy Borderless 4 × 6 inches S041809 S042038 50 100 Letter (8.
spr280_qg.book Page 7 Monday, June 4, 2007 2:20 PM Basic Printing This section describes the basic steps for printing a photo or document stored on your Windows® or Macintosh® computer, and printing directly on an ink jetprintable CD or DVD. For detailed instructions on printing, see the on-screen User’s Guide. Before you start, make sure you’ve installed your printer software and connected the printer to your computer as described on the Start Here sheet.
spr280_qg.book Page 8 Monday, June 4, 2007 2:20 PM 4. Make sure EPSON Stylus Photo R280 Series is selected, then click the Preferences or Properties button. (If you see a Setup, Printer, or Options button, click it. Then click Preferences or Properties on the next screen.) 5. On the Main tab, select the basic print settings. Make sure you choose the correct paper Type setting for your paper (see page 11).
spr280_qg.book Page 9 Monday, June 4, 2007 2:20 PM 8. Click OK to save your settings, then click OK or Print to start printing. This window appears and shows the progress of your print job. Check ink cartridge status Pause or resume printing Cancel printing Printing with a Macintosh 1. Load paper (see page 4). 2. Open a photo or document in a printing program. 3. Select Page Setup from the File menu.
spr280_qg.book Page 10 Monday, June 4, 2007 2:20 PM 5. Select Print from the File menu. You see a window like this one: Select Stylus Photo R280 Select Print Settings 6. Choose Print Settings from the pop-up menu and select the following settings as necessary: Select your Media Type (see page 11) Select Color or Grayscale Select higher quality or faster printing (if available) Select Automatic mode Note: In certain programs, you may need to select Advanced before you can select Print Settings.
spr280_qg.book Page 11 Monday, June 4, 2007 2:20 PM 10. To monitor the progress of your print job, click the appears in the dock on the bottom of your desktop. printer icon when it If you’re using OS X 10.2.x, click the Print Center icon instead, then double-click Stylus Photo R280 in the Printer List window. Pause or resume printing Cancel printing Select the print job 11. When you’re finished, close the printer window or Print Center.
spr280_qg.
spr280_qg.book Page 13 Monday, June 4, 2007 2:20 PM Printing on CDs and DVDs Your printer includes a special tray that lets you print customized text, graphics, and photos directly on an ink jet-printable CD or DVD. The Epson Print CD software makes it easy to import your own photos, add text, and modify your designs with a variety of special effects. For detailed instructions on printing, see the on-screen User’s Guide. You can print on both regular 12-cm and 8-cm mini CDs and DVDs.
spr280_qg.book Page 14 Monday, June 4, 2007 2:20 PM To print on a small CD or DVD (8-cm), place the small CD/DVD adapter on the tray first, then place the CD or DVD inside the adapter. Caution: Make sure you always use the small CD/DVD adapter when you print on 8-cm CDs or DVDs and that the CD or DVD and adapter lie flat on the tray; otherwise the printer may be damaged. 12-cm CD/DVD 8-cm CD/DVD Always use this piece with 8-cm CDs or DVDs 5.
spr280_qg.book Page 15 Monday, June 4, 2007 2:20 PM Maintaining Your Printer Follow the instructions in this chapter for checking and cleaning the print head nozzles and replacing ink cartridges. Tip: To keep your Epson product looking like new, make sure you don’t place anything on top of the cover or use it as a writing surface. If you need to clean the cover, use only a soft, nonabrasive microfiber-type cloth.
spr280_qg.book Page 16 Monday, June 4, 2007 2:20 PM Cleaning the Print Head If print quality has declined and the nozzle check pattern indicates clogged nozzles, you can clean the print head. Note: Print head cleaning uses ink, so clean it only if necessary. If the red H ink light comes on or flashes, you cannot clean the print head. In this case, replace the appropriate ink cartridge first (see page 18). 1. Make sure the printer is on and the H ink light is off. 2.
spr280_qg.book Page 17 Monday, June 4, 2007 2:20 PM Checking the Ink Cartridge Status When the red H ink light starts flashing, one or more cartridges are low on ink and will need to be replaced soon. When the red H ink light stays on, you need to replace the cartridge(s). You can also check the ink level using Status Monitor (see the on-screen User’s Guide). Caution: You cannot print when an ink cartridge is expended, even if other cartridges are not expended.
spr280_qg.book Page 18 Monday, June 4, 2007 2:20 PM Note: Try the High Capacity 77 cartridges available at http://www.epson.com/highcapacity (U.S. sales) or http://www.epson.ca (Canadian sales), or the 77 color multipack at your local reseller. You may use any combination of cartridge sizes. (If you’ve installed a 78 black cartridge, you can still use a 77 magenta cartridge, for example.) We recommend that you use genuine Epson cartridges and do not refill them.
spr280_qg.book Page 19 Monday, June 4, 2007 2:20 PM Caution: Do not move the print head by hand; this may damage your printer. Always press and release the H ink button to move it. Be careful not to touch the white flat cable inside the printer. 5. Press the H ink button again. ■ If another cartridge is low or expended, it moves to the _ position. Press the H ink button again to see if any more cartridges are low or expended.
spr280_qg.book Page 20 Monday, June 4, 2007 2:20 PM 7. Remove the new ink cartridge from the package. Caution: Be careful not to break the hooks on the front of the ink cartridge when you remove it from the package. Do not touch the green chip on the front of the cartridge. This can damage the ink cartridge. Always install an ink cartridge immediately after removing the old cartridge. If the cartridge is not installed promptly, the print head may dry out and be unable to print. 8.
spr280_qg.book Page 21 Monday, June 4, 2007 2:20 PM 10. Insert the new ink cartridge into the holder and push it down until it clicks into place. 11. Once you replace all the cartridges that need replacing, close the cartridge cover and push it down until it clicks into place. 12. Close the printer cover. 13. Press the H ink button to begin charging the ink. This takes about one and a half minutes. When it’s finished, the P power light stops flashing and remains on, and the H ink light goes out.
spr280_qg.book Page 22 Monday, June 4, 2007 2:20 PM Solving Problems If you have a problem with your printer, check the lights on the control panel to diagnose the cause. You can also check “Problems and Solutions” on page 23 for basic troubleshooting suggestions, or see your on-screen User’s Guide for more detailed help. Checking for Software Updates Periodically, it’s a good idea to check Epson’s support website for free updates to your Epson Stylus Photo R280 Series software.
spr280_qg.book Page 23 Monday, June 4, 2007 2:20 PM Lights Explanation Red ) paper out light and green P power light flash If you’re printing on paper, it is jammed in the printer. Press the ) paper button to eject the paper. If that doesn’t work, turn off the printer, open the cover, and pull the paper out from the front, including any torn pieces. Then turn on the printer, reload paper, and press the ) paper button. If you’re printing on a CD or DVD, the CD/DVD tray has not ejected.
spr280_qg.book Page 24 Monday, June 4, 2007 2:20 PM Paper Feeding Problems ■ ■ ■ ■ If paper doesn’t feed, remove it from the sheet feeder. Flip through the stack to separate the sheets a little. Then reload the paper against the right side, and slide the edge guide against the paper (but not too tightly). Do not load too many sheets at once—up to 20 sheets of photo paper and 120 sheets of plain paper. Load other special papers one sheet at a time.
spr280_qg.book Page 25 Monday, June 4, 2007 2:20 PM Where To Get Help Epson Technical Support Internet Support Visit Epson’s support website at epson.com/support and select your product for solutions to common problems. You can download drivers and documentation, get FAQs and troubleshooting advice, or e-mail Epson with your questions.
spr280_qg.book Page 26 Monday, June 4, 2007 2:20 PM Notices Important Safety Instructions Before using your Epson Stylus Photo R280 Series, read and follow these safety instructions: ■ Be sure to follow all warnings and instructions marked on the R280 Series. ■ Use only the type of power source indicated on the R280 Series label. ■ Use only the power cord that comes with the R280 Series. Use of another cord may cause fires or shock. Do not use the cord with any other equipment.
spr280_qg.book Page 27 Monday, June 4, 2007 2:20 PM Ink Cartridge Safety Instructions ■ Keep ink cartridges out of the reach of children and do not drink the ink. ■ Be careful when you handle used ink cartridges; there may be ink remaining around the ink supply port. If ink gets on your skin, wash it off with soap and water. If it gets in your eyes, flush them immediately with water. ■ Do not put your hand inside the R280 Series or touch any cartridges during printing.
spr280_qg.book Page 28 Monday, June 4, 2007 2:20 PM FCC Compliance Statement For United States Users This equipment has been tested and found to comply with the limits for a Class B digital device, pursuant to Part 15 of the FCC Rules. These limits are designed to provide reasonable protection against harmful interference in a residential installation.
spr280_qg.book Page 29 Monday, June 4, 2007 2:20 PM Epson America, Inc., Limited Warranty What Is Covered: Epson America, Inc. (“Epson”) warrants to the original retail purchaser that the Epson printer covered by this limited warranty statement, if purchased and operated only in the United States or Canada, will be free from defects in workmanship and materials for a period of one (1) year from the date of original purchase. For warranty service, you must provide proof of the date of original purchase.
spr280_qg.book Page 30 Monday, June 4, 2007 2:20 PM abuse, improper installation, neglect, improper shipping, damage caused by disasters such as fire, flood, and lightning, improper electrical current, software problems, interaction with non-Epson products, or service other than by an Epson Authorized Servicer. If a claimed defect cannot be identified or reproduced, you will be held responsible for the costs incurred.
spr280_qg.book Page 31 Monday, June 4, 2007 2:20 PM Copyright Notice All rights reserved. No part of this publication may be reproduced, stored in a retrieval system, or transmitted in any form or by any means, electronic, mechanical, photocopying, recording, or otherwise, without the prior written permission of Seiko Epson Corporation. The information contained herein is designed only for use with this Epson product. Epson is not responsible for any use of this information as applied to other equipment.
spr280_qg.book Page 32 Monday, June 4, 2007 2:20 PM CPD-23763 Printed in XXXXXX XX.