Printer Basics
Copyright Notice All rights reserved. No part of this publication may be reproduced, stored in a retrieval system, or transmitted in any form or by any means, electronic, mechanical, photocopying, recording, or otherwise, without the prior written permission of Seiko Epson Corporation. The information contained herein is designed only for use with this Epson product. Epson is not responsible for any use of this information as applied to other equipment.
Contents Introduction . . . . . . . . . . . . . . . . . . . . . . . . . . . . . . . . . . . . . . . . . . . 5 Using the Printer’s Control Panel . . . . . . . . . . . . . . . . . . . . . . . . . . . . . . . 6 Loading Paper . . . . . . . . . . . . . . . . . . . . . . . . . . . . . . . . . . . . . . . . . 7 Using Special Papers . . . . . . . . . . . . . . . . . . . . . . . . . . . . . . . . . . . . . . . 10 Printing From a Memory Card . . . . . . . . . . . . . . . . . . . . . . . . . .
Maintaining Your Printer . . . . . . . . . . . . . . . . . . . . . . . . . . . . . . 48 Checking the Print Head Nozzles . . . . . . . . . . . . . . . . . . . . . . . . . . . . . . Cleaning the Print Head . . . . . . . . . . . . . . . . . . . . . . . . . . . . . . . . . . . . Aligning the Print Head . . . . . . . . . . . . . . . . . . . . . . . . . . . . . . . . . . . . . Replacing Ink Cartridges . . . . . . . . . . . . . . . . . . . . . . . . . . . . . . . . . . . . 48 49 50 51 Solving Problems . . . . .
Introduction After you have set up your Epson Stylus® Photo R380 as described on the Start Here sheet, turn here to: ■ Load paper ■ Print photos stored on a memory card ■ Print photos directly from your camera or mobile phone ■ Print on CDs or DVDs ■ Print a basic document or photo from your computer ■ Backup your photos ■ Perform routine maintenance ■ Solve simple problems This book tells you how to do most of these things without ever turning on your computer! Of course your printer can do
Using the Printer’s Control Panel View and print photos and videos on card Print on CD/DVDs Display 1 to 16 photos; crop or zoom a photo Check ink status; maintain the printer; adjust CD/DVD print position; backup photos; restore defaults; make PictBridge® or Bluetooth® settings Stop printing; cancel settings To save energy, the screen goes dark after the printer has been idle for a while. You also see the Mode lights flash back and forth. Press any button to reactivate the printer.
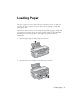
Loading Paper The type of paper you choose affects the way your printout looks, so make sure you select the correct paper for your job. If you are just printing a rough draft, plain paper is fine. However, for the best results, use one of Epson’s special ink jet papers designed for your printer. For example, photos look great printed on Epson® Ultra Premium Photo Paper Glossy. See page 10 for a list of Epson papers and ordering information. 1. Open the paper support, then pull up the extension. 2.
Note: Make sure the front tray is in the paper (lower) position. If it is not, push in the front tray extensions and lift up the tray lever to reposition the front tray. Then slide out the front tray extensions. 3. Slide the left edge guide to the left. 4. Insert the paper, printable side up, against the right edge behind the tab. You can load up to 120 sheets of plain paper or up to 20 sheets of photo paper. Make sure the paper stack fits under the arrow inside the left edge guide.
5. Slide the left edge guide against the left edge of the paper (but not too tightly). 4 × 6-inch, 5 × 7-inch Letter-size, 8 × 10-inch For additional information and instructions on loading envelopes, see your on-screen User’s Guide.
Using Special Papers You can purchase genuine Epson ink and paper from an authorized Epson reseller. To find the nearest reseller, call 800-GO-EPSON (800-463-7766). Or you can also purchase online at www.epsonstore.com (U.S. sales) or www.epson.ca (Canadian sales). Paper name* Size Part number Epson Ultra Premium Photo Paper Glossy Borderless 4 × 6 inches S041934 Letter (8.
Paper name* Size Part number Epson Presentation Paper Matte Letter (8.5 × 11 inches) S041062 Epson Iron-on Cool Peel Transfer paper Letter (8.5 × 11 inches) S041153 Epson Photo Quality Self Adhesive Sheets A4 (8.3 × 11.7 inches) S041106 Epson Ultra Premium Photo Paper Luster Letter (8.5 × 11 inches) S041405 Epson Photo Quality Ink Jet Paper Epson Premium Luster Photo Paper * The availability of paper types and sizes varies by location.
Printing From a Memory Card The R380 lets you print color photos directly from your digital camera’s memory card; just insert it into one of the memory card slots on the printer and you’re ready to print. You can follow the same steps to print from a USB flash drive. The color and lighting in your images are automatically corrected.
Compatible Cards and Image Formats You can use the following types of cards with your printer: Slot Type of card Top slot xD-Picture Card™ xD-Picture Card Type M xD-Picture Card Type H MagicGate™ Memory Stick MagicGate Memory Stick Duo* Memory Stick™ Memory Stick Duo™* Memory Stick PRO™ Memory Stick PRO Duo™* Top slot MultiMediaCard SD™ Card SDHC Card miniSD™ Card* miniSDHC Card* microSD Card* microSDHC Card* Bottom slot Bottom slot CompactFlash® Microdrive™ * Adapter required The printer supports
Inserting the Card 1. Make sure the printer is turned on. 2. Open the memory card cover. Caution: If your card requires an adapter, make sure you insert it into the adapter before you insert it in the slot. Otherwise, the card may get stuck in the slot. Do not insert more than one card at a time, and do not force the card into the slot. 3. Make sure the memory card access light is off and that no cards are in any of the slots, then insert your card into the correct slot. See page 13 for details.
Caution: Do not remove the card or turn off the printer while the memory card access light is flashing; you may lose data on the card. If your printer is connected to a computer running Windows 2000 or XP, never turn off the printer or unplug the USB cable when the memory card light is flashing; you may lose data on the card. On a Macintosh, always drag the memory card icon on the desktop into the trash to eject the card before you turn off the printer or unplug the USB cable.
Viewing Photos You can view each photo individually, play a slide show of your photos, or display sixteen photos at once. First, insert your memory card or USB flash drive as described above. 1. Press the Memory Card mode button. 2. Press l or r to select View and Print, then press OK. You see your first photo, with information as shown: ■ To view the photo only, without the information, press the Display/Crop button twice. ■ To view 16 photos at a time, press the Display/Crop button again. 3.
4. Repeat steps 2 and 3 for each photo you want to print. 5. Press the Print Settings button and choose your print settings (see page 21). If you loaded 4 × 6 Premium Photo Paper Glossy, skip to step 7. 6. Press OK to confirm your print settings and selections. 7. Make sure you have paper loaded, then press x Start to print your photos. Note: If you need to cancel printing, press the y Stop/Clear Settings button.
Printing Photos from Specific Dates The Print by Date option lets you print all the photos on your memory card that were taken on a specific date. Before you start, make sure you press the Memory Card mode button. 1. Press l or r to choose Print by Date, then press OK to display a list of dates. 2. Press u or d to highlight a date, then press r to select it. A checkmark appears in the box for the date you selected. If you want to cancel your selection, press r again. 3.
4. Press l or r to choose Print Proof Sheet, then press OK. 5. Press the Print Settings button and choose your print settings (see page 21), then press OK. 6. Press the x Start button to print the proof sheet(s). This may take a few minutes. For multiple proof sheets, the pages containing the oldest images are printed first. If you need to cancel printing more sheets, press the y Stop/Clear Settings button.
Note: Depending on the movie resolution and the transfer rate of your memory card or storage device, the video may not play smoothly. 8. While the movie is playing, do one of the following: ■ Print 1 frame: When you see the scene you want to print, press OK. ■ Print N frames: When you see the first scene in the range you want to print, press OK to select it. When you see the last scene in the range you want to print, press OK again.
3. Press OK to print DPOF data. You see this screen: 4. Press the Print Settings button and select settings as necessary. See page 21 for instructions. 5. Press the x Start button to print. Note: If you need to cancel printing, press the y Stop/Clear Settings button. Choosing Print Settings After choosing the photos you want to print (see page 16), make sure you choose the appropriate settings for your paper type, size, and print layout, as described below. 1. Press the Print Settings button. 2.
4. Press d to highlight Paper Size, then press r to display a list of sizes. 5. Press u or d to choose your paper size, then press OK. 6. Press d to highlight Layout. 7. Press u or d to select one of the following layout options, then press OK. Borderless Prints one photo per sheet, borderless; rotates the photo to fit on the paper as necessary. Border Prints one photo per sheet with borders around the edges; rotates the photo to fit the paper as necessary.
9. Press u or d to highlight the settings shown in the following table, then press r to display the list of options. Press u or d to select the option you want, then press OK. Setting Description Filter Select Sepia to print your photo in a brown tone for an old-fashioned look. Select B&W to print your photo in black and white. Enhance Select PhotoEnhance to automatically adjust the brightness, contrast, and saturation of your photos. Select P.I.M.
Touching Up Your Photos Your printer lets you correct the color and improve your photos without using a computer. PhotoEnhance automatically corrects under- or over-exposure, enhances skin tones, and sharpens scenery. For example, if the subject of your photo is too dark because of a bright background (backlighting), PhotoEnhance™ can adjust the lighting so that the person’s face is brighter in the printout.
3. Select from these options, then press OK: ■ PhotoEnhance: Adjusts the brightness, contrast, and saturation of your photos. For example, if you have a photo with a subject that is too dark because of a bright background (backlighting), PhotoEnhance might be able to improve the brightness levels so that the person’s face is brighter in the printout. (The PhotoEnhance face lighting adjustment works best when faces take up a significant portion of the photo with both eyes visible.) ■ P.I.M.
Note: These settings remain in effect until you change them. To reset all settings to the defaults, see page 27. 4. Press OK again, then press the x Start button to print your photo or photos. Cropping Your Photos Your printer lets you decide how your photos fit on the page with cropping, expansion for borderless prints, and fit to frame. Cropping You can use the Display/Crop button to select only the part of the photo you want to print.
Borderless Expansion When you print borderless photos, your image is slightly expanded and cropped to fill the sheet of paper. If too much of your photo edges are cut off, you can adjust the expansion setting as described below. 1. Press the Print Settings button. 2. Press u to choose Expansion, then press r. 3. If too much of your photo edges are cut off, select Mid, or Min (least expansion). If you see a white edge on your photo, select Standard. 4. Press OK to save your setting.
Printing From a Camera or Phone You can print your photos directly from a digital camera, mobile phone, or other portable device. ■ If your camera or mobile phone is PictBridge- or USB DIRECT-PRINT™compatible, you can connect it directly to your printer and print your photos. ■ If your mobile phone, PDA, or other device supports infrared transmission, you can send your photos to the printer and print them wirelessly.
6. Connect the USB cable that came with your camera or phone to the external device USB (EXT. I/F) port on the front of your printer. Then connect the other end to the port on your camera or phone. 7. Turn on your camera or phone. One of the following messages is displayed on the LCD screen: 8. Use your camera or phone to select the photos you want to print, adjust any necessary settings, and print your photos. See your camera’s or phone’s manual for details.
Printing From a Mobile Phone If your mobile phone or PDA has a camera and an infrared port, you can send your photos to the printer and print them directly from your phone or PDA. 1. Make sure the printer is not printing. 2. Load the type of paper you want to use (see page 7). 3. Press Setup to enter the Setup menu. 4. Press l or r to select PictBridge Settings, then press OK. 5. Press l or r to select your print settings, as described on page 21. 6. After you select the settings you want, press OK.
Printing on CDs and DVDs Your printer includes a special tray that lets you print your photos directly on ink jet-printable CDs or DVDs—without using a computer. You can also use the Epson Print CD software that came with your printer to add text and modify your designs with a variety of special effects. For instructions on using Epson Print CD on your computer, see your on-screen User’s Guide. Caution: Use only ink jet-printable CDs or DVDs for printing.
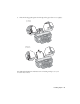
Inserting a CD or DVD Make sure the data, music, or video is burned on your ink jet-printable CDs or DVDs before you print. Otherwise, dirt or scratches on the surface may cause errors when you burn the data. If you plan to print large numbers of CDs or DVDs, it’s a good idea to print a small sample, then wait a day and check the quality to make sure it is satisfactory. Caution: Make sure you insert the tray correctly, or you may damage the printer or tray. 1. Turn on the printer and open the front cover.
3. Place the CD or DVD on the CD tray with the white or printable side face-up. Make sure the disc lies flat on the tray. 4. Insert the CD tray carefully between the guides on the front tray. 5. Slide the CD tray in until the arrows on the trays are aligned. Don’t push in the tray too far; line up the arrows exactly. 6. Follow the instructions in the next section to print photos on your CD or DVD from your memory card.
Printing Memory Card Photos on a CD or DVD 1. Insert a CD or DVD for printing, as described on page 32. 2. Press the Print CD/DVD mode button. 3. Press the Print Settings button. Press d or u to select the following: ■ Media Type: make sure CD/DVD is selected. ■ Paper Type: make sure CD/DVD is selected. ■ Paper Size: make sure CD/DVD is selected. ■ Layout: choose from the following layouts: 1-up One photo is centered on the CD/DVD.
6. Press x Start to print on your CD or DVD. Note: If you need to cancel printing, press the y Stop/Clear Settings button. 7. When you are finished printing, remove the CD/DVD tray from the printer. To return the output tray to the paper position, see page 36. Note: After you print, handle the CD or DVD carefully. To allow the ink to dry fully, wait at least 24 hours before playing the disc or inserting it in a drive. Keep printed discs away from moisture and direct sunlight.
Returning the Output Tray to the Paper Position 1. Pull up the lever to lower the output tray to the paper position. 2. Pull out the front tray extensions.
Printing a Jewel Case Insert You can print a photo or an index of photos and have it automatically formatted with lines for cutting and folding to fit a CD or DVD jewel case. If you choose to print an index, up to 24 photos will be printed on the insert. If you select more than 24 photos, multiple inserts will be printed. First, make sure you load letter-size paper, remove the CD/DVD tray, and return the front tray to the paper position as described above. 1. Press the Print CD/DVD mode button. 2.
Printing From Your Computer This section describes the basic steps for printing a photo or document stored on your Windows or Macintosh computer. Note: For detailed instructions on printing, see the on-screen User’s Guide. Before you start, make sure you’ve installed your printer software and connected the printer to your computer as described on the Start Here sheet. Be sure to load the right paper and select the correct paper type setting in the printer driver. (See page 44 for more information.
4. Make sure EPSON Stylus Photo R380 Series is selected, then click the Preferences or Properties button. (If you see a Setup, Printer, or Options button, click it. Then click Preferences or Properties on the next screen.) 5.
6. For more printing options, click the Advanced button. Then select the following settings as necessary: Select a color management method (To choose No Color Adjustment, click ICM first) Select Paper & Quality Options as necessary Select Print Options as necessary Click here if you want to see this Advanced screen each time you access your print settings Note: For the highest quality on selected papers, you can select Photo RPM (5760 × 1440) from the quality option pop-up menu (as shown above).
8. Click OK to save your settings, then click OK or Print to start printing. This window appears and shows the progress of your print job. Click to pause or resume printing Click to cancel printing Click to buy ink Printing From a Macintosh If you’re using a Mac OS® X-compatible application, follow the steps below to print. 1. Load paper (see page 7). 2. Open the photo or document in your application. 3. Open the File menu and select Page Setup.
5. Open the File menu and select Print. You see a window like this one: Select Stylus Photo R380 Select Print Settings 6. Choose Print Settings from the pop-up menu and select the following settings as necessary: Select your Media Type (see page 44) Select Color or Grayscale Select higher quality or faster printing (if available) Select Automatic mode Note: For more information about printer settings, click the ? button. 7.
■ Cover Page (Mac OS X 10.4.x only): print a cover page before or after your document. ■ ColorSync or Color Management: select ColorSync® or adjust the color controls, change the gamma setting, or turn off color adjustments in the printer software. ■ Expansion: reduce or enlarge the image size for borderless printing. ■ Summary: view a list of all your selections. 8. Click the Advanced button to change additional settings.
You see a screen like this: Pause printing Resume printing Cancel printing Select the print job 11. When you’re finished, close the printer window or Print Center. Selecting the Correct Paper Type Select the correct Type (see page 39) or Media Type (see page 42) setting in your printer software: For this paper . . . Plain paper Epson Bright White Paper Select this Type or Media Type setting . . .
Select this Type or Media Type setting . . . For this paper . . .
Backing Up Your Photos You can back up photo files on your memory card to a computer or to an external USB device, such as a flash memory (thumb) drive. Once your files are backed up, you can use your camera to delete them from the card and take more pictures. For instructions on copying photos to your computer, see the on-screen User’s Guide. To save your files to a USB flash drive or other device, such as an external CD-R/RW drive or Iomega® Zip® drive.
4. Press the Setup button. 5. Press l or r to select Backup Memory Card, then press OK. Press OK again to display the message shown below on the right: 6. Press OK to confirm, then press OK again to begin copying your files. All the photos on your memory card are copied to your connected storage device. Depending on how many photos there are, this may take several minutes. You can back up multiple times to the same drive, disk, or CD until it is full.
Maintaining Your Printer If you notice a decline in print quality or your ink is expended, follow the instructions in this chapter for: ■ “Checking the Print Head Nozzles” (see below) ■ “Cleaning the Print Head” on page 49 ■ “Aligning the Print Head” on page 50 ■ “Replacing Ink Cartridges” on page 51 Checking the Print Head Nozzles If your printouts are faint or have light or dark band running through them, some of the nozzles in the print head may be clogged.
7. If there are no gaps in the pattern, the print head doesn’t need to be cleaned. Press OK to return to the Maintenance menu. If there are gaps in the pattern, clean the print head as described below. Note: You can also check the nozzles with software when connected to a computer; see your on-screen User’s Guide for details. Cleaning the Print Head If your printouts are unexpectedly light or faint, or you notice light or dark bands across your printout, you may need to clean the print head.
8. If there are no gaps in the pattern, press OK to return to the Maintenance menu. If there are gaps in the pattern, press x Start to clean the print head again. If you don’t see any improvement after cleaning four or five times, see page 57. You can also turn the printer off and wait at least 6 hours or overnight. This lets any dried ink soften. Then try cleaning the print head again.
7. Look at pattern #1 and find the square that is most even, with no noticeable streaks or lines. 8. Press r, then press u or d to select the number for that square. 9. Press OK. 10. Press d to select the next pattern, then repeat steps 7 through 9. 11. When you are done, press OK. Replacing Ink Cartridges When you print with low or expended ink cartridges, you see a message on the LCD screen. You can check which cartridge is low or needs to be replaced.
Purchasing Ink Cartridges Epson offers two different capacity cartridges for each color in your printer. Use these Epson ink cartridges within six months of installing them and before the expiration date on the package.
Removing and Installing Ink Cartridges Be sure you have a new ink cartridge before you begin. Once you start replacing a cartridge, you must complete all the steps in one session. Caution: Do not open ink cartridge packages until you are ready to install the ink. Cartridges are vacuum packed to maintain reliability. Leave the expended cartridge installed until you have obtained a replacement, or the ink remaining in the print head nozzles may dry out.
4. Squeeze the tab at the back of the cartridge and lift it straight out. Dispose of it carefully. Do not take the used cartridge apart or try to refill it. Warning: If ink gets on your hands, wash them thoroughly with soap and water. If ink gets into your eyes, flush them immediately with water. If discomfort or vision problems continue after a thorough flushing, see a doctor immediately. 5. Remove the new ink cartridge from the package.
6. Remove the yellow tape from the bottom of the ink cartridge. Caution: You must remove the yellow tape from the cartridge before you install it; otherwise, print quality may decline or you may not be able to print. If you have installed an ink cartridge without removing the yellow tape, take the cartridge out of the printer, remove the yellow tape, and then reinstall it. Do not remove the transparent seal from the bottom of the cartridge; otherwise, the cartridge may become unusable.
9. Close the ink cartridge cover and press it until it clicks into place. 10. Close the printer cover, then press the OK button. The printer begins charging ink. This takes about one minute. Caution: Never turn off the printer while ink is charging or you’ll waste ink. Note: You cannot continue printing with one ink cartridge expended, even if the other cartridges still contain ink. Before printing, replace the expended cartridge.
Solving Problems You can diagnose and solve most problems by checking the messages on the LCD screen and trying the recommended solutions. You can also check “Problems and Solutions” on page 59 for basic troubleshooting suggestions, or double-click the User’s Guide icon on your computer desktop for more detailed help.
Message Solution Data error. The document cannot be printed. See the documentation for the device transmitting the data. This error occurs when the transmitting device does not send data properly. Cannot recognize the device. Make sure you’ve inserted your memory card correctly. If you connected a USB storage device, make sure you’ve inserted the disk correctly. Cannot recognize the memory card or disk. Make sure you’ve inserted the memory card or storage disk correctly.
Problems and Solutions Check the solutions below if you’re having trouble using your printer. Noise Problems ■ The first time you install ink cartridges, the printer must charge its print head for about 2 minutes. Wait until charging finishes (when you see the message “Initialization is complete”) before you turn off the printer, or it may charge improperly and use excess ink the next time you turn it on.
Paper Feeding Problems ■ If paper doesn’t feed, remove it from the sheet feeder. Flip through the stack to separate the sheets a little. Then reload the paper against the right edge, and slide the left edge guide against the paper (but not too tightly). ■ Do not load too many sheets at once (up to 20 sheets of photo paper or 120 sheets of plain paper). See your User’s Guide for more information. ■ If paper is jammed, follow these steps to clear the jam: 1.
Print Quality Problems If you have any problems with the copy or print quality, try these solutions: ■ Make sure the printer is not tilted or placed on an uneven surface. ■ Load the paper printable side up (usually the whiter, brighter, or glossy side). ■ Make sure your paper isn’t damp or curled. ■ Use a support sheet with special paper or load your paper one sheet at a time. Remove sheets from the output tray as they are printed.
Where To Get Help Epson Technical Support Epson provides these technical support services: Internet Support Visit Epson’s support website at http://support.epson.com and select your product for solutions to common problems. You can download drivers and documentation, get FAQs and troubleshooting advice, or e-mail Epson with your questions.
Notices Important Safety Instructions Before using your printer, read and follow these safety instructions: ■ Be sure to follow all warnings and instructions marked on the printer. ■ Use only the type of power source indicated on the printer label. ■ Use only the power cord that comes with the printer. Use of another cord may cause fires or shock. Do not use the cord with any other equipment. ■ Place the printer near a wall outlet where the plug can be easily unplugged.
Ink Cartridge Safety Instructions ■ Keep ink cartridges out of the reach of children and do not drink the ink. ■ Be careful when you handle used ink cartridges; there may be ink remaining around the ink supply port. If ink gets on your skin, wash it off with soap and water. If it gets in your eyes, flush them immediately with water. ■ Do not put your hand inside the printer or touch any cartridges during printing. ■ Install a new ink cartridge immediately after removing an empty one.
FCC Compliance Statement For United States Users This equipment has been tested and found to comply with the limits for a Class B digital device, pursuant to Part 15 of the FCC Rules. These limits are designed to provide reasonable protection against harmful interference in a residential installation. This equipment generates, uses, and can radiate radio frequency energy and, if not installed and used in accordance with the instructions, may cause harmful interference to radio or television reception.
Declaration of Conformity According to 47CFR, Part 2 and 15 for: Class B Personal Computers and Peripherals; and/or CPU Boards and Power Supplies used with Class B Personal Computers: We: Located at: Epson America, Inc. MS 3-13 3840 Kilroy Airport Way Long Beach, CA 90806 Telephone: (562) 290-5254 Declare under sole responsibility that the product identified herein, complies with 47CFR Part 2 and 15 of the FCC rules as a Class B digital device.
Epson America, Inc., Limited Warranty What Is Covered: Epson America, Inc. (“Epson”) warrants to the original retail purchaser that the Epson printer covered by this limited warranty statement, if purchased and operated only in the United States or Canada, will be free from defects in workmanship and materials for a period of one (1) year from the date of original purchase. For warranty service, you must provide proof of the date of original purchase.
fail to be properly maintained or fail to function properly as a result of misuse, abuse, improper installation, neglect, improper shipping, damage caused by disasters such as fire, flood, and lightning, improper electrical current, software problems, interaction with nonEpson products, or service other than by an Epson Authorized Servicer. If a claimed defect cannot be identified or reproduced, you will be held responsible for the costs incurred.
Index A Accessories, 62 Adjusting photo quality, 24 to 26 Aligning print head, 50 to 51 All photos, printing, 17 ArcSoft PhotoImpression, 62 B Backing up photos, 46 to 47 Black & White, 25 Borderless expansion, 27 Brightness, 25 Buttons, 6 C Camera connecting to printer, 29 printing from, 28 to 29 Cancelling printing with a computer, 41, 44 without a computer, 17 Cartridges, replacing, 51 to 56 CD Jacket setting, 37 CD-R/RW drive, backing up photos, 46 to 47 CDs adjusting print density, 25 adjusting print
F M FCC statement, 65 File formats, 13 Fit to Frame, 27 Front tray CD/DVD position, 32 paper position, 36 Macintosh color management settings, 43 page layout settings, 41, 42 printing from, 41 to 44 Media Type setting, 44 to 45 Memory card compatibility, 13 inserting, 13 to 14 printing from, 12 to 27 Memory Card button, 6 Messages, errors, 57 to 58 Mobile phone, printing from, 28 to 30 Mode button, 6 H Help, Epson, 62 I Image formats, 13 Image quality problems, 61 Image quality settings, 25 Infrared pr
Photos adjusting quality, 24 to 26 backing up, 46 to 47 cropping, 26 to 27 printing, 12 to 27 printing all, 17 printing by date, 18 sizing, 26 to 27 storing, 11 viewing and printing, 16 to 17 PictBridge, 28 Premium photo papers, 10 Print head aligning, 50 to 51 cleaning, 49 to 50 Print quality problems, 61 Print settings, 21 to 26 Printing adjusting CD/DVD position, 35 all photos, 17 cancelling, 41, 44 from a camera, 28 to 29 from a memory card, 12 to 27 from a PDA, 30 in Windows, 38 to 41 on a Macintosh, 4
U Ultra Premium photo papers, 10 USB Device printing from, 15 USB device backing up photos, 46 to 47 V Viewing photos, 16 W Warranty, 67 to 68 Windows color management settings, 40 page layout settings, 39 Paper Type setting, 44 to 45 printing with, 38 to 41 Type setting, 39 Z Zip drive, backing up photos, 46 to 47 72 Index