
Basic Operation Guide Printer RX700


Table Of Contents
- Safety Instructions
- Using the Control Panel
- Basic Copying
- Copying on CD/DVD
- Printing Directly from a Memory Card - Basic Printing
- Printing Directly from a Memory Card - Printing Options
- Printing a Single Photo
- Printing Multiple Photos onto One Sheet
- Printing Enlarged Images
- Printing Photo Stickers
- Printing on CD/DVD
- Printing a CD Jacket
- Printing on EPSON Iron-On Cool Peel Transfer Paper
- Printing Using a Combo Printing Sheet
- Printing with DPOF Functions
- Printing with Photo Frames
- Changing Print Settings
- Printing from Film
- Scanning to a Memory Card
- Printing Directly from a Digital Camera
- Printing Directly from an External Device
- Replacing Ink Cartridges
- Maintenance and Transporting
- Troubleshooting
- Customer Support
- Product Specifications
- Summary of Panel Settings
- Index
Copying on CD/DVD 13
English
Copying on CD/DVD
Note:
❏ Use only CD/DVD media labelled as suitable for
printing, for example “Printable on the label surface”
or “Printable with ink jet printers”.
❏ The printed surface is easily smeared immediately
after printing.
❏ Be sure to let CD/DVD dry completely for more than
24 hours before using them or touching the printed
surface.
❏ Do not allow the printed CD/DVD to dry in direct
sunlight.
❏ Moisture on the printable surface may cause
smearing.
❏ If the CD/DVD tray or the inner transparent section
of the CD/DVD are accidentally printed on,
immediately wipe off the ink.
❏ Reprinting on the same CD/DVD may not improve
the print quality.
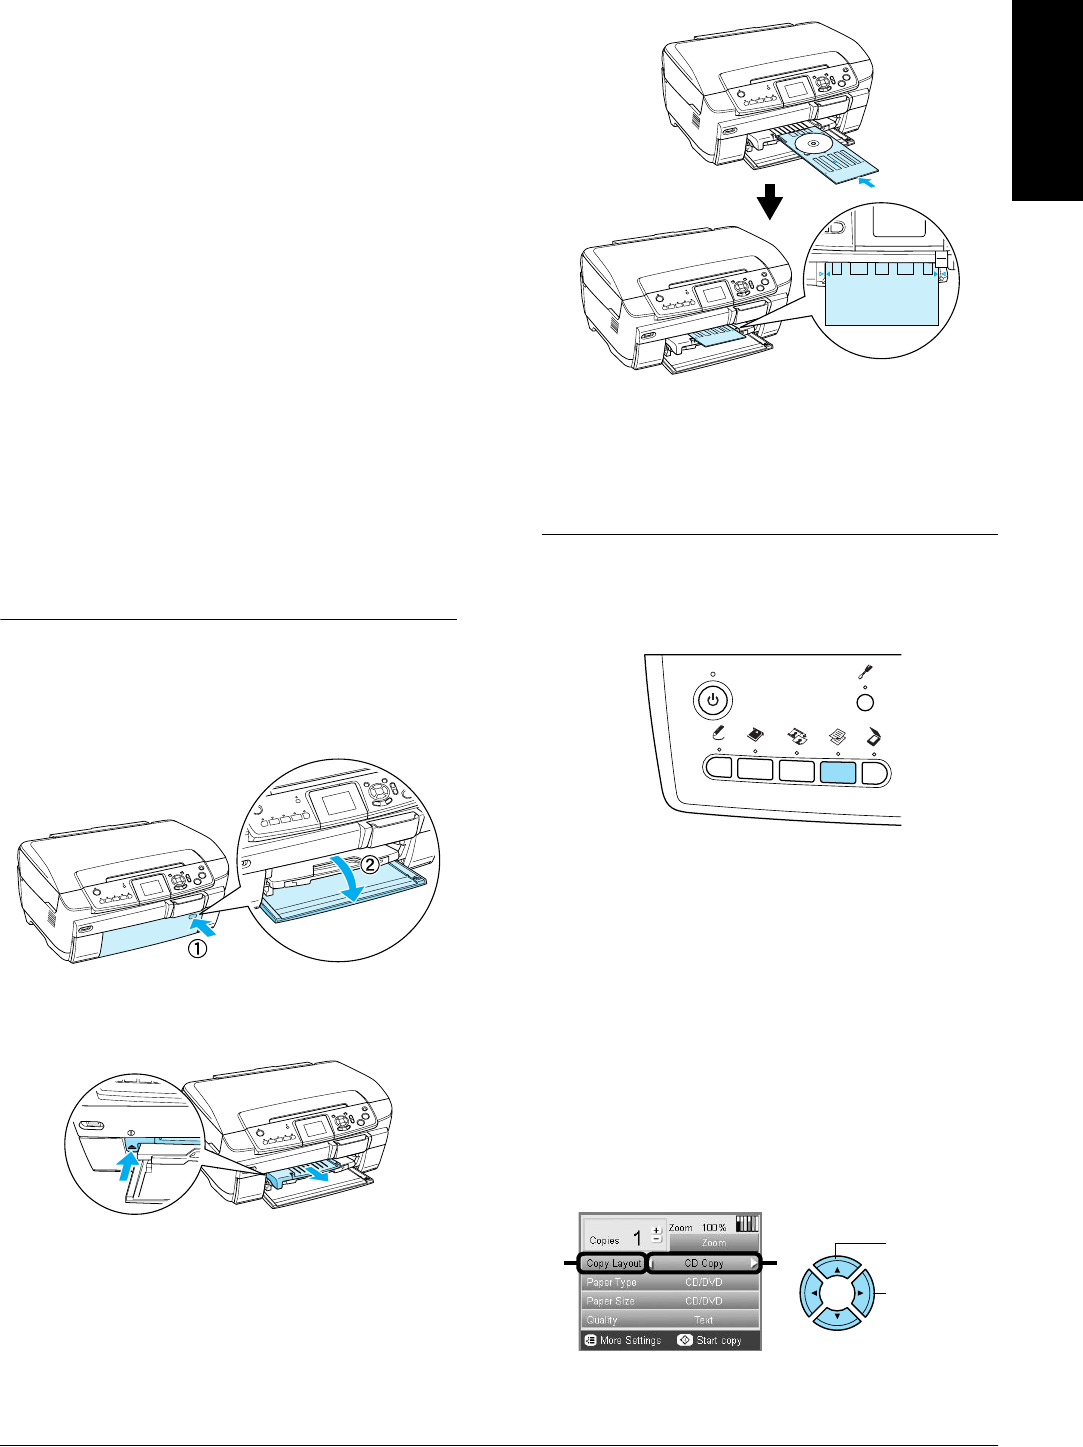
Loading a CD/DVD
1. Open the front cover by pressing the hollow
portion as illustrated.
2. Press 5 on the CD/DVD guide. The CD/DVD
guide slides out.
3. Place the CD/DVD on the CD/DVD tray with
the label surface up.
4. Insert the CD/DVD tray into the CD/DVD
guide.
Note:
Align the arrow mark on the CD/DVD tray with the
arrow mark on the CD/DVD guide.
Copying a CD/DVD
1. Press the Copy button.
2. Load the CD/DVD.
& See “Loading a CD/DVD” on page 13
3. Place the original document on the document
table.
& See “Placing a Photo or Document on the
Document Table” on page 7
Note:
The maximum square area in the center on the
document is scanned. When printing, the square area
is enlarged or reduced to CD/DVD size and trimmed
to doughnut shape.
4. Select Copy Layout and CD Copy.
5. Select Quality and the desired quality setting.
21
1. Select
Copy Layout.
2. Select CD
Copy.