Color Ink Jet Printer Color Ink Jet Printer Startup Guide Printed in Japan XX.
L R4C4860 Startup Guide COVER.FM 11/20/00 Rev. C A5 size Proof Sign-off: DAI K.A. Kobayashi T. Morita K. Nishi DAI K. Ramsey All rights reserved. No part of this publication may be reproduced, stored in a retrieval system, or transmitted in any form or by any means, electronic, mechanical, photocopying, recording, or otherwise, without the prior written permission of SEIKO EPSON CORPORATION. The information contained herein is designed only for use with this EPSON printer.
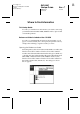
Proof Sign-off: DAI K.A. Kobayashi T. Morita K. Nishi DAI K. Ramsey R4C4860 Startup Guide FRONT.FM 11/20/00 Rev. C A5 size Where to Find Information This Startup Guide Provides you with the basic information you need to start using your EPSON STYLUS PRO 10000/10000CF and its optional and consumable products.
L R4C4860 Startup Guide FRONT.FM 11/20/00 Rev. C A5 size Proof Sign-off: DAI K.A. Kobayashi T. Morita K. Nishi DAI K. Ramsey Click View Reference Guide to open the guide. To install the Reference Guide on your hard disk, click Install Reference Guide and follow the on-screen instructions. When installation is complete, the ESPR10000/10000CF (Windows) or a View Reference Guide (Macintosh) icon appears in the EPSON folder. Double-click the icon to open the guide.
R4C4860 Startup Guide Proof Sign-off: DAI K.A. Kobayashi T. Morita K. Nishi DAI K. Ramsey FRONT.FM 11/20/00 Rev. C A5 size System Requirements To use your printer with a PC To use your printer, you need Microsoft® Windows® Millennium Edition, 98, 95, 2000, and NT® 4.0; and a shielded, twisted-pair parallel cable. If you want to connect your printer to a USB port, you need a Windows Me, 98, or 2000 pre-installed PC equipped with a USB port; and a shielded USB cable.
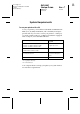
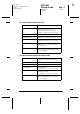
L R4C4860 Startup Guide FRONT.FM 11/20/00 Rev. C A5 size Proof Sign-off: DAI K.A. Kobayashi T. Morita K. Nishi DAI K. Ramsey To use your printer with a Macintosh To use this printer, your Apple® Macintosh® must meet the following system requirements. You also need a USB cable to connect this printer to Apple Macintosh computers. Minimum system Recommended system PowerPC PowerPC G4 400 MHz or higher processor System 7.6.1 Mac OS 8.
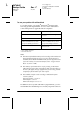
Proof Sign-off: DAI K.A. Kobayashi T. Morita K. Nishi DAI K. Ramsey R4C4860 Startup Guide FRONT.FM 11/20/00 Rev. C A5 size To use the Online Guide with a PC System Microsoft Windows 98, 95, 2000, or NT 4.0 CPU i486/25 MHz (for Windows 95/NT 4.
L R4C4860 Startup Guide FRONT.FM 11/20/00 vi Rev. C A5 size Proof Sign-off: DAI K.A. Kobayashi T. Morita K. Nishi DAI K.
Proof Sign-off: DAI K.A. Kobayashi T. Morita K. Nishi DAI K. Ramsey R4C4860 Startup Guide START.TOC 11/20/00 Rev. C A5 size Contents Safety Instructions Important Safety Instructions . . . . . . . . . . . . . . . . . . . . . . . . . . . . . 1 A Few Precautions. . . . . . . . . . . . . . . . . . . . . . . . . . . . . . . . . . . . . . . 2 For United Kingdom Users . . . . . . . . . . . . . . . . . . . . . . . . . . . . . . . 8 Use of options . . . . . . . . . . . . . . . . . . . . . . . . . . . . . . . . .
L R4C4860 Startup Guide START.TOC 11/20/00 Rev. C A5 size Proof Sign-off: DAI K.A. Kobayashi T. Morita K. Nishi DAI K. Ramsey Chapter 2 Setting up the Printer with Your PC Connecting the Printer to Your PC . . . . . . . . . . . . . . . . . . . . . . . . Using the built-in parallel interface . . . . . . . . . . . . . . . . . . . Using a USB connection (For Windows Me, 98, and 2000) . . . . . . . . . . . . . . . . . . . Installing the Printer Software on Your PC . . . . . . . . . . . . . . . . .
Proof Sign-off: DAI K.A. Kobayashi T. Morita K. Nishi DAI K. Ramsey R4C4860 Startup Guide START.TOC 11/20/00 Rev. C A5 size Chapter 5 Checking the Printer’s Condition Using Printer Utilities . . . . . . . . . . . . . . . . . . . . . . . . . . . . . . . . . . . . 5-2 Accessing the printer utilities . . . . . . . . . . . . . . . . . . . . . . . . . 5-2 Printing the Nozzle Check Pattern . . . . . . . . . . . . . . . . . . . . . . . . . 5-3 Cleaning the Print Heads . . . . . . . . . . . . . . . . . . . . . .
L R4C4860 Startup Guide START.TOC 11/20/00 x Rev. C A5 size Proof Sign-off: DAI K.A. Kobayashi T. Morita K. Nishi DAI K.
Proof Sign-off: DAI K.A. Kobayashi T. Morita K. Nishi DAI K. Ramsey R4C4860 Startup Guide SAFTY.FM 11/20/00 Rev. C A5 size Safety Instructions Important Safety Instructions Read all of these instructions before using your printer. Also be sure to follow all warnings and instructions marked on the printer. ❏ Do not block or cover the openings in the printer’s cabinet. ❏ Do not insert objects through the slots. Take care not to spill liquid on the printer.
L R4C4860 Startup Guide SAFTY.FM 11/20/00 Rev. C A5 size Proof Sign-off: DAI K.A. Kobayashi T. Morita K. Nishi DAI K. Ramsey ❏ Do not attempt to service the printer yourself. ❏ Unplug the printer and refer servicing to qualified service personnel under the following conditions: The power cord or plug is damaged; liquid has entered the printer; the printer has been dropped or the cabinet damaged; the printer does not operate normally or exhibits a distinct change in performance.
Proof Sign-off: DAI K.A. Kobayashi T. Morita K. Nishi DAI K. Ramsey R4C4860 Startup Guide SAFTY.FM 11/20/00 Rev. C A5 size ❏ Always turn the printer off using the Power button on the control panel. When this button is pressed, the Operate light flashes briefly then goes off. Do not unplug the printer or turn off the power to the outlet until the Operate light stops flashing. ❏ Before transporting the printer, make sure the print heads are in the home (far right) position.
L R4C4860 Startup Guide SAFTY.FM 11/20/00 Rev. C A5 size Proof Sign-off: DAI K.A. Kobayashi T. Morita K. Nishi DAI K. Ramsey ❏ Do not dismantle the ink cartridges or try to refill them. This could damage the print heads. ❏ Store ink cartridges in a cool, dark place. ❏ After bringing an ink cartridge inside from a cold storage site, allow it to warm up at room temperature for at least three hours before using it. ❏ Do not touch the green IC chip on the side of the cartridge.
Proof Sign-off: DAI K.A. Kobayashi T. Morita K. Nishi DAI K. Ramsey R4C4860 Startup Guide SAFTY.FM 11/20/00 Rev. C A5 size ❏ Keep the printer away from the dusty areas. ❏ Place the printer near a wall outlet where the plug can be easily unplugged. Note for French-speaking users: Placez l’imprimante près d’une prise de contacte où la fiche peut être débranchée facilement.
L R4C4860 Startup Guide SAFTY.FM 11/20/00 Rev. C A5 size Proof Sign-off: DAI K.A. Kobayashi T. Morita K. Nishi DAI K. Ramsey There is no possibility of danger from the laser, provided that the printer is operated according to the instructions in the guides provided. Since radiation emitted by the laser is completely confined within protective housings and external covers, the laser beam cannot escape from the machine during any phase of user operation.
Proof Sign-off: DAI K.A. Kobayashi T. Morita K. Nishi DAI K. Ramsey R4C4860 Startup Guide SAFTY.FM 11/20/00 Rev. C A5 size Laser safety labels Your printer is a Class 1 laser product as defined in the IEC 60825 specifications. The label shown below is attached in countries where required.
L R4C4860 Startup Guide SAFTY.FM 11/20/00 Rev. C A5 size Proof Sign-off: DAI K.A. Kobayashi T. Morita K. Nishi DAI K. Ramsey An additional laser warning label is affixed to the inside of the printer, as shown below. For United Kingdom Users Use of options EPSON (UK) Limited shall not be liable against any damages or problems arising from the use of any options or consumable products other than those designated as Original EPSON Products or EPSON Approved Products by EPSON (UK) Limited.
Proof Sign-off: DAI K.A. Kobayashi T. Morita K. Nishi DAI K. Ramsey R4C4860 Startup Guide SAFTY.FM 11/20/00 Rev. C A5 size Safety information w Warning: This appliance must be earthed. Refer to rating plate for voltage and check that the appliance voltage corresponds to the supply voltage.
L R4C4860 Startup Guide SAFTY.FM 11/20/00 Rev. C A5 size Proof Sign-off: DAI K.A. Kobayashi T. Morita K. Nishi DAI K. Ramsey Warnings, Cautions, and Notes w c Warnings must be followed carefully to avoid bodily injury. Cautions must be observed to avoid damage to your equipment. Notes contain important information and useful tips on the operation of your printer.
Proof Sign-off: DAI K.A. Kobayashi T. Morita K. Nishi DAI K. Ramsey R4C4860 Startup Guide Rev. C SAFTY.
L R4C4860 Startup Guide SAFTY.FM 11/20/00 12 Rev. C A5 size Taking a Look at Your Printer Proof Sign-off: DAI K.A. Kobayashi T. Morita K. Nishi DAI K.
Proof Sign-off: DAI K.A. Kobayashi T. Morita K. Nishi DAI K. Ramsey R4C4860 Startup Guide INST.FM 11/29/00 Rev. C A5 size Chapter 1 Installing the Ink Cartridges and Loading Paper Installing the ink cartridges . . . . . . . . . . . . . . . . . . . . . . . . . . . . . . . 1-2 Loading Paper . . . . . . . . . . . . . . . . . . . . . . . . . . . . . . . . . . . . . . . . . . 1-5 Loading roll paper . . . . . . . . . . . . . . . . . . . . . . . . . . . . . . . . . . 1-5 Loading cut sheet media . . . . . . . .
L R4C4860 Startup Guide INST.FM 11/29/00 Rev. C A5 size Proof Sign-off: DAI K.A. Kobayashi T. Morita K. Nishi DAI K. Ramsey Installing the ink cartridges To install the ink cartridges, follow the instructions below. w Warning: The ink cartridges are self-contained units. Under ordinary use, ink will not leak from the cartridges. If ink does get on your hands, wash them thoroughly with soap and water. If ink gets into your eyes, flush them immediately with water. 1.
Proof Sign-off: DAI K.A. Kobayashi T. Morita K. Nishi DAI K. Ramsey R4C4860 Startup Guide INST.FM 11/29/00 Rev. C A5 size 3. Put the attached label on the back of the ink compartment cover. 4. Push the top of the clamp, and pull it forward. 5. Remove the package from an ink cartridge. Note: If you use the ColorFast type ink cartridge, shake the cartridge gently before installing it.
L R4C4860 Startup Guide INST.FM 11/29/00 Rev. C A5 size Proof Sign-off: DAI K.A. Kobayashi T. Morita K. Nishi DAI K. Ramsey 6. Hold the ink cartridge with arrow mark on the left side and pointing to the rear of the printer, and insert it into the slot. Be sure to match the colors of the seal of compartment and the cartridge you are replacing. 7. Close the cartridge clamp backwards. Make sure the corresponding Ink Out light goes off. Repeat step 5 to 6 for the other five color ink cartridges. 8.
R4C4860 Startup Guide Proof Sign-off: DAI K.A. Kobayashi T. Morita K. Nishi DAI K. Ramsey INST.FM 11/29/00 Rev. C A5 size Loading Paper 1 Loading roll paper To load the roll paper onto the printer, follow the instructions below. 1. Slide the movable flange off the end of the spindle. 2. Place the roll paper on a flat surface so that it unwinds in the direction shown. Slide the roll paper onto the spindle and fully onto the fixed flange. 3.
L R4C4860 Startup Guide INST.FM 11/29/00 Rev. C A5 size Proof Sign-off: DAI K.A. Kobayashi T. Morita K. Nishi DAI K. Ramsey 4. Open the roll paper cover. Holding the spindle, fit the right end of the spindle into the mounting bracket inside the printer. Note: The spindle and mounting brackets are color-coded. Mount the spindle into the mounting bracket that is the same color as the end of the spindle. 5. Fit the left end of the spindle into the left mounting bracket inside the printer.
Proof Sign-off: DAI K.A. Kobayashi T. Morita K. Nishi DAI K. Ramsey R4C4860 Startup Guide INST.FM 11/29/00 Rev. C A5 size 6. Make sure that the printer is turned on, then repeatedly press the Paper Source button until the Roll Auto Cut light comes on. 7. Set the paper set lever to the released position. Note: For the position names of the paper set lever, see the attached instruction seal on the lever shown below.
L R4C4860 Startup Guide INST.FM 11/29/00 Rev. C A5 size Proof Sign-off: DAI K.A. Kobayashi T. Morita K. Nishi DAI K. Ramsey 8. Insert the paper into the paper insertion slot. 9. Pull the paper down through the paper insertion slot so that it comes out below.
Proof Sign-off: DAI K.A. Kobayashi T. Morita K. Nishi DAI K. Ramsey R4C4860 Startup Guide INST.FM 11/29/00 Rev. C A5 size 10. Holding the bottom edge of the paper, turn the roll paper to remove slack. Make sure that the bottom edge of the paper is straight, and that it is aligned with the rows of holes in the metal plate below the lower cover. 11. Set the paper set lever to the secured position, and close the roll paper cover.
L R4C4860 Startup Guide INST.FM 11/29/00 Rev. C A5 size Proof Sign-off: DAI K.A. Kobayashi T. Morita K. Nishi DAI K. Ramsey 12. Press the Pause button. The print heads move and the paper automatically feeds into the printing position. READY appears on the LCD panel. Note: Even if you do not press the Pause button, the print heads move and paper feeds into the printing position automatically. READY appears on the LCD panel. Now you are ready to print on roll paper.
Proof Sign-off: DAI K.A. Kobayashi T. Morita K. Nishi DAI K. Ramsey R4C4860 Startup Guide INST.FM 11/29/00 Rev. C A5 size Loading cut sheet media longer than 279 mm (long edge of letter size) To load cut sheet media longer than 279 mm, follow the steps below. c Caution: As much as possible, keep your fingers off the printable surface of the media, as fingerprints may reduce printout quality. 1. Make sure that the printer is on and the roll paper cover is closed. 2.
L R4C4860 Startup Guide INST.FM 11/29/00 Rev. C A5 size Proof Sign-off: DAI K.A. Kobayashi T. Morita K. Nishi DAI K. Ramsey 4. Load the sheet into the paper insertion so that it comes out below. Make sure that the right and bottom edges of the paper are straight and in line with the rows of punch holes. Set the paper set lever to the released position. PRESS PAUSE BUTTON appears. 5. Set the paper set lever to the secured position. PRESS PAUSE BUTTON appears on the LCD panel.
R4C4860 Startup Guide Proof Sign-off: DAI K.A. Kobayashi T. Morita K. Nishi DAI K. Ramsey INST.FM 11/29/00 Rev. C A5 size 6. Press the Pause button. The print heads move and the sheet feeds automatically into the printing position. READY appears on the LCD panel. Note: Even if you do not press the Pause button, the print heads move and paper feeds into the printing position automatically. READY appears on the LCD panel. Now you are ready to print on cut sheet media.
L R4C4860 Startup Guide INST.FM 11/29/00 Rev. C A5 size Proof Sign-off: DAI K.A. Kobayashi T. Morita K. Nishi DAI K. Ramsey 3. Make sure that the paper set lever is in the secured position. Then load the sheet into the paper insertion slot until it meets resistance. Make sure that the right edge of the paper is straight and in line with the right edge of the scale on the roll paper cover. PRESS PAUSE BUTTON appears on the LCD panel. 4. Press the Pause button.
Proof Sign-off: DAI K.A. Kobayashi T. Morita K. Nishi DAI K. Ramsey R4C4860 Startup Guide SETUP.FM 11/29/00 Rev. C A5 size Chapter 2 Setting up the Printer with Your PC 2 Connecting the Printer to Your PC . . . . . . . . . . . . . . . . . . . . . . . . . 2-2 Using the built-in parallel interface . . . . . . . . . . . . . . . . . . . . 2-2 Using a USB connection (For Windows Me, 98, and 2000) . . . . . . . . . . . . . . . . . . . . 2-3 Installing the Printer Software on Your PC . . . . . . . . . . . .
L R4C4860 Startup Guide SETUP.FM 11/29/00 Rev. C A5 size Proof Sign-off: DAI K.A. Kobayashi T. Morita K. Nishi DAI K. Ramsey Connecting the Printer to Your PC The method you use to connect the printer to your PC depends on how you want to send print jobs. If you want to send them directly, use the printer’s built-in parallel interface or the USB interface. If you want to send them over a network, use an optional interface card.
Proof Sign-off: DAI K.A. Kobayashi T. Morita K. Nishi DAI K. Ramsey R4C4860 Startup Guide SETUP.FM 11/29/00 Rev. C A5 size 3. Plug the other end of the cable into the computer’s parallel port. 2 See “Installing the Printer Software on Your PC” on page 2-4 for instructions on installing the printer software. You must install the printer software before using your printer. Using a USB connection (For Windows Me, 98, and 2000) To connect the printer to a USB port, you need a standard shielded USB cable.
L R4C4860 Startup Guide SETUP.FM 11/29/00 Rev. C A5 size Proof Sign-off: DAI K.A. Kobayashi T. Morita K. Nishi DAI K. Ramsey 1. Make sure both the printer and computer are turned off. 2. Plug the appropriate end of the cable into the USB port on the back of the printer. (The end that fits the printer has a different shape than the end that fits the computer.) 3. Connect the other end of the cable to the computer’s USB port. See the next section for instructions on installing the printer software.
Proof Sign-off: DAI K.A. Kobayashi T. Morita K. Nishi DAI K. Ramsey R4C4860 Startup Guide SETUP.FM 11/29/00 Rev. C A5 size Printer software components Your printer software includes the following items: ❏ Printer driver and utilities The printer driver runs, or “drives,” your printer; use it to make settings such as print quality, speed, media type, and paper size. The Nozzle Check, Head Cleaning, and Print Head Alignment utilities help you keep your printer in top operating condition.
L R4C4860 Startup Guide SETUP.FM 11/29/00 Rev. C A5 size Proof Sign-off: DAI K.A. Kobayashi T. Morita K. Nishi DAI K. Ramsey Installing on Windows Me, 98, 95, 2000, and NT 4.0 Follow these steps to install your printer software: Note: If you wish to make a floppy disk version of the printer software included on your CD-ROM, insert the printer software CD-ROM, then doubleclick Create Floppy based printer driver/utility disks and follow the on-screen instructions. 1. Make sure that your printer is off. 2.
Proof Sign-off: DAI K.A. Kobayashi T. Morita K. Nishi DAI K. Ramsey R4C4860 Startup Guide SETUP.FM 11/29/00 Rev. C A5 size 5. Click Install Printer Driver/Utility, then the right arrow, and then OK in the dialog box that appears to start the printer software installation. 2 6. Windows 95 and NT users should proceed to step 6. For Windows 98 users, follow the on-screen instructions to turn on your printer. The printer port configuration starts automatically.
L R4C4860 Startup Guide SETUP.FM 11/29/00 Rev. C A5 size Proof Sign-off: DAI K.A. Kobayashi T. Morita K. Nishi DAI K. Ramsey For information on opening and using the printer software, see “Printing From Your PC” on page 4-2. See also “Printer Software” in your Online Guide. If you use your printer on a network, see “Setting Up Your Printer on a Network” on page 2-9.
Proof Sign-off: DAI K.A. Kobayashi T. Morita K. Nishi DAI K. Ramsey R4C4860 Startup Guide SETUP.FM 11/29/00 Rev. C A5 size 3. Click the Details tab and make sure that EPUSBx: (EPSON Stylus Pro 10000/10000CF) is displayed in the Print to the following port list box. 2 Note: If the correct port is not displayed, refer to the “Troubleshooting” section of the Online Guide. Setting Up Your Printer on a Network For Windows Me, 98, and 95, see below. For Windows 2000 and NT 4.
L R4C4860 Startup Guide SETUP.FM 11/29/00 Rev. C A5 size Proof Sign-off: DAI K.A. Kobayashi T. Morita K. Nishi DAI K. Ramsey For Windows Me, 98, and 95 This section tells you how to set up your printer so that other computers on a network can use it. First, you need to set up the printer as a shared printer on the computer to which the printer is connected. Then, you must signify the network path to the printer from each computer to use the printer, and install the printer software on those computers.
Proof Sign-off: DAI K.A. Kobayashi T. Morita K. Nishi DAI K. Ramsey R4C4860 Startup Guide SETUP.FM 11/29/00 Rev. C A5 size 5. In the Network window, click OK. 6. In the Control Panel, double-click Printers. Note: ❏ If a dialog box requesting the Windows Me, 98, or 95 CD-ROM appears, insert the CD-ROM in the CD-ROM drive, then follow the messages on the screen. ❏ If a dialog box appears requesting you to restart your computer, do so. Then open the Printer folder, and continue from step 7. 7.
L R4C4860 Startup Guide SETUP.FM 11/29/00 Rev. C A5 size Proof Sign-off: DAI K.A. Kobayashi T. Morita K. Nishi DAI K. Ramsey Accessing the printer through a network To access your printer from another computer on a network, follow these steps. Note: Your printer must be set up as a shared resource on the computer to which it is directly connected before you can access it from another computer. For instructions, see “Setting up your printer as a shared printer” on page 2-10. 1.
Proof Sign-off: DAI K.A. Kobayashi T. Morita K. Nishi DAI K. Ramsey R4C4860 Startup Guide SETUP.FM 11/29/00 Rev. C A5 size 6. Double-click the icon of the computer that is directly connected to the printer. Then click the printer’s icon. 2 7. Click OK and follow the messages on the screen. For Windows 2000 and NT 4.0 Note: This section is written for small network users only. If you are on a large network and would like to share your printer, consult your network administrator.
L R4C4860 Startup Guide SETUP.FM 11/29/00 Rev. C A5 size Proof Sign-off: DAI K.A. Kobayashi T. Morita K. Nishi DAI K. Ramsey Setting up your printer as a shared printer Follow these steps to share a printer that is connected directly to your computer with others on a network. 1. Click Start, point to Settings, and click Printers. 2. Select your printer, then click Sharing on the File menu. 3. Click the Shared radio button and enter the Share Name. 4. Click OK.
Proof Sign-off: DAI K.A. Kobayashi T. Morita K. Nishi DAI K. Ramsey R4C4860 Startup Guide SETUP.FM 11/29/00 Rev. C A5 size Accessing the printer through a network To access your printer from another computer on a network, follow these steps. Note: Your printer must be set up as a shared resource on the computer to which it is directly connected before you can access it from another computer. For instructions, see “Setting up your printer as a shared printer” on page 2-14. 1.
L R4C4860 Startup Guide SETUP.FM 11/29/00 Rev. C A5 size Proof Sign-off: DAI K.A. Kobayashi T. Morita K. Nishi DAI K. Ramsey 3. Click the Ports tab, then click Add Port. 4. The following dialog appears. Select Local Port, then click New Port.
Proof Sign-off: DAI K.A. Kobayashi T. Morita K. Nishi DAI K. Ramsey R4C4860 Startup Guide SETUP.FM 11/29/00 Rev. C A5 size 5. The following dialog appears. In the text box, type the following information: \\name of computer that is connected to the printer\name of the shared printer Then click OK. 6. In the Printer Ports dialog box, click Close to return to the Ports menu.
L R4C4860 Startup Guide SETUP.FM 11/29/00 Rev. C A5 size Proof Sign-off: DAI K.A. Kobayashi T. Morita K. Nishi DAI K. Ramsey 7. On the Ports menu, make sure that the new port is added and the check box is selected. Click OK to close the printer driver.
Proof Sign-off: DAI K.A. Kobayashi T. Morita K. Nishi DAI K. Ramsey R4C4860 Startup Guide MAC.FM 11/29/00 Rev. C A5 size Chapter 3 Setting up the Printer with Your Macintosh Connecting the Printer to Your Macintosh . . . . . . . . . . . . . . . . . . 3-2 Using the built-in USB interface. . . . . . . . . . . . . . . . . . . . . . . 3-2 3 Installing the Printer Software on Macintosh . . . . . . . . . . . . . . . . 3-3 Printer software components . . . . . . . . . . . . . . . . . . . . . . . . .
L R4C4860 Startup Guide MAC.FM 11/29/00 Rev. C A5 size Proof Sign-off: DAI K.A. Kobayashi T. Morita K. Nishi DAI K. Ramsey Connecting the Printer to Your Macintosh The method you use to connect the printer to your Macintosh depends on whether you want to send print jobs directly to the printer using the printer’s built-in USB interface, or send print jobs to the printer over a network using an optional interface card.
Proof Sign-off: DAI K.A. Kobayashi T. Morita K. Nishi DAI K. Ramsey R4C4860 Startup Guide MAC.FM 11/29/00 Rev. C A5 size 3. Plug the other end of the cable into the computer’s USB port on the back of the Macintosh. 3 Now see “Installing the Printer Software on Macintosh” on page 3-3. You must install the printer software before using your printer.
L R4C4860 Startup Guide MAC.FM 11/29/00 Rev. C A5 size Proof Sign-off: DAI K.A. Kobayashi T. Morita K. Nishi DAI K. Ramsey Printer software components Your printer software includes the following items. EPSON Printer Driver Package ❏ SPro 10000/10000CF This is the printer driver software that runs your printer. With it, you can make settings such as Media Type, Print Quality, and Paper Size. ❏ EPSON Monitor3 Monitors and manages background printing jobs.
R4C4860 Startup Guide Proof Sign-off: DAI K.A. Kobayashi T. Morita K. Nishi DAI K. Ramsey MAC.FM 11/29/00 Rev. C A5 size Installing on Macintosh c Caution: Turn off all virus protection programs before you install your printer software. Follow these steps to install your printer software. 1. Insert the software CD-ROM shipped with your printer in the CD-ROM drive. The EPSON printer software disk opens automatically. 2.
L R4C4860 Startup Guide MAC.FM 11/29/00 Rev. C A5 size Proof Sign-off: DAI K.A. Kobayashi T. Morita K. Nishi DAI K. Ramsey 5. To install the printer software included on your printer software CD-ROM, make sure the Install Location box displays the correct disk drive, then click Install. 6. When a message appears informing you that the installation is complete, click Restart to restart your computer.
R4C4860 Startup Guide Proof Sign-off: DAI K.A. Kobayashi T. Morita K. Nishi DAI K. Ramsey MAC.FM 11/29/00 Rev. C A5 size 2. Select the appropriate Background Printing radio button to turn background printing on or off. With background printing on, you can use your Macintosh while it is preparing a document for printing. In order to use the EPSON Monitor3 utility to manage print jobs, background printing must be turned on. 3 3. Close the Chooser.
L R4C4860 Startup Guide MAC.FM 11/29/00 Rev. C A5 size Proof Sign-off: DAI K.A. Kobayashi T. Morita K. Nishi DAI K. Ramsey Setting up your printer as a shared printer Follow these steps to share a printer connected directly to your computer with other computers on an AppleTalk network. 1. Turn on the printer. 2. Select Chooser from the Apple menu and click the printer’s icon. Then select the port to which the printer is connected. 3. Click the Setup button. The following dialog box appears.
R4C4860 Startup Guide Proof Sign-off: DAI K.A. Kobayashi T. Morita K. Nishi DAI K. Ramsey MAC.FM 11/29/00 Rev. C A5 size 4. Select the Share this Printer check box, then type the printer name and password information as needed. 5. Click OK. The name of the shared printer appears in the port list in the Chooser. 6. Close the Chooser. 3 Accessing the printer through a network To access your printer from another computer on the network, follow these steps. 1. Turn on your printer. 2.
L R4C4860 Startup Guide MAC.FM 11/29/00 Rev. C A5 size Proof Sign-off: DAI K.A. Kobayashi T. Morita K. Nishi DAI K. Ramsey 3. If the following dialog box appears, enter the password for the printer, then click OK. 4. Select the appropriate Background Printing option button to turn background printing on or off. 5. Close the Chooser.
Proof Sign-off: DAI K.A. Kobayashi T. Morita K. Nishi DAI K. Ramsey R4C4860 Startup Guide MANAG.FM 11/29/00 Rev. C A5 size Chapter 4 Printing and Printer Management Printing From Your PC . . . . . . . . . . . . . . . . . . . . . . . . . . . . . . . . . . . 4-2 Making the printer driver settings . . . . . . . . . . . . . . . . . . . . . 4-2 Cancelling printing from your PC . . . . . . . . . . . . . . . . . . . . . 4-7 Printing From Your Macintosh . . . . . . . . . . . . . . . . . . . . . . . . . . . .
L R4C4860 Startup Guide MANAG.FM 11/29/00 Rev. C A5 size Proof Sign-off: DAI K.A. Kobayashi T. Morita K. Nishi DAI K. Ramsey Printing From Your PC After loading the paper, you are ready to print your document from your PC. Note: To ensure the print quality, you may need to check the printer’s condition before you start printing. See Chapter 5, “Checking the Printer’s Condition.
Proof Sign-off: DAI K.A. Kobayashi T. Morita K. Nishi DAI K. Ramsey R4C4860 Startup Guide MANAG.FM 11/29/00 Rev. C A5 size 2. Make sure your printer is selected and then click Properties, or Options. You may need to click a combination of these buttons. The driver settings window appears. 4 3. Click the Main tab to display the Main menu. 4. Select the media you loaded in the printer from the Media Type list.
L R4C4860 Startup Guide MANAG.FM 11/29/00 Rev. C A5 size Proof Sign-off: DAI K.A. Kobayashi T. Morita K. Nishi DAI K. Ramsey 6. Make sure the Automatic radio button in the Mode box is selected. Note: When Automatic is selected, the printer driver takes control of all detailed settings based on the current Media Type setting and Ink setting. 7. Adjust Speed and Quality in the Mode box if a slider appears. Drag the slider left or right depending on which is more important.
Proof Sign-off: DAI K.A. Kobayashi T. Morita K. Nishi DAI K. Ramsey R4C4860 Startup Guide MANAG.FM 11/29/00 Rev. C A5 size 10. Select the type of paper you loaded in the printer from the Paper Source list. 11. Select the paper size you loaded in the printer from the Paper Size list. Note: Most Windows applications feature paper size settings that override similar settings in the printer driver. 12. When roll paper is used, set the Roll Paper Option as required.
L R4C4860 Startup Guide MANAG.FM 11/29/00 Rev. C A5 size Proof Sign-off: DAI K.A. Kobayashi T. Morita K. Nishi DAI K. Ramsey 14. Click the Layout tab to display the Layout menu. 15. Select Reduce/Enlarge and adjust the print image size if necessary. 16. Click the OK button at the bottom of the window. The screen returns to the Print Setup dialog (or a similar dialog) of your application. 17. Click Print to print the document.
Proof Sign-off: DAI K.A. Kobayashi T. Morita K. Nishi DAI K. Ramsey R4C4860 Startup Guide MANAG.FM 11/29/00 Rev. C A5 size While printing, the EPSON Progress Meter will appear, showing the printing progress and the status of your printer. 4 For details, see “Printer Software” in your Online Guide. Cancelling printing from your PC To cancel the printing in progress, press the Stop button on the EPSON Progress Meter. You can also pause or restart printing. To pause printing, press the Pause button.
L R4C4860 Startup Guide MANAG.FM 11/29/00 Rev. C A5 size Proof Sign-off: DAI K.A. Kobayashi T. Morita K. Nishi DAI K. Ramsey Printing From Your Macintosh After loading the paper, you are ready to print your document from your Macintosh. Note: To ensure the print quality, you may need to check the printer’s condition before you start printing. See Chapter 5, “Checking the Printer’s Condition.” Making the printer driver settings To make the printer driver settings, follow the steps below.
Proof Sign-off: DAI K.A. Kobayashi T. Morita K. Nishi DAI K. Ramsey R4C4860 Startup Guide MANAG.FM 11/29/00 Rev. C A5 size 2. Select the paper size you loaded in the printer from the Paper Size list. 3. Select the type of paper you loaded in the printer from the Paper Source list. 4. Make settings for Orientation and Reduce or Enlarge as required. 5. When roll paper is used, set the Roll Paper Option as required.
L R4C4860 Startup Guide MANAG.FM 11/29/00 Rev. C A5 size Proof Sign-off: DAI K.A. Kobayashi T. Morita K. Nishi DAI K. Ramsey 7. Choose Print from the File menu. The Print dialog box appears as shown below. Note: You can also open the Print dialog box by pressing the Options button in the Page Setup dialog box. 8. Make the settings for Copies and Pages 9. Select the media you loaded in the printer from the Media Type list.
Proof Sign-off: DAI K.A. Kobayashi T. Morita K. Nishi DAI K. Ramsey R4C4860 Startup Guide MANAG.FM 11/29/00 Rev. C A5 size 13. Adjust Speed and Quality in the Mode box if a slider appears. Drag the slider left or right depending on which is more important. This setting is usually automatically decided in accordance with your Media Type setting. Note: Depending on the Media Type you choose, a slider appears in the Mode box. 14. Click the Print button to start printing.
L R4C4860 Startup Guide MANAG.FM 11/29/00 Rev. C A5 size 3. Click the print job. Proof Sign-off: DAI K.A. Kobayashi T. Morita K. Nishi DAI K. Ramsey button, then click the stop button to cancel the When background printing is off 1. Press the Power button to turn off the printer. 2. Hold down the J key on your keyboard and press the [.] period key to cancel the print job.
Proof Sign-off: DAI K.A. Kobayashi T. Morita K. Nishi DAI K. Ramsey R4C4860 Startup Guide CONDI.FM 11/29/00 Rev. C A5 size Chapter 5 Checking the Printer’s Condition Using Printer Utilities . . . . . . . . . . . . . . . . . . . . . . . . . . . . . . . . . . . . 5-2 Accessing the printer utilities . . . . . . . . . . . . . . . . . . . . . . . . . 5-2 Printing the Nozzle Check Pattern . . . . . . . . . . . . . . . . . . . . . . . . . 5-3 Cleaning the Print Heads . . . . . . . . . . . . . . . . . . . . . .
L R4C4860 Startup Guide CONDI.FM 11/29/00 Rev. C A5 size Proof Sign-off: DAI K.A. Kobayashi T. Morita K. Nishi DAI K. Ramsey Using Printer Utilities To ensure the print quality, you may need to check the printer’s condition using the following utilities from the printer software. Note: You can also check from the printer’s control panel. See “The Control Panel“ in your Online Guide.
Proof Sign-off: DAI K.A. Kobayashi T. Morita K. Nishi DAI K. Ramsey R4C4860 Startup Guide CONDI.FM 11/29/00 Rev. C A5 size Printing the Nozzle Check Pattern You can check the print head nozzles from your computer with the Nozzle Check utility in the printer software. Note: Do not start the Nozzle Check utility while printing is in progress; otherwise, your printout may be marred. Follow the steps below: 1. Make sure the printer is turned on and paper is loaded in the printer. (A4 or wider paper) 5 2.
L R4C4860 Startup Guide CONDI.FM 11/29/00 Rev. C A5 size Proof Sign-off: DAI K.A. Kobayashi T. Morita K. Nishi DAI K. Ramsey If any segments of printed lines are missing in your nozzle check pattern, ink nozzles are clogged and the print heads require cleaning. c Caution: Make sure that the nozzle check pattern printing is complete before you start printing. Otherwise, print quality may decline.
Proof Sign-off: DAI K.A. Kobayashi T. Morita K. Nishi DAI K. Ramsey R4C4860 Startup Guide CONDI.FM 11/29/00 Rev. C A5 size 1. Make sure the lights on the control panel do not indicate that ink is low or ink is out. 2. Access the printer software. See “Accessing the printer utilities” on page 5-2. 3. Click the Head Cleaning button. 4. Follow the messages on your screen. The Pause light of the printer flashes during the cleaning cycle, which takes about one minute to complete.
L R4C4860 Startup Guide CONDI.FM 11/29/00 Rev. C A5 size Proof Sign-off: DAI K.A. Kobayashi T. Morita K. Nishi DAI K. Ramsey Aligning the Print Heads You can align the print heads using the Print Head Alignment utility in the printer software. Note: ❏ Do not start the Print Head Alignment utility while printing is in progress; otherwise, your printout may be marred. ❏ Alignment pattern printing requires 0.5 m roll paper. Follow the steps below: 1.
Proof Sign-off: DAI K.A. Kobayashi T. Morita K. Nishi DAI K. Ramsey R4C4860 Startup Guide CONDI.FM 11/29/00 Rev. C A5 size 5. Choose the set number that has the smallest gap in each alignment pattern. In the example below, set number 8 has the smallest gaps. 5 6. Select the number you chose in step 5 (for example, number 8), then click Finish. Note: If the set with the smallest gap is unclear and cannot be selected, click the Realignment button and repeat from step 5.
L R4C4860 Startup Guide CONDI.FM 11/29/00 5-8 Rev. C A5 size Checking the Printer’s Condition Proof Sign-off: DAI K.A. Kobayashi T. Morita K. Nishi DAI K.
Proof Sign-off: DAI K.A. Kobayashi T. Morita K. Nishi DAI K. Ramsey R4C4860 Startup Guide CARD.FM 11/20/00 Rev. C A5 size Chapter 6 Using an Optional Interface Card Available Optional Interface Cards . . . . . . . . . . . . . . . . . . . . . . . . 6-2 Installing the Optional Interface Card . . . . . . . . . . . . . . . . . . . . . .
L R4C4860 Startup Guide CARD.FM 11/20/00 Rev. C A5 size Proof Sign-off: DAI K.A. Kobayashi T. Morita K. Nishi DAI K. Ramsey Available Optional Interface Cards The optional Ethernet Interface Cards shown below let you use your printer on a network. The Ethernet card automatically detects the protocols on your network, so you can print from Windows Me, 98, 95, 2000, NT 4.0, and Macintosh on an AppleTalk network. EPSONNet 10/100 BASE TX Int.
Proof Sign-off: DAI K.A. Kobayashi T. Morita K. Nishi DAI K. Ramsey R4C4860 Startup Guide CARD.FM 11/20/00 Rev. C A5 size 4. Use a cross-head screwdriver to remove the two screws securing the shield plate to the optional interface slot; then lift off the plate. Be sure to keep the screws; you may need to use them again when you re-install the shield plate. 5. Set any DIP switches and jumper on the card, if necessary. See the interface card’s documentation for details. 6.
L R4C4860 Startup Guide CARD.FM 11/20/00 Rev. C A5 size Proof Sign-off: DAI K.A. Kobayashi T. Morita K. Nishi DAI K. Ramsey 7. Secure the interface card in the slot with the two screws included with the interface card. 8. Connect a compatible interface cable to the interface card and to your computer. If the cable has a ground wire, secure it with one of the screws. Also, if you are using more than one computer, reconnect the other interface cable. 9. Make sure the printer is turned off.
EPSON OVERSEAS MARKETING LOCATIONS Epson America, Inc. EPSON UK LTD. 3840 Kilroy Airport Way Long Beach, CA 90806 Phone: (562) 981-3840 Fax: (562) 290-5220 Campus 100, Maylands Avenue, Hemel Hempstead, Herts, HP2 7TJ, U.K. Phone: (+44) 01442 261144 Fax: (+44) 01442 227227 EPSON DEUTSCHLAND GmbH EPSON FRANCE S.A. Z lpicher Stra e 6, 40549 D sseldorf Germany Phone: (0211) 56030 Fax: (0211) 5047787 68 bis, rue Marjolin 92300, Levallois-Perret, France Phone: 33.1.41.86.26.
Color Ink Jet Printer Color Ink Jet Printer Startup Guide Printed in Japan XX.