® Assembly and Setup Guide Safety Instructions . . . . . . . . . . . . . . . . . . . . . . . . . . 1 Assembling the Stand . . . . . . . . . . . . . . . . . . . . . . . 2 Assembling the Printer and Stand . . . . . . . . . . . . . 3 Setting up Stylus Pro 10600 . . . . . . . . . . . . . . . . . . . 5 Connecting the Printer with Your Computer . . . . . 9 Installing the Printer Software . . . . . . . . . . . . . . . . 10 Using the User Guides . . . . . . . . . . . . . . . . . . . . . .
All rights reserved. No part of this publication may be reproduced, stored in a retrieval system, or transmitted in any form or by any means, electronic, mechanical, photocopying, recording, or otherwise, without the prior written permission of SEIKO EPSON CORPORATION. The information contained herein is designed only for use with this EPSON printer. EPSON is not responsible for any use of this information as applied to other printers.
Safety Instructions ❏ Keep the printer away from the dusty area. ❏ Place the printer near a wall outlet where the plug can be easily unplugged. Important Safety Instructions When using the printer Read all of these instructions before using your printer. Also be sure to follow all warnings and instructions marked on the printer. ❏ Do not put your hand inside the printer or touch the ink cartridges during printing. ❏ Do not block or cover the openings in the printer cabinet.
For United Kingdom Users Warning, Cautions, and Notes Use of options w Warnings must be followed carefully to avoid bodily injury. c Cautions must be observed to avoid damage to your equipment. EPSON (UK) Limited shall not be liable against any damages or problems arising from the use of any options or consumable products other than those designated as Original EPSON Products or EPSON Approved Products by EPSON (UK) Limited.
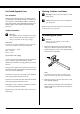
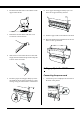
Assembling the Printer and Stand 4. Insert the printer into the guide pins on the stand. Mounting the printer on the stand 1. Position the stand in front of the printer (K) as shown. Note: When you place the printer on the stand, match the right end square of the printer to the square of the same part of the stand. 2. Lock the two casters and extend the two stabilizer knobs underneath the stand. 5.
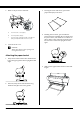
7. Remove the protective materials: 3. Turning the stitch side down, spread the paper basket (F) on the floor. a c b a: from the front cover (tapes). b: from the platen (tapes). c: from the side of the print head compartment (fixing metal plate inside the front cover). 8. Close the front cover. c 4. Holding the rear shaft, pass it under the horizontal struts. Holding the rear shafts and the joint sockets, turn them one revolution as shown below.
6. Hook the both ends of the center shafts on the upper basket hooks. 10. Set 10 paper feed support films (G) at even intervals of approximately 4 inches. 7. Hold the front side shafts and turn it one revolution as shown below. 11. Slide the upper and lower basket hooks back. 12. Hook the basket rings in the directions shown below to take up the slack. 8. Slide out the lower basket hooks to their full length, then attach the L shape ends to the joint sockets on the front side.
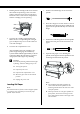
2. Attach the three clamps packed with your printer, then route the power cord through the clamps at the rear of the printer. 2. Push the ink compartment cover to open it. 3. Put the attached label for your ink type on the back of the ink compartment cover. 3. Check the label on the back of the printer to make sure the voltage required by the printer matches that of the electrical outlet you are using. 4. Plug the power cord into a properly grounded electrical outlet.
6. Holding the ink cartridge with arrow mark on the left side and pointing to the rear of the printer, and insert it into the slot. Be sure to match the colors of the seal of compartment and the cartridge you are replacing. 1. Slide the movable flange off the end of the spindle. 2. Place the roll paper on a flat surface so that it unwinds in the direction shown. Slide the roll paper onto the spindle and fully onto the fixed flange. 7. Close the ink cartridge clamp backwards.
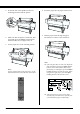
5. Fit the left end of the spindle into the left mounting bracket inside the printer. 6. Make sure that the printer is turned on, then repeatedly press the Paper Source button until the Roll Auto Cut light comes on. 8. Insert the paper into the paper insertion slot. 9. Pull the paper down through the paper insertion slot so that it comes out below. 7. Set the paper lever to the released position.
10. Holding the bottom edge of the paper, turn the roll paper to remove slack. Make sure that the bottom edge of the paper is straight, and that it is aligned with the rows of holes. Connecting the Printer with Your Computer Using the built-in parallel interface or built-in USB interface Use a shielded, twisted-pair cable, or a standard shielded USB cable. Note: ❏ When using an inappropriate cable or connecting peripheral devices between the printer and the computer, the connection may be unstable. 11.
USB For Windows Installing on Windows Follow these steps to install your printer software. 1. Make sure that your printer if off. 2. Turn on your computer and start Windows. Note: When the cable has a grounding wire, secure the wire with the screw below the connector. 3. Plug the other end of the cable into the computer' s parallel or USB interface connector. Using the installed IEEE1394 interface or Ethernet interface 3. Insert the printer software CD-ROM shipped with your printer in the CD-ROM drive.
Ensuring that the USB driver or IEEE 1394 driver is installed correctly in Windows (for Windows Me, 98 and 2000 only) After the printer software installation is complete, confirm that the USB driver is installed correctly. 4. Choose your printer from the window, then click the right arrow. 5. Click Install Software, then the right arrow. 1. Click the Start button, point to Settings, and click Printers. Make sure that the icon for your printer appears in the Printer window. 2.
Using the User Guides What to Do Next After completing the hardware setup and the driver installation, see the Reference Guide for detailed information about your printer’s functions, maintenance, troubleshooting, technical specifications and optional products. Using the User Guides It contains detailed instructions on how to use the printer, and information on using optional products. You can view this guide directly from the CD-ROM, or install into your computer and view it from your hard disk.
Printed in Japan 02.