Proof Sign-off: AVA M.Arai K.Nishi K.Nishi Latex H.Nicholas R R41A0E84P Unpacking and Setup Guide Rev.D A4 size English COVER1.FM 6/19/07 Unpacking and Setup Guide Safety Instructions . . . . . . . . . . . . . . . . . . . . . . . . 1 Unpacking and Assembling the Base Unit . . . . 3 Unpacking the Printer . . . . . . . . . . . . . . . . . . . . . 4 Mounting the Printer on the Base Unit . . . . . . . 5 Installing the Auto Take-Up Reel Unit . . . . . . . 6 Choosing a Place for the Printer . . . . . . . .
L R41A0E84P Unpacking and Setup Guide Rev.D COVER2.FM 5/17/07 Proof Sign-off: AVA M.Arai K.Nishi K.Nishi Latex H.
R41A0E84P Unpacking and Setup Guide Rev.D ENGLISH.FM 6/19/07 Safety Instructions Read all of these instructions before using your printer. Also be sure to follow all warnings and instructions marked on the printer. Warning, Cautions, and Notes w Warnings must be followed carefully to avoid bodily injury. c Cautions must be observed to avoid damage to your equipment. Notes contain important information and useful tips on the operation of your printer.
L R41A0E84P Unpacking and Setup Guide Rev.D ENGLISH.FM 6/19/07 Proof Sign-off: AVA M.Arai K.Nishi K.Nishi Latex H.Nicholas A4 size ❏ Shake an ink cartridge well before installing it for best results. Important: The wires in the mains lead fitted to this appliance are coloured in accordance with the following code: Green and yellow - Earth Blue - Neutral Brown - Live If you have to fit a plug: c Caution: Do not shake cartridges (that have been installed previously) with too much force.
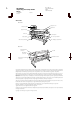
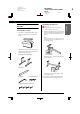
R41A0E84P Unpacking and Setup Guide Rev.D Proof Sign-off: AVA M.Arai K.Nishi K.Nishi Latex H.Nicholas ENGLISH.FM 6/19/07 Checking the contents 1. Open the box, and then lift up the box that contains the base unit and away from the printer. A4 size Assembling the base unit w English Unpacking and Assembling the Base Unit R Warning: Have two people working on either side to assemble the base unit (23.2 kg). 1. Hold base upright left and a horizontal strut as shown.
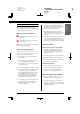
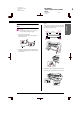
L R41A0E84P Unpacking and Setup Guide Rev.D ENGLISH.FM 6/19/07 A4 size Unpacking the Printer w Warning: The printer unit is heavy and unwieldy. Have two people unpack the printer unit. 1. Remove the roll paper spindle with roll paper, polystyrene foam, and cardboard cushions from around the printer. 2. Lift the box up and away from the printer. Remove all items from the hollow on the rear side of the printer. Note: The ink cartridges included with your printer are primarily for the initial setup. 3.
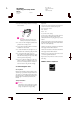
R41A0E84P Unpacking and Setup Guide Rev.D ENGLISH.FM 6/19/07 Mounting the Printer on the Base Unit w Warning: Do not attempt to lift the printer unit (about 127.3 kg) with fewer than four people. R A4 size Note: When you place the printer on the base unit, match the right end square of the printer to the square of the same part of the base unit. top view 1. Lock the two front casters. Place the casters sideways and lock them so they will not move. Caster lock 2.
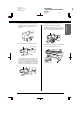
L R41A0E84P Unpacking and Setup Guide Rev.D ENGLISH.FM 6/19/07 Proof Sign-off: AVA M.Arai K.Nishi K.Nishi Latex H.Nicholas A4 size Installing the Auto Take-Up Reel Unit Installing the Auto Take-up Reel Unit 1. Attach the drive unit on the horizontal strut as shown below, and tighten the black screws to attach the drive unit to the printer securely. Checking the contents Make sure that all the items shown below are included and not damaged.
R41A0E84P Unpacking and Setup Guide Rev.D ENGLISH.FM 6/19/07 4. Plug the cable connector into the connector on the back of the printer as shown below, then tighten the screws on both sides of the connector. R A4 size 7. Attach the flange (marked with L) on the movable unit by pinching the knob. The flange is reversible. One side is for the 3-inch core, and the other side is for the 2-inch core. Set the appropriate side for the core. 5. Turn the lock lever to the left to release it. 8.
L R41A0E84P Unpacking and Setup Guide Rev.D ENGLISH.FM 6/19/07 Proof Sign-off: AVA M.Arai K.Nishi K.Nishi Latex H.Nicholas A4 size Installing the take-up reel core 4. Turn the lock lever to the front to lock the movable unit. 1. Make sure that the lock lever is released (turned to the left). Slide the movable unit to the left end of the horizontal strut. Make sure the core is fixed properly. 2. Slip one end of the take-up reel core over the flanged knob on the drive unit. 3.
R41A0E84P Unpacking and Setup Guide Rev.D ENGLISH.FM 6/19/07 Choosing a Place for the Printer Instructions for placing the printer ❏ Choose a flat and stable location that can support the printer weight (about 150.5 kg). ❏ Use only an outlet that meets the power requirements of this printer.
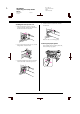
L R41A0E84P Unpacking and Setup Guide Rev.D ENGLISH.FM 6/19/07 Proof Sign-off: AVA M.Arai K.Nishi K.Nishi Latex H.Nicholas A4 size Settling the printer Setting up the Printer 1. Release the front casters. Removing the materials 1. Remove the all protective tapes from the printer and protective materials inside of the ink compartments. 2. Move the printer to the place of use (a short distance away).
R41A0E84P Unpacking and Setup Guide Rev.D ENGLISH.FM 6/19/07 ❏ Be careful not to touch the cables around the print head; otherwise, the printer may be damaged. R A4 size 3. Route the power cord through the clamps at the rear of the printer. The cord can be routed to either the left or right side. 3. Close the front cover. 4. Plug the power cord into a properly grounded electrical outlet. c Connecting the power cord 1.
L R41A0E84P Unpacking and Setup Guide Rev.D ENGLISH.FM 6/19/07 Proof Sign-off: AVA M.Arai K.Nishi K.Nishi Latex H.Nicholas A4 size Installing the ink cartridges 3. Check the ink cartridge and its slot. To install the ink cartridges, follow the instructions below. w Warnings: The ink cartridges are self-contained units. Under ordinary use, ink will not leak from the cartridges. If ink does get on your hands, wash them thoroughly with soap and water.
R41A0E84P Unpacking and Setup Guide Rev.D ENGLISH.FM 6/19/07 5. Hold the ink cartridge with the arrow mark facing up and pointing to the rear of the printer, and then insert it in the slot as far as it will go until it clicks. R A4 size Confirming the Printing English Proof Sign-off: AVA M.Arai K.Nishi K.Nishi Latex H.Nicholas Loading the roll paper To load the roll paper onto the printer, follow the instructions below. 1. Open the roll paper cover.
L R41A0E84P Unpacking and Setup Guide Rev.D ENGLISH.FM 6/19/07 Proof Sign-off: AVA M.Arai K.Nishi K.Nishi Latex H.Nicholas A4 size 3. Aligning it with the rails on both sides, slowly roll the paper roll into place and set it on the mounting brackets inside the printer. 4. Make sure that the Pause light is not flashing, and then set the paper lever to the released position. LEVER RELEASED. LOAD PAPER appears on the LCD panel. 5. Insert the paper into the paper insertion slot.
R41A0E84P Unpacking and Setup Guide Rev.D ENGLISH.FM 6/19/07 7. Holding the bottom edge of the paper, turn the roll paper to remove slack. Make sure that the bottom edge of the paper is straight, and that it is aligned with the horizontal line. R A4 size 9. If DO YOU WANT TO USE THE FOLLOWING PAPER? appears on the LCD panel, press the Menu button to set the media type. When using thick, heavy, or curled paper, press the Paper Feed button to increase the power.
L R41A0E84P Unpacking and Setup Guide Rev.D ENGLISH.FM 6/19/07 Proof Sign-off: AVA M.Arai K.Nishi K.Nishi Latex H.Nicholas A4 size Printing a status sheet 1. Press the Paper Source Roll Auto Cut On . Loading the Cut Sheet Media button to display To load cut sheet media longer than Super A3/B (483 mm), see the next section. To load cut sheet media with a length of Super A3/B (483 mm) or below, see “Loading cut sheet media with a length of Super A3/B (483 mm) or below” on page 18.
Proof Sign-off: AVA M.Arai K.Nishi K.Nishi Latex H.Nicholas R41A0E84P Unpacking and Setup Guide Rev.D ENGLISH.FM 6/19/07 Caution: Do not set the paper lever to the released position while the Power light or Pause light is flashing; otherwise, damage may occur. A4 size 6. Set the paper lever to the secured position. Press the button or wait a while. English c R 4. Load the sheet into the paper insertion slot until it comes out below. 7.
L R41A0E84P Unpacking and Setup Guide Rev.D ENGLISH.FM 6/19/07 A4 size Loading cut sheet media with a length of Super A3/B (483 mm) or below 1. Make sure that the printer is on and the roll paper cover is closed. 2. Press the Paper Source appears. until Sheet button repeatedly 3. Make sure that the paper lever is in the secured position, and then load the sheet into the paper insertion slot until it meets resistance.
R41A0E84P Unpacking and Setup Guide Rev.D Proof Sign-off: AVA M.Arai K.Nishi K.Nishi Latex H.Nicholas ENGLISH.FM 6/19/07 A4 size 4. Open the front cover. English Printing on thick paper (0.5 to 1.5 mm) R When you load thick cut sheets (0.5 to 1.5 mm), such as cardboard, follow the steps below. Note: Do not load thick paper (0.5 to 1.5 mm) longer than 728 mm; otherwise, paper jams may occur. 1. Make sure that the printer is on and the roll paper cover is closed. 2. Press the Paper Source appears.
L R41A0E84P Unpacking and Setup Guide Rev.D ENGLISH.FM 6/19/07 A4 size 6. Set the paper lever to the secured position, and then close the front cover. Press the Proof Sign-off: AVA M.Arai K.Nishi K.Nishi Latex H.Nicholas Connecting the Printer with Your Computer button or wait a while. Connect the printer and computer with a USB cable or Ethernet cable. Use the following cables. ❏ USB cable ❏ 100BaseTX or 1000BaseT Category 6 Shielded twisted-pair cable 1. Make sure the printer is turned off. 7.
R41A0E84P Unpacking and Setup Guide Rev.D ENGLISH.FM 6/19/07 Installing the Printer Driver and Software R A4 size Note: If the following dialog box appears, make sure the publisher is SEIKO EPSON, and then click Unlock. After connecting the printer to your computer, you need to install the software included on the Printer Software CD-ROM shipped with your printer. To install your printer software, follow the steps below. Note: Be sure that you have an administrator rights to install the software. 1.
L R41A0E84P Unpacking and Setup Guide Rev.D ENGLISH.FM 6/19/07 Proof Sign-off: AVA M.Arai K.Nishi K.Nishi Latex H.Nicholas A4 size 3. Click Add. Aligning the Print Head You need to perform Print Head Alignment before you start printing your data. This prevents deterioration of print quality caused by misalignment of the print head. Print Head Alignment improves the print quality of your printed data. 4. Select your printer, and then click Add. For Windows 1.
R41A0E84P Unpacking and Setup Guide Rev.D ENGLISH.FM 6/19/07 2. Right-click your printer icon, and click Printing Preferences. R A4 size For Mac OS X 1. Double-click the Applications folder, and then double-click the EPSON Printer Utility2 icon. 3. Click the Utility tab. 2. If the printer list appears, select the printer and then click OK. 3. Select Print Head Alignment. Follow the on-screen instructions to complete the print head alignment. 4. Select Print Head Alignment.
L R41A0E84P Unpacking and Setup Guide Rev.D ENGLISH.FM 6/19/07 A4 size Using the Online User’s Guide What to do Next After completing the hardware setup and the driver installation, see the User’s Guide for detailed information on your printer’s functions, maintenance, troubleshooting, technical specifications, and optional products. Using the Online User’s Guide It contains detailed instructions on using the printer, and information on using the optional products.
Proof Sign-off: AVA M.Arai K.Nishi K.Nishi Latex H.Nicholas R41A0E84P Unpacking and Setup Guide Rev.D ENGLISH.
L R41A0E84P Unpacking and Setup Guide Rev.D COVER4.FM 6/19/07 A4 size Proof Sign-off: AVA M.Arai K.Nishi K.Nishi Latex H.