English Setup Guide Safety Instructions . . . . . . . . . . . . . . . . . . . . . . . . . . 1 Assembling the Printer . . . . . . . . . . . . . . . . . . . . . . 2 Setting Up the Printer . . . . . . . . . . . . . . . . . . . . . . . . 3 Loading Roll Paper . . . . . . . . . . . . . . . . . . . . . . . . . 6 Loading Cut-Sheet Paper . . . . . . . . . . . . . . . . . . . . 8 Connecting the Printer with Your Computer . . . . 11 Installing the Printer Driver and Software. . . . . . .
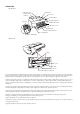
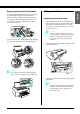
Printer Parts Front view Roll paper cover Rear manual feed slot Paper lever Top cover Control panel Roll paper support Ink lever Maintenance tank Paper tray cover Paper tray Front manual feed slot Ink compartment Ink cartridge slot Rear view Knobs Rear cover AC inlet USB interface connector Network interface connector No part of this publication may be reproduced, stored in a retrieval system, or transmitted in any form or by any means, electronic, mechanical, photocopying, recording, or otherwise, wi
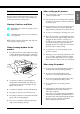
Read all of these instructions before using your printer. Also be sure to follow all warnings and instructions marked on the printer. Warning, Cautions, and Notes w Warnings must be followed carefully to avoid bodily injury. c Cautions must be observed to avoid damage to your equipment. Notes contain important information and useful tips on the operation of your printer. When choosing a place for this product ❏ Place this product on a flat, stable surface that is larger than this product.
When handling the ink cartridges Assembling the Printer ❏ Keep ink cartridges out of the reach of children and do not drink their contents. ❏ Store ink cartridges in a cool, dark place. ❏ If ink gets on your skin, wash it off with soap and water. If ink gets in your eyes, flush them immediately with water. Checking the contents Make sure that all of the items shown are included, and are not damaged. ❏ Shake an ink cartridge well before installing it for best results.
To prevent damage during shipping, your printer is packed with several pieces of protective material. Remove the protective material from your printer before using it. Open the top cover, loosen the two screws, and then pull out the carriage fixed board. Setting Up the Printer English Removing the protective materials Connecting the power cord 1. Check the label on the back of the printer to make sure the voltage required by the printer matches that of the wall outlet.
Installing the paper tray Insert the paper tray in the slots at the front of the printer. ❏ The right ink compartment of EPSON Stylus Pro 4450 cannot be opened. Do not press the cover too hard; otherwise, you may break it. 5678 1234 Installing the ink cartridges w Warning: The ink cartridges are self-contained units. Under ordinary use, ink does not leak from the cartridges. If ink does get on your hands, wash them thoroughly with soap and water.
4. Remove the package from an ink cartridge, and then shake the ink cartridge well for best results. 7. After inserting all ink cartridges in their corresponding slot, lower the ink levers. The printer starts initial ink charging. 8. After approximately two minutes, ink lever messages appear on the LCD panel. Raise or lower the ink levers accordingly until READY appears on the LCD panel, which indicates initial ink charging is completed. c 5.
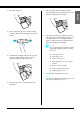
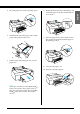
Loading Roll Paper 4. Slide the movable flange (removed in step 1) onto the spindle and into the end of the roll paper until it fixes into place. Attaching the roll paper to the spindle When installing the roll paper onto the spindle, follow the steps below. 1. Slide the movable flange off the end of the spindle. Attaching roll paper to the printer To attach roll paper to the printer, follow the steps below. 1. Open the roll paper cover. 2.
5. Hold the both sides of the paper, and load the paper in the paper insertion slot. 7. Hold both the fixed and movable flanges, and rewind the paper to the line marked with an arrow mark. 8. Move the paper lever to the secured position. The printer automatically feeds the paper to the printing position. 6. Pull the paper until it hangs down over the paper tray. 9. Close the roll paper cover. 10. Raise the roll paper support.
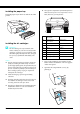
11. Extend the paper tray and the paper tray cover according to the paper length to be used for printing. Loading Cut-Sheet Paper To load cut-sheet paper in the paper tray, follow the steps below. Note: This section describes loading cut-sheet paper smaller than A3 size. If you want to load A3 or a larger paper, or if you want to know the details of paper handling, see "Paper Handling" in the User’s Guide included on the Printer Software CD-ROM shipped with your printer. 1.
❏ The loadable capacity of paper in the paper tray differs depending on the media and its size. The paper tray can hold up to 250-sheets of 17 lb or 64 g/m² plain paper. Do not load the paper above the arrow mark on the inside surface of the left edge guide. For information on the loadable capacity of Epson special media, see the following table. 6. Clean the inside of the tray to remove any dust. Dust may decrease the printout quality. 7.
8. Adjust the length of the paper guide and the edge guide according to the paper size. Loading paper into the rear manual feed slot Note: ❏ You can load one sheet at a time into the rear feed slot. ❏ Load paper with the printable surface up. ❏ Paper with a thickness between 0.08 and 1.6 mm can be set in the landscape position. However, always set recycled or plain paper and A4, Letter size, or 8 × 10 in. paper in the portrait position, regardless of the thickness. 9.
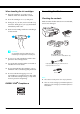
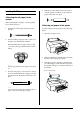
Connecting the Printer with Your Computer Connect the printer and computer with a USB cable or Ethernet cable. Use the following cables. ❏ USB cable ❏ 10BaseT or 100BaseTX Category 5 Shielded twisted-pair cable 1. Make sure the printer is turned off. Note: Make sure the roll paper support is not raised. c Caution: Do not leave the paper in the printer for a long period of time; its quality will deteriorate. We recommend that you remove the paper from the printer after printing. 2.
Installing the Printer Driver and Software Note: If the following dialog box appears, make sure the publisher is SEIKO EPSON, and then click Unblock. After connecting the printer to your computer, you need to install the software included on the Printer Software CD-ROM shipped with your printer. To install your printer software, follow the steps below. Note: Be sure that you have an administrator rights to install the software. 1.
English Using the Online User’s Guide What to do next After completing the hardware setup and the driver installation, see the User’s Guide for detailed information on your printer’s functions, maintenance, troubleshooting, technical specifications and optional products. Using the online User’s Guide It contains detailed instructions on using the printer, and information on using the optional products. To view the User’s Guide, double-click the ESPR4450_488X Manual icon on the desktop.