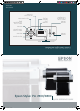
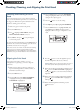
SP7898_QRGcvr.indd 1 7/29/05 11:47:16 AM QUICK REFERENCE GUIDE Epson Stylus Pro 7800/9800 ® Control Panel Lights and Buttons Paper light Ink light Paper Feed up button Power light and button Menu button Hold for 3 seconds to clean the print head. Enter button Hold for 3 seconds to cut roll paper after printing. Ink cartridge gauges Pause light and button Maintenance tank gauge Hold for 3 seconds to cancel a print job or reset the printer.
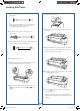
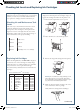
Loading Roll Paper 1 Slide the black paper stop off the end of the spindle. 7 Release the paper lever. 8 Feed the paper into the slot and pull it all the way through. 9 Turn the roll back to remove any slack. Then align the bottom edge with the horizontal line and the right edge with the vertical line. 10 Return the paper lever to the locked position. Then close the roll paper cover. 11 Press the Pause button. The paper feeds into printing position.
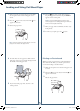
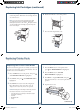
Loading and Using Cut Sheet Paper 1 Remove any roll paper from the paper path. Make sure the printer is on and the roll paper cover is closed. 2 Press the Paper Source button until the appears on the LCD. 3 Release the paper lever. 6 Press the Pause button. The sheet feeds into the printing position automatically and READY appears on the control panel. Caution: To avoid damaging the printer, never move the paper lever during printing, or while the Power or Pause light is flashing.
Open the front cover. (The cover has special tabs that act as paper supports when the cover is open.) 7 Return the paper lever to the locked position. Then close the front cover. 5 Feed the posterboard into the paper slot until it meets resistance. 8 Press the Pause button. The board feeds into the printing position automatically and READY appears on the control panel. 9 Run your print job. After it is finished, the posterboard stays in the printer.
Checking, Cleaning, and Aligning the Print Head Checking and Cleaning the Print Head If your printed image shows a color shift or horizontal lines, you should check the print head to see if any nozzles are clogged or deflected. The printer will then run an automatic cleaning cycle if necessary. 1 Make sure paper is loaded in the printer. 2 Press the Menu button. 3 Press to highlight TEST PRINT, then press Menu. NOZZLE CHECK is selected. 4 Press Menu, then press nozzle check pattern.
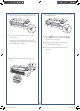
Checking Ink Levels and Replacing Ink Cartridges When one of the icons shows empty and INK OUT is displayed on the LCD panel, the cartridge is empty. To replace the cartridge, first make sure the printer is on. Before you begin a large print job, you should check your ink levels. If one of your cartridges is low, you can replace it before you start. Or you can wait until the ink runs out, replace the cartridge, and then continue the job. 1 Press the ink compartment cover to open it.
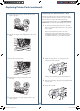
Replacing Ink Cartridges (continued) 5 Hold the cartridge with the arrow mark pointing toward the printer. Then insert the cartridge into the slot. Don’t force it. 6 Return the ink lever to its locked position. 7 Close the ink compartment cover. Note: If you can’t insert the cartridge smoothly, you may have the wrong cartridge. Check the package and product code. If the Ink light remains on after installing the cartridge, try removing and then reinserting it.
Replacing Printer Parts (continued) 5 Replacing the Maintenance Tank Hold down the side pin, as shown, then turn the latch to the right. The Epson Stylus Pro 7800 has one maintenance tank (on the right side) and the 9800 has two (one on either side). You need to replace the maintenance tank (part # C12C890191) when you see MAINTENANCE TANK FULL on the LCD. The ink light also turns red. 1 6 Release the side pin and carefully remove the cutter blade. 7 Insert the new cutter blade.
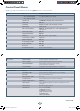
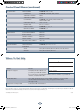
Control Panel Menus Boldface type indicates the default setting. Press the Menu button to access the menus.
Control Panel Menus (continued) CUSTOM PAPER MAINTENANCE HEAD ALIGNMENT PAPER NUMBER STANDARD, NO. (1 to 10) PLATEN GAP STANDARD, NARROW, WIDE, WIDER THICKNESS PATTERN PRINT THICKNESS NUMBER 1 to 15 CUT METHOD STANDARD, THIN PAPER, THICK PAPER FAST, THICK PAPER SLOW PAPER FEED ADJUST -0.70% to 0.70% DRYING TIME 0. 0 sec. to 10.0 sec.
SP7898_QRGcvr.indd 1 7/29/05 11:47:16 AM QUICK REFERENCE GUIDE Epson Stylus Pro 7800/9800 ® Control Panel Lights and Buttons Paper light Ink light Paper Feed up button Power light and button Menu button Hold for 3 seconds to clean the print head. Enter button Pause light and button Ink cartridge gauges Hold for 3 seconds to cancel a print job or reset the printer. Maintenance tank gauge Hold for 3 seconds to cut roll paper after printing.