® Unpacking and Setup Guide Safety Instructions . . . . . . . . . . . . . . . . . . . . . . . . . . 1 Unpacking and Assembling Stylus Pro 9600 . . . . . 2 Unpacking and Assembling Stylus Pro 7600 . . . . . 8 Setting up Stylus Pro 7600/9600 . . . . . . . . . . . . . . 13 Using the User Guides . . . . . . . . . . . . . . . . . . . . . .
All rights reserved. No part of this publication may be reproduced, stored in a retrieval system, or transmitted in any form or by any means, electronic, mechanical, photocopying, recording, or otherwise, without the prior written permission of SEIKO EPSON CORPORATION. The information contained herein is designed only for use with this EPSON printer. EPSON is not responsible for any use of this information as applied to other printers.
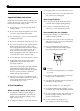
Safety Instructions ❏ Keep the printer away from the dusty areas. ❏ Place the printer near a wall outlet where the plug can be easily unplugged. Important Safety Instructions When using the printer Read all of these instructions before using your printer. Also be sure to follow all warnings and instructions marked on the printer. ❏ Do not put your hand inside the printer or touch the ink cartridges during printing. ❏ Do not block or cover the openings in the printers cabinet.
For United Kingdom Users Warnings, Cautions, and Notes Use of options w c EPSON (UK) Limited shall not be liable against any damages or problems arising from the use of any options or consumable products other than those designated as Original EPSON Products or EPSON Approved Products by EPSON (UK) Limited. Warnings must be followed carefully to avoid bodily injury. Cautions must be observed to avoid damage to your equipment.
❏ Operate the printer under the following conditions: Parts: A Temperature: 10 to 40ºC Humidity: B 5 to 85% without condensation ❏ Avoid locations that are subject to direct sunlight, excessive heat, moisture, or dust. ❏ Do not block the ventilation openings. ❏ Avoid locations near potential sources of interference such as loud speakers or cordless phones. C ❏ Avoid locations near TVs, radios, air conditioners, or humidifiers. ❏ Keep the printer away from combustible substances.
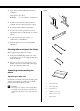
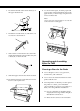
Tools: 2. Referring the Step 1, fix the other strut to the base. G 3. Fasten four screws on the both sides of the base upright securely. H This completes assembly of the base unit. Before attaching the paper basket, mount the printer on the base unit. I Unpacking the printer J G: Hex wrench H: Hex socket head bolts (4) I: Wing nuts and spring washers (2) I is for connecting the printer unit to the base unit. J: c Caution: The printer unit is heavy and unwieldy.
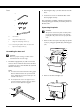
3. Take out the cardboard panels from around the printer. R 4. Remove the polystyrene foam stoppers under the printer.
2. Remove the protective materials of the paper guides from underneath the printer. ❏ When you place the printer on the base unit, match the right end square of the printer (shown as 4 in the illustration below) to the square of the same part of the base unit. 3. Position the base unit in front of the printer unit as shown. top view 4. Mount the printer on the base unit as shown below. c 5. Fasten the bottom of the printer and base unit with wing nuts and washers (I).
7. Remove the protective materials. 2. Likewise, fully insert and attach the long basket hooks (D) to the lower guides. a D b c 3. Turning the stitch side downward, spread the paper basket on the floor. a: from the front cover (tapes) b: from the ink compartment cover (tapes) c: from the side of the print head compartment (fixing metal plate inside the front cover) c Caution: Watch your fingers when opening and closing the front cover. 8. Close the front cover. Attaching the paper basket 4.
6. Hook the both ends of the center shafts (U) on the upper basket hooks. 11. As shown in the figure, hook the paper feed support film on the intermediate shaft of the paper basket, so that it hangs along the inner surface of the basket. Note: Set five paper feed support films at even intervals in the order shown in the figure. U 7. Hold the front side shafts (V) and turn it one revolution as shown below. V 8.
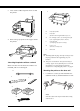
❏ Place the front rubber legs of the printer just at the end of the desk. ❏ Leave enough room (over 600 mm) in front of the desk. ❏ Prevent your printouts from getting dirty or crinkled. ❏ Use a grounded power outlet. Do not use a damaged or frayed power cord. Avoid using an outlet that is shared with other appliances. Unpacking the Printer c Caution: The printer unit is heavy and unwieldy. Have two people unpack the printer. 1.
4. Remove the protective materials: C: Right base (1) and Left base (1) D: Right leg (1) and Left leg (1) ❏ from the side of the print head compartment (inside the front cover). E: Bottom horizontal strut (1) F: Top horizontal strut (1) ❏ from the ink compartment cover (tape). G: Basket hooks (4) H: Paper basket (1) ❏ from the front cover (tape). Tool: I Note: Do not re-install the screw. Store it separately to avoid losing it.
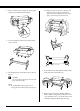
Assembling the Stand c Caution: Assembly requires two people. Be careful to match the right and left legs (R and L is engraved on the inner side of the base parts) and base parts. 4. Insert the top horizontal strut into the right and left legs. Use a screw driver to fasten the strut with + head screws with washers (L). L L 1. Insert the right leg into the right base by sliding the leg slot onto the base projection as shown. Fasten the leg to the base with 2 base bolts (J). 5.
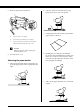
2. Mount the printer on the printer mount as shown. 2. Snap the rear paper basket joints onto the tips of the basket hooks at the rear of the Stand. Make sure the joints are positioned as shown. 3. Fasten the bottom of the printer and the printer mount with wing screws (N) and washers (O). O N O N 3. Rotate the front paper basket joints to enfold the bar which is not attached to the fabric as shown (P). Then, snap the front paper basket joints onto the tips of the basket hooks at the front of the Stand.
Setting up Stylus Pro 7600/9600 Connecting the power cord 5. Plug the power cord into a properly grounded electrical outlet. c 1. Make sure that the printer is off. It is off when the surface of the Power button is even with the button protectors. Caution: Do not use an outlet that is controlled by an automatic timer or wall switch. Otherwise, accidental shut down or damage to your printer may occur. Installing the ink cartridges To install the ink cartridges, follow the instructions below. w 2.
Note: If you use the EPSON UltraChrome ink cartridge, shake the cartridge gently before installing it. Loading the Roll Paper To load the roll paper onto the printer, follow the instructions below. 1. Slide the movable flange off the end of the spindle. 4. Hold the ink cartridge with arrow mark on the left side and pointing to the rear of the printer, and insert it into the slot until the corresponding Ink Out light turns off. 2.
6. Set the paper lever to the released position. ❏ If the paper does not come out even after executing the procedure above, open the front cover and pull the paper out manually. 9. Holding the bottom edge of the paper, turn the roll paper to remove slack. Make sure that the bottom edge of the paper is straight, and that it is aligned with the rows of the holes. 7. Insert the paper into the paper insertion slot. 10. Set the paper lever to the secured position, and close the roll paper cover. 8.
Reusing the Packaging If you need to transport your printer a long distance, the printer should be repacked using the original boxes and packing materials. Contact your dealer for assistance. Connecting the Printer For Windows The method you use to connect the printer to your PC depends on how you want to send your print jobs. If you want to send them directly, use the printer's built-in parallel interface or the USB interface. If you want to send them over a network, use an optional interface card.
Using the built-in USB interface To use the printer's built-in USB interface, you will need a USB interface cable. Then follow the steps below to connect the printer to your computer. 1. Make sure both the printer and computer are turned off. 2. Plug the cable connector securely into the printer's USB port. The printer driver runs, or “drives,” your printer; use it to make settings such as print quality, speed, media type, and paper size.
4. Choose your printer from the window, then click the right arrow. 5. Click Install Software, then the right arrow. 3. Click the Details tab and make sure that EPUSBx: (EPSON Stylus Pro 7600/9600) is displayed in the Print to the following port list box. 6. Click Install in the dialog box that appears to start the printer software installation. 7. Follow the on-screen instruction.
Keeps track of the current status of your printer, and alerts you when printer errors occur. 5. Click Install Software, then the right arrow. ❏ Nozzle Check Checks for clogged nozzles. ❏ Head Cleaning Cleans the print heads to maintain the best print quality. ❏ Print Head Alignment Adjust the print heads so that vertical and horizontal lines are aligned. ❏ Printer and Option Information Enables you to make ON/OFF settings for the photo printing accelerator. 6.
With background printing on, you can use your Macintosh while it is preparing a document for printing. In order to use the EPSON Monitor3 utility to manage print jobs, background printing must be turned on. 3. Close the Chooser. 4. Check the label on the back of the printer to make sure the voltage required by the printer matches that of the electrical outlet you are using.
Printed in XXXX