
Printer User Guide
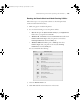
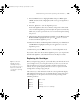
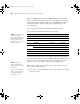
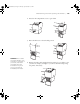
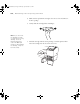
Table Of Contents
- Front Matter
- Contents
- Introduction
- Chap 1-Setting Up the Printer
- Unpacking and Assembling the Epson Stylus Pro 7800
- Unpacking and Assembling the Epson Stylus Pro 9800
- Connecting the Power Cord
- Installing Ink
- Connecting to Your System
- Connecting to the Network
- Installing the Software for Macintosh
- Installing the Software for Windows
- Updating Your Printer Firmware
- Configuring the Printer for Your Network
- Chap 2-Handling Paper and Other Media
- Chap 3-Printing with Epson Drivers for Macintosh
- Chap 4-Printing with Epson Drivers for Windows
- Chap 5-Maintaining and Transporting the Printer
- Checking Printer Status and Part Life
- Checking and Cleaning the Print Head
- Aligning the Print Head
- Replacing Ink Cartridges
- Switching Black Ink Cartridges
- Changing the Date and Time
- Using Maintenance Mode
- Replacing the Paper Cutter Blade
- Replacing the Maintenance Tank
- Cleaning the Printer
- Transporting or Storing the Printer
- Chap 6-Solving Problems
- Appendix A: Specifications
- Index
5-125
Maintaining and Transporting the Printer | 125
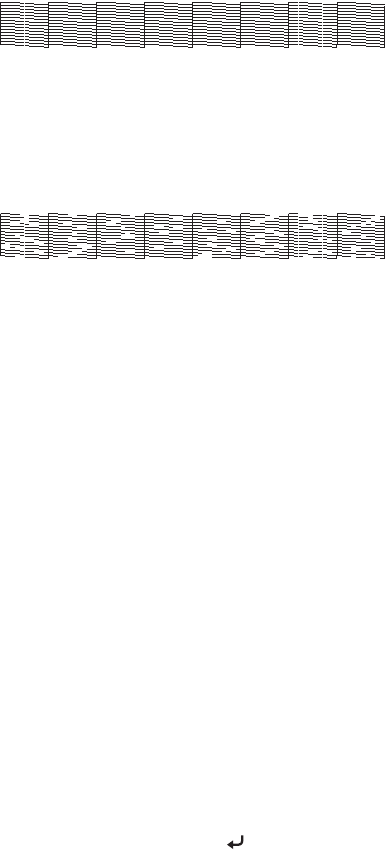
7. After the pattern is printed, use at least a 10× eye loupe to examine it.
• If the pattern looks good as shown below, the print head is clean.
• If any dots or segments are missing or deflected as shown below, run
a cleaning cycle by pressing and holding the
Menu button for at
least 3 seconds. Then print another nozzle check pattern to make
sure the nozzles are clean.
Running a Power Cleaning Cycle
You can run a power cleaning cycle from the control panel if the normal
cleaning process is not sufficient to clear the nozzles. However, the power
cycle uses a large quantity of ink, so it is recommended only as a last resort.
The cartridges need to be at least 50% full to use power cleaning. You may
need to replace a low cartridge to run the cleaning cycle. After cleaning, you
can reinsert the old cartridge.
1. Print a nozzle check to make sure the print head needs cleaning, as
described on page 124.
2. Make sure the printer is ready and the red B ink light on the printer’s
LCD display is not on or flashing.
3. Press the
Menu button.
4. Press the d button until
MAINTENANCE is highlighted, then press
Menu.
5. Press the d button until
PWR CLEANING is highlighted, then press
Menu. Press Menu again, then press to start the power cleaning.
6. Follow the instructions on the LCD display to raise or lower the ink
levers.
Caution: Don’t run a
cleaning cycle while
thick media is loaded in
the printer.
7800-9800Guide.book Page 125 Monday, April 10, 2006 11:59 AM