
user manual


Table Of Contents
- Front Matter
- Contents
- Introduction
- Chap 1-Setting Up the Printer
- Unpacking and Assembling the Epson Stylus Pro 7800
- Unpacking and Assembling the Epson Stylus Pro 9800
- Connecting the Power Cord
- Installing Ink
- Connecting to Your System
- Connecting to the Network
- Installing the Software for Macintosh
- Installing the Software for Windows
- Updating Your Printer Firmware
- Configuring the Printer for Your Network
- Chap 2-Handling Paper and Other Media
- Chap 3-Printing with Epson Drivers for Macintosh
- Chap 4-Printing with Epson Drivers for Windows
- Chap 5-Maintaining and Transporting the Printer
- Checking Printer Status and Part Life
- Checking and Cleaning the Print Head
- Aligning the Print Head
- Replacing Ink Cartridges
- Switching Black Ink Cartridges
- Changing the Date and Time
- Using Maintenance Mode
- Replacing the Paper Cutter Blade
- Replacing the Maintenance Tank
- Cleaning the Printer
- Transporting or Storing the Printer
- Chap 6-Solving Problems
- Appendix A: Specifications
- Index
4-114
114 | Printing with Epson Drivers for Windows
• Max Optical Density
adjusts the overall density or focus of the
print. Create a soft focus print by setting the density to lower.
• Highlight Point Shift helps to reduce gloss differential by adding
density to the highlights of your image.
• The tone color circle click adjusts the hue of your black and white
print. Click on any portion of the color wheel or enter
corresponding values to customize the tone (hue) to add to your
print. The closer you select to the edge of the wheel, the more color
you will add.
• Preview approximates the image tone based on your settings. Note
that this preview always shows the same image and is not color
managed. It provides a level of feedback as you make changes.
Managing Print Jobs
Your printer comes with several utilities that let you check on your print jobs
and cancel, pause, or restart them.
The Progress Meter opens each time you send a print job. Status Monitor 3,
which appears on the taskbar when you print, lets you check the printer’s
status and monitor print jobs.
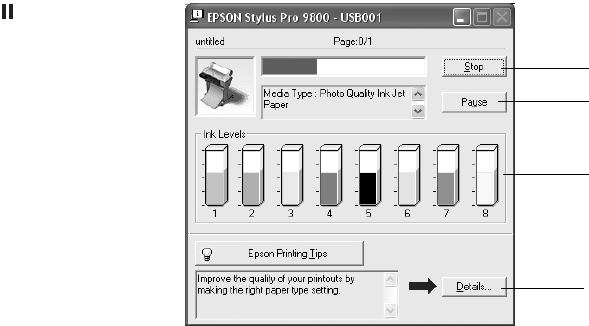
Using the Progress Meter
After you send a print job, the Progress Meter window appears:
Note: You can also
cancel a print job by
pressing the Pause
button on the printer and
holding it for at least 3
seconds.
Click to cancel
Click to pause/resume
printing
Click for more details
on the displayed
printing tip
May not appear if you
are printing over a
network
7800-9800Guide.book Page 114 Monday, April 10, 2006 11:59 AM