
user manual


Table Of Contents
- Front Matter
- Contents
- Introduction
- Chap 1-Setting Up the Printer
- Unpacking and Assembling the Epson Stylus Pro 7800
- Unpacking and Assembling the Epson Stylus Pro 9800
- Connecting the Power Cord
- Installing Ink
- Connecting to Your System
- Connecting to the Network
- Installing the Software for Macintosh
- Installing the Software for Windows
- Updating Your Printer Firmware
- Configuring the Printer for Your Network
- Chap 2-Handling Paper and Other Media
- Chap 3-Printing with Epson Drivers for Macintosh
- Chap 4-Printing with Epson Drivers for Windows
- Chap 5-Maintaining and Transporting the Printer
- Checking Printer Status and Part Life
- Checking and Cleaning the Print Head
- Aligning the Print Head
- Replacing Ink Cartridges
- Switching Black Ink Cartridges
- Changing the Date and Time
- Using Maintenance Mode
- Replacing the Paper Cutter Blade
- Replacing the Maintenance Tank
- Cleaning the Printer
- Transporting or Storing the Printer
- Chap 6-Solving Problems
- Appendix A: Specifications
- Index
1-41
Setting Up the Printer | 41
Connecting to the Network
If you plan to connect the printer to your network, you need the optional
EpsonNet print server card. The EpsonNet print server is a 10/100 BaseTX
Type-B Ethernet interface card (part number C12C824341).
If the print server card didn’t come with your printer, you can purchase it
from an authorized Epson reseller. To find the nearest reseller, call
800-GO-EPSON (800-463-7766) or visit www.prograpics.epson.com. In
the U.S., you can also purchase online at www.epsonstore.com. In Canada,
you can also purchase at www.epson.ca or 800-807-7766.
Make sure you have the correct cable for connecting the printer. To connect
to a network hub, you need a standard RJ-45 “straight-through” network
cable. To connect directly to your computer’s network interface, you need
an RJ-45 crossover cable.
Before you install the print server, make sure you check the documentation
included with the card for additional instructions. Then follow these steps to
install the card:
1. Turn off your computer and printer.
2. IMPORTANT: Unplug the printer from its electrical outlet. Not doing
so may cause damage to the printer and the card.
3. Disconnect any interface cables from the printer.
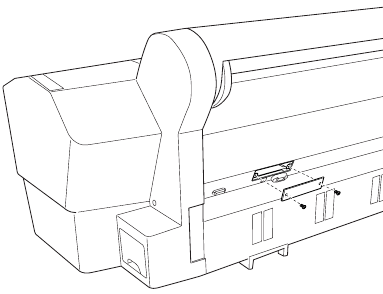
4. Use a cross-head screwdriver to remove the two screws securing the
optional interface cover. Then lift off the cover as shown:
Note: The print server
card is included with the
Professional Edition of
the printer.
Caution: You must
unplug the printer from
the power outlet, or you
may damage the printer
and the card.
7800-9800Guide.book Page 41 Monday, April 10, 2006 11:59 AM