
user manual


Table Of Contents
- Front Matter
- Contents
- Introduction
- Chap 1-Setting Up the Printer
- Unpacking and Assembling the Epson Stylus Pro 7800
- Unpacking and Assembling the Epson Stylus Pro 9800
- Connecting the Power Cord
- Installing Ink
- Connecting to Your System
- Connecting to the Network
- Installing the Software for Macintosh
- Installing the Software for Windows
- Updating Your Printer Firmware
- Configuring the Printer for Your Network
- Chap 2-Handling Paper and Other Media
- Chap 3-Printing with Epson Drivers for Macintosh
- Chap 4-Printing with Epson Drivers for Windows
- Chap 5-Maintaining and Transporting the Printer
- Checking Printer Status and Part Life
- Checking and Cleaning the Print Head
- Aligning the Print Head
- Replacing Ink Cartridges
- Switching Black Ink Cartridges
- Changing the Date and Time
- Using Maintenance Mode
- Replacing the Paper Cutter Blade
- Replacing the Maintenance Tank
- Cleaning the Printer
- Transporting or Storing the Printer
- Chap 6-Solving Problems
- Appendix A: Specifications
- Index
1-42
42 | Setting Up the Printer
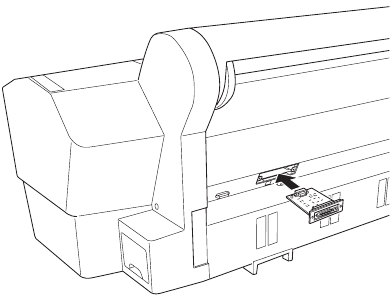
Make sure you keep the screws in case you need to remove the card and
replace the cover.
5. Slide the card along the slots inside the compartment. Push it in firmly
to fully insert the connector into the printer’s internal slot.
6. Use the two screws included with the card to secure it.
7. Connect one end of the appropriate cable to the card. Then connect the
other end to your network hub or to your computer’s Ethernet port.
8. Plug in the printer’s power cord.
Follow the instructions in the next section to install your printer software,
then configure the printer for your network as described on page 53.
7800-9800Guide.book Page 42 Monday, April 10, 2006 11:59 AM