
Instruction manual


53
Handling Media and Printouts | 53
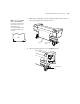
9. Set the switch on the top of the reel controller to ON.
10. Set the paper release lever to the
Secured position.
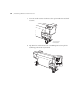
11. When
READY appears on the LCD display, press the Menu button.
12.
PRINTER SETUP is highlighted. Press Menu again.
13. Press d to select
AUTO TAKE-UP REEL, press Menu, and select ON.
14. Press the Pause button to exit the menus.
Now you can check the print quality as described in the next section.
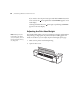
Checking the Print Quality
When you first set up the printer, it’s a good idea to run a nozzle check to
test the print quality.
1. Press the
Menu button, press d to highlight TEST PRINT, and press
Menu again.
2. Select
NOZZLE CHECK, press Menu, and press to print a nozzle
check pattern.
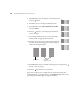
3. Examine the printed pattern to determine if the print head nozzles need
cleaning or not at this point.
Note: Before printing
without the Auto Take-Up
Reel, be sure to set the
AUTO TAKE-UP REEL
setting to OFF.
Note: If you have any
print quality problems
after cleaning the print
head, see page 74 for
information on additional
print head cleaning cycles
you can run.
It’s a good idea to run a
nozzle check and clean
the print head, if
necessary, whenever you
load a new media type or
print a large job. You can
also set the printer to
automatically print a
nozzle check pattern
and/or clean the print
head at set intervals. See
page 114 for details.
Cleaning
not needed
Clean the
print head