
Instruction manual


74
74 | Maintaining the Printer
Cleaning the Print Head
If you notice gaps, lines, or color shifts in your printouts, or a nozzle check
reveals clogged or deflected nozzles, you should clean the print head. You
can run print head cleaning cycles in four different levels:
• Very light
• Light (standard level)
• Medium
• Heavy
If you find that you regularly need to clean the print head, you can set up a
REGULAR CLEANING cycle in the PRINTER SETUP menu. This lets you
clean the print head a specific number of hours after running a print job to
maintain print quality. See page 114 for instructions.
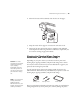
1. Turn on the printer and make sure the
Check H ink light on the
printer’s LCD display is not on or flashing.
2. Do one of the following:
• To run a standard (light) cleaning cycle, press and hold down the
Menu button for three seconds. Go to step 7.
• To run another level of cleaning cycle, go to step 3.
3. Press the
Menu button.
4. Press the d button until
MAINTENANCE is highlighted, then press
Menu.
5. Press d until one of the following cleaning levels is highlighted, then
press
Menu.
• CLEANING (VERY LIGHT)
•CLEANING (LIGHT)
• CLEANING (MEDIUM)
•CLEANING (HEAVY)
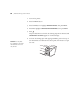
6. Press to start the cleaning cycle.
Note: It is best to clean
the print head if you have
not used the printer for at
least one week to
maintain print quality.
Note: It is best to run a
higher level cleaning cycle
only when the previous
level does not clear the
clogged or deflected
nozzles.