User’s Guide NPD3289-00
EPSON Stylus Pro GS6000 User’s Guide Copyrights and Trademarks Copyrights and Trademarks No part of this publication may be reproduced, stored in a retrieval system, or transmitted in any form or by any means, electronic, mechanical, photocopying, recording, or otherwise, without the prior written permission of Seiko Epson Corporation. The information contained herein is designed only for use with this Epson printer. Epson is not responsible for any use of this information as applied to other printers.
EPSON Stylus Pro GS6000 User’s Guide Contents Contents Copyrights and Trademarks Handling Paper Using Roll Paper. . . . . . . . . . . . . . . . . . . . . . . . . . .32 Loading roll paper . . . . . . . . . . . . . . . . . . . . . . .32 Note for fixing roll paper holders . . . . . . . . . .34 Setting roll paper . . . . . . . . . . . . . . . . . . . . . . . .35 Setting paper type . . . . . . . . . . . . . . . . . . . . . . .38 Replacing Roll Paper . . . . . . . . . . . . . . . . . . . . . . .39 Paper . . .
EPSON Stylus Pro GS6000 User’s Guide Contents Maintenance and Move or Transportation Where To Get Help Technical Support Web Site . . . . . . . . . . . . . . . . .82 Contacting Customer Support . . . . . . . . . . . . . . .82 Before Contacting Epson. . . . . . . . . . . . . . . . . .82 Help for Users in North America . . . . . . . . . .83 Help for Users in Europe . . . . . . . . . . . . . . . . .83 Help for Users in Australia. . . . . . . . . . . . . . . .83 Help for Users in Singapore . . . . . . . . .
EPSON Stylus Pro GS6000 User’s Guide Safety Instructions ❏ When not using the printer for a long period (one week or more), perform head cleaning once a week. If head cleaning is not performed, the print head may get clogged. Doing so will preserve print quality. Safety Instructions Important Safety Instructions See “Head cleaning” on page 66 ❏ Clean the cleaning wiper once a month, or when blurs or gaps appear on printed paper after head cleaning.
EPSON Stylus Pro GS6000 User’s Guide Safety Instructions Emergency Measures Handling waste ink ❏ If ink sticks to your skin, wash well with plenty of soapy water. Consult your doctor if your skin feels irritated or is discolored. Observe the following when handling the waste ink: ❏ If it gets in your eyes, flush them immediately with plenty of tap water and see a doctor as soon as possible. ❏ Before using this product, please be sure to read the Material Safety Data Sheet (MSDS).
EPSON Stylus Pro GS6000 User’s Guide Safety Instructions ❏ When connecting the printer to a computer or other device with a cable, ensure the correct orientation of the connectors. Each connector has only one correct orientation. Inserting a connector in the wrong orientation may damage both devices connected by the cable. Setting up the printer Observe the following when setting up the printer: ❏ Do not block or cover the vents and openings in the printer. ❏ This device has two power systems.
EPSON Stylus Pro GS6000 User’s Guide Safety Instructions ❏ The IC chip on this ink cartridge retains a variety of cartridge related-information such as the ink cartridge status, so that the cartridge may be removed and reinserted freely. Handling ink cartridges Observe the following when handling the ink cartridges: ❏ If you remove an ink cartridge for later use, protect the ink supply area from dirt and dust, and store it in the same environment as the printer.
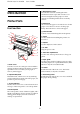
EPSON Stylus Pro GS6000 User’s Guide Introduction e. Maintenance cover Introduction Prevents the user from touching the inner mechanical section. Open and close the cover when cleaning the cleaning wiper or when cleaning around the print head. It is normally closed. Printer Parts f. Paper lever Set or release the paper. Lower the lever to fix the paper. Lower the lever more to fix the paper firmly. Raise the lever to release the paper. Front section g.
EPSON Stylus Pro GS6000 User’s Guide Introduction Features Rear section EPSON Stylus Pro GS6000 is a wide-format color Eco-Solvent ink jet printer that supports 64-inch roll paper. g b a b The features of this printer are described below. High-speed output c f The new type print head achieves high-speed output. It is compatible with paper up to 1,625 mm in width. c Wide variety of compatible paper The head is adjustable to two levels of height and compatible with paper up to 1.3 mm in thickness.
EPSON Stylus Pro GS6000 User’s Guide The Control Panel d. Enter button The Control Panel Sets the selected parameter in the selected item in the Menu mode. Executes the item if the selected item is for execution only. e. Paper Feed button Buttons, Lights, and Messages / ❏ Feeds the roll paper in the forward reverse direction. or Note: When AUTO TAKE-UP REEL is ON in the Menu mode, the roll paper cannot be fed in the reverse direction.
EPSON Stylus Pro GS6000 User’s Guide The Control Panel e Low Heat light Lights f f a The status or the meaning is shown by combination of the light. See below for the detail. High Heat light When the printer is READY b e c High Heat Low Heat Status On On Three of the heaters have reached preset temperature. Flashing Off One or more of the heater is trying to reach the preset temperature. Flashing Flashing A heater error has occurred. Off Off Heaters are off.
EPSON Stylus Pro GS6000 User’s Guide The Control Panel ❏ Ink remaining Display Icon Description There is enough ink remaining. a b e c We recommend you prepare a new ink cartridge. d Prepare a new ink cartridge. (flashing) This icon indicates the yellow tank. a. Messages Displays the printer status, operation, and error messages. See “Error Messages on the LCD Panel” on page 72 See “Details of Menu mode” on page 19 The ink is expended so you cannot print.
EPSON Stylus Pro GS6000 User’s Guide The Control Panel Menu Mode 1. Select a menu. Example: Select PRINTER SETUP. The Menu mode enables you to make printer settings similar to those you would normally make in the software, as well as other additional settings, directly through the control panel. The control panel shows the printer information, and operations such as nozzle check can be performed using the control panel. A Press the mode.
EPSON Stylus Pro GS6000 User’s Guide The Control Panel 2. There are three cases depending on the items you have selected. B. When you execute a function Example: When selecting NOZZLE CHECK in the Test Print menu A. When you can select a parameter Example: When selecting PRINT NOZZLE PATTERN in the Printer Setup menu A B A In the Test Print menu, press the button to select NOZZLE CHECK. B Press the button to enter the Nozzle Check item. C Press the Check.
EPSON Stylus Pro GS6000 User’s Guide The Control Panel C. When you want to display the printer information Example: When selecting INK LEVEL in the Printer Status menu A In the Printer Status menu, press the / button to select INK LEVEL. B Press the item. C Confirm the remaining ink on the display. Press the / button to display the remaining amount of each ink color.
EPSON Stylus Pro GS6000 User’s Guide The Control Panel Menu list Menu Item Parameter “PRINTER SETUP” on page 19 SIDE MARGIN 5mm to 25mm (0.2inch to 1.
EPSON Stylus Pro GS6000 User’s Guide The Control Panel “PRINTER STATUS” on page 25 “NETWORK SETUP” on page 26 VERSION T0xxxx-xx xx IBCC PRINTABLE PAGES (ink color) nnnnnn PAGES INK LEVEL (ink color) nn% USAGE COUNT INK xxxxx.xml PAPER xxxxx.xcm CLEAR USAGE COUNT INK EXECUTE PAPER EXECUTE JOB HISTORY No. 0-No. 9 INK xxxxx.xml PAPER xxx.
EPSON Stylus Pro GS6000 User’s Guide The Control Panel Details of Menu mode PRINTER SETUP Item Parameter Explanation SIDE MARGIN 5mm to 25mm (0.20inch to 1.00inch) You can set the margin for left and right side. PAPER SIZE CHECK ON You can select whether to check the paper width. OFF ❏ ON: Check the paper width and top edge of the paper. ❏ OFF: Do not check the paper width and top edge of the paper.
EPSON Stylus Pro GS6000 User’s Guide The Control Panel Item Parameter Explanation AUTO TAKE-UP REEL ON Use this setting when using the Auto Take-Up Reel Unit. When ON is selected, you cannot feed the roll paper in the reverse direction. OFF Note: When the Auto Take-Up Reel Unit is not installed, please do not set to ON. By doing so, the product will be unable to function properly.
EPSON Stylus Pro GS6000 User’s Guide The Control Panel Details of PAPER SETUP After you have selected the paper number, make the following settings. To make the custom paper type settings, see the following section. “Making the Custom Paper Type Setting” on page 28 Item Parameter Explanation PRINT MODE MAX QUALITY You can select the print quality (print mode) according to the usage of print data or print speed. QUALITY1 ❏ MAX QUALITY, QUALITY1, QUALITY2: Performs high-quality printing.
EPSON Stylus Pro GS6000 User’s Guide The Control Panel Item Parameter Explanation PLATEN HEATER OFF You can set the Platen Heater temperature. The Platen Heater is located under the print heads. Set this menu to warm up ink and improve print quality. 30°C to 50°C (86°F to 122°F) a b c a. Print head, b. Platen Heater, c. Roll paper Note: For appropriate temperatures to set to this function, see the instructions included with the paper, or contact your supplier.
EPSON Stylus Pro GS6000 User’s Guide The Control Panel Item Parameter Explanation M/W ADJUSTMENT (Micro Weave Adjustment) LOW A to B You can improve the print quality by adjusting the print mode you have set. MEDIUM A to D ❏ LOW A, B: The effect of M/W Adjustment function will be minimized. If obvious white lines or uneven print density appear on printed paper in LOW A, set to LOW B. ❏ MEDIUM A, B, C, D: The printing joint between two head passes will have a wave form.
EPSON Stylus Pro GS6000 User’s Guide The Control Panel Item Parameter Explanation PRINT MULTIPLE LAYER OFF You can set the overwrite count per line. 2 to 8 MAINTENANCE You can perform maintenance functions, such as cleaning. Item Parameter Explanation CLEANING (VERY LIGHT) EXECUTE You can perform very light cleaning. It discharges a smaller amount of ink compared to CLEANING (LIGHT). CLEANING (LIGHT) EXECUTE You can perform normal cleaning. Select this mode normally.
EPSON Stylus Pro GS6000 User’s Guide The Control Panel PRINTER STATUS This menu shows the printer status. Item Parameter Explanation VERSION T0xxxx-xx xx IBCC You can see the firmware version. PRINTABLE PAGES (ink color) nnnnnn PAGES You can see the number of pages printable for each ink cartridge. INK LEVEL (ink color) nn% You can see the status of each ink cartridge. USAGE COUNT INK xxxxx.xml PAPER xxxxx.
EPSON Stylus Pro GS6000 User’s Guide The Control Panel NETWORK SETUP This menu contains the following items. For detailed information about network settings, see the Network Guide. Item Parameter Explanation NETWORK SETUP DISABLE You can configure the network setting of the printer. The following items appear only when ENABLE is selected. After setting the items, press the button in the Network Setup menu, so the network is reset and the network connection is available after 15 seconds.
EPSON Stylus Pro GS6000 User’s Guide The Control Panel Maintenance Mode Maintenance mode list You can change the language or unit used on the display or return all the setting values to their factory default. A Turn off the printer by pressing the button. B Press the button while pressing and holding down the button to turn on the printer. Item Parameter Explanation LANGUAGE ENGLISH You can select the language to be displayed on the LCD panel.
EPSON Stylus Pro GS6000 User’s Guide The Control Panel Making the Custom Paper Type Setting D Select a print mode. E Set the paper feed adjustment, if necessary. You can register up to 30 custom papers. The registered number is displayed on the LCD panel when using the printer. Note: The printer becomes in the Ready state when you press the button at any point of making the following settings. The settings you have made so far are registered as the custom settings (including unchanged settings).
EPSON Stylus Pro GS6000 User’s Guide The Control Panel J Set the M/W Adjustment, if necessary. K Select the paper suction, if necessary. L 1. Press the / button to select M/W ADJUSTMENT, and then press the button. 2. Press the / button to select a suitable setting for the paper. 3. Press the button. 4. Press the button to go back to the previous menu. 1. Press the / button to select PAPER SUCTION, and then press the button. 2. Press the / button to select a suitable setting for the paper. 3.
EPSON Stylus Pro GS6000 User’s Guide Using the Printer Software Using the Printer Software EpsonNet Config EpsonNet Config is a Windows-based configuration software for administrators to configure the network interface for TCP/IP, NetWare, MS Network, AppleTalk, IPP, and SNMP. Introduction See Network Guide for detailed information of this software. The printer software CD-ROM includes the following software.
EPSON Stylus Pro GS6000 User’s Guide Using the Printer Software Uninstalling the Printer Software C Select EPSON Printer Software, and then click Change/Remove (or Uninstall/Change). D Select the target printer icon, and then click OK. E Follow the on-screen instructions to complete uninstallation. This section describes how to uninstall the printer software from your computer. Note: ❏ For Windows XP/Vista, you must log in as a user with an Administrator account.
EPSON Stylus Pro GS6000 User’s Guide Handling Paper Handling Paper Loading roll paper This section explains how to load roll paper. Put the roll paper in the center. Using Roll Paper Note: The following roll paper can be attached to the printer: the core diameter is three inches, outside diameter of paper is 150 mm or less, weight is 30 kg or less. This section explains how to handle the printer. Note: ❏ See the following for details about handling paper.
EPSON Stylus Pro GS6000 User’s Guide Handling Paper C E Set the roll paper to the roll paper holder (Left). Loosen the fixing levers of the right and left roll paper holders, move the roll paper to the center (d mark shows the center position) and tighten the levers. Note: Fix the roll paper holders by pressing the holders to the printer. Note: Set the roll paper as shown below depending on the type of roll paper.
EPSON Stylus Pro GS6000 User’s Guide Handling Paper Phenomenon 2: Note for fixing roll paper holders The roll paper holder is not fixed completely. Because the fixing lever comes loose, it cannot be fixed by moving the lever clockwise. The following phenomenon may occur depending on the usage. Phenomenon 1: The roll paper holder is fixed but the fixing lever is not pointed downward completely. (In this case, the roll paper holder on the left may interfere with the roll paper.
EPSON Stylus Pro GS6000 User’s Guide Handling Paper D Setting roll paper Note: If the end of the roll paper is not wound tightly, wind it tightly again, and then load it. This section explains how to set roll paper. A Turn on the printer. c Caution: Do not move the paper lever during E initial operation. The print head portion may touch the pressurizing roller portion, and cause a malfunction. PAPER OUT. LOAD PAPER is displayed on the LCD panel.
EPSON Stylus Pro GS6000 User’s Guide Handling Paper F Rewind the roll paper a little by rolling the flange on the roll paper holder while holding the edge of the paper, and eliminate any slack or slant. Note: When setting the roll paper, set both sides of the paper at least 5 mm away from the edge of the pressurizing roller. Slippage or creases may occur during printing.
EPSON Stylus Pro GS6000 User’s Guide Handling Paper G H If the edge of the roll paper is set less than 5 mm from the edge of the pressurizing roller, follow the procedure below to adjust the position of the roll paper. Lower the paper lever. 1) Loosen the fixing levers of the right and left roll paper holders, and move the roll paper to left or right. 2) After moving the roll paper, fix it with fixing levers of the right and left roll paper holders.
EPSON Stylus Pro GS6000 User’s Guide Handling Paper Setting paper type E Press the button. F Press the button to exit the Menu mode. This section explains how to set up the paper type. Note: If you have not made the paper type setting in the Paper Setup menu, see the following section to set up the paper type. “Making the Custom Paper Type Setting” on page 28 A Press the mode. B Press the / button to display PAPER SETUP, and then press the button.
EPSON Stylus Pro GS6000 User’s Guide Handling Paper Replacing Roll Paper D Loosen the lever of the right roll paper holder and remove it away from the paper. E Take the same procedure as in step 4, remove the roll paper from the left roll paper holder. F To load another roll paper, see the following. “Using Roll Paper” on page 32 This section describes when and how to replace roll paper. Replace roll paper in the following situations.
EPSON Stylus Pro GS6000 User’s Guide Handling Paper Paper Cautions on handling paper This section explains details of available paper for this printer. Note the following points when handling the paper. Paper type ❏ Use the recommended paper in the proper conditions (temperature and humidity). See an instructions attached to the paper. ❏ Do not use paper that is folded, cut, or torn. The type and quality of paper greatly influence the print result.
EPSON Stylus Pro GS6000 User’s Guide Handling Paper The printable area of this printer is described below. Paper size / Printable area The supported paper size and thickness is described below. Width 300 to 1625 mm Thickness Max 0.3 mm (When Head height adjustment lever is Low) A B-L Max 1.3 mm (When Head height adjustment lever is High) B-R 300mm C 1625mm 41 A Min. 5 mm B-L 5 to 25 mm B-R 5 to 25 mm C Min. 5 mm When end of the roll paper, the margin will be 77.4 mm.
EPSON Stylus Pro GS6000 User’s Guide Handling Paper B Head height adjustment Change the head height by moving the head height adjustment lever (blue). High: Printing with high printing rate or using strongly-curved paper can cause print heads to rub. Changing the head height may allow you to avoid head rub. Follow the procedure below to change the head height. Note: ❏ If the head height adjustment lever is raised, high print quality is not guaranteed.
EPSON Stylus Pro GS6000 User’s Guide Handling Paper C E Close the front cover. After installing the paper holder plates, make sure that they do not interfere with the paper as it is fed through the printer. c Caution: If a paper jams when using the paper holder plates, the plates may be deformed. When the paper holder plates are deformed, stop using the printer and do not remove the clogged paper by force. Using the printer with deformed paper plates may damage the grid roller or print heads.
EPSON Stylus Pro GS6000 User’s Guide Handling Paper D Ejecting Paper This section explains how to eject paper after printing is finished. Place a razor blade on the paper cut groove on the paper guide, and cut the roll paper. w Warning: When you hold paper, do not place your finger on the paper cut groove; mishandling the razor blade may cause a cut on your finger or hand. Cutting roll paper Cut the roll paper after printing is finished.
EPSON Stylus Pro GS6000 User’s Guide Handling Paper E Using Auto Take-Up Reel Unit Make sure that the roll paper is passed over the cushioning roller and then tape the leading edge to the scroller in the center. Use the Auto Take-Up Reel Unit to roll up your print so it will not be fed out onto the floor. A Turn on the power of the Auto Take-Up Reel Unit. B Make sure the changeover switch is set to OFF. C Set the front edge of the roll paper so that it reaches the scroller.
EPSON Stylus Pro GS6000 User’s Guide Handling Paper G Take up the roll paper for one and half revolution of the take-up reel core by rolling the scroller by hand. I Set the changeover switch to ON. J In the Menu mode of Control Panel, make sure that the AUTO TAKE-UP setting is ON. See “PRINTER SETUP” on page 19 K H Return the scroller releasing lever. The scroller returns to its original position. Then pull the cushioning roller down forward.
EPSON Stylus Pro GS6000 User’s Guide Adjust Printing Adjust Printing C Select Media Adjustment in the EPSON LFP Remote Panel main dialog box. D Click Bidirectional Alignment. Print head alignment To prevent deterioration of print quality caused by misalignment of the print head, align the print head before you start printing your data. Head alignment must be set for each print mode.
EPSON Stylus Pro GS6000 User’s Guide Adjust Printing C D 1. Press the button to enter the Menu mode. 2. Press the / button to display PAPER SETUP, and then press the button. 3. Press the / button to display PAPER SETUP, and then press the button. 4. Press the / button to select the paper number, and then press the button. 5. Press the / button to display PRINT MODE, and then press the button. 6. Press the / button to select the print mode, and then press the button.
EPSON Stylus Pro GS6000 User’s Guide Adjust Printing D G Perform initial adjust print. Note: If you increase the feeding length, the accuracy of the paper feed adjustment improves; however, it wastes the paper. Print a sample pattern. 1. Press the / button to select PRINT SAMPLE PATTERN, and then press the button. 2. Press the button to print a sample pattern. 1. Press the / button to display PAPER FEED ADJUST, and then press the button. 2.
EPSON Stylus Pro GS6000 User’s Guide Adjust Printing I Select the fine adjustment value according to the printing result in step 7. 1. Press the / button to select the value. 2. Press the button to save the fine adjustment value. J Press the state. button to return to the READY How to fix the paper firmly If the print quality does not improve even after you have adjusted the paper feed as described in the previous section, follow the steps below. A Load the roll paper to the printer.
EPSON Stylus Pro GS6000 User’s Guide Options and Consumable Products Options and Consumable Products Ink cartridges Note: The product number varies by country. 2007/03/07 17:39:571 Consumable Products The following consumable products are available for use with your printer (as of June, 2008). Recommended paper For details of the recommended paper, contact your local Epson customer support.
EPSON Stylus Pro GS6000 User’s Guide Options and Consumable Products Options Carrying bar Name Product code Carrying bar C12C890541 See Unpacking and Setup Guide Maintenance kit Name Product code Maintenance kit C12C890611 See the following section for details of the contents of the maintenance kit. “Maintenance Kit” on page 53 Ink cleaner Name Product code Ink cleaner C12C890621 See the following section for details of the ink cleaner.
EPSON Stylus Pro GS6000 User’s Guide Maintenance and Move or Transportation Maintenance Kit Maintenance and Move or Transportation Details of kit contents a b c 2007/03/07 17:39:571 Where to Set up the Printer a. Plastic Glove A plastic glove to be worn when maintaining the printer. Instructions for placing the printer b. Flushing Pad Observe the following when setting up the printer: c. Cleaning Stick Spare flushing pad for replacing.
EPSON Stylus Pro GS6000 User’s Guide Maintenance and Move or Transportation When not in use, store the tray in the empty space of the maintenance area, on the left side of the printer. B Then, dampen the cleaning stick with the ink cleaner being careful not to let any of it drip from the cleaning stick. C Clean the cleaning wiper or around the print head.
EPSON Stylus Pro GS6000 User’s Guide Maintenance and Move or Transportation D After transferring the waste ink to the empty container, close the waste ink valve securely. A Prepare an empty container to contain the waste ink. E Wipe the opening of the waste ink valve with a cloth, etc. B Lay a protective material on the floor under the ink drain tank. F Dispose of the waste ink as an industrial waste product. C Open the waste ink valve, and transfer the waste ink to the container.
EPSON Stylus Pro GS6000 User’s Guide Maintenance and Move or Transportation Replacing Ink Cartridges About ink cartridges Be sure to use the following ink cartridges with this printer. Note: When you replace the ink cartridges while the printer is turned off, the remaining ink cannot be detected correctly so the ink may become unusable before the Ink Check light comes on and you cannot print correctly. Follow the steps below to replace an ink cartridge.
EPSON Stylus Pro GS6000 User’s Guide Maintenance and Move or Transportation ❏ Because the green IC chip has the cartridge’s own information and the ink remaining information, you can still use the ink cartridge after pulling out the ink cartridge from the printer. Notes for storing the ink cartridges ❏ Do not add ink to the cartridge. The green IC chip remembers the ink remaining so that you cannot change the amount of ink remaining.
EPSON Stylus Pro GS6000 User’s Guide Maintenance and Move or Transportation D F Carefully pull the expended cartridge straight out of the slot. Hold the ink cartridge with the arrow mark facing up and pointing to the rear of the printer, and then insert it gently into the slot as far as it will go. Make sure to match the ink cartridge color with the color label on the slot. w Warning: If ink gets on your hands, wash them thoroughly with soap and water.
EPSON Stylus Pro GS6000 User’s Guide Maintenance and Move or Transportation E Replacing Flushing Pad Press the button to start Carriage Maintenance. Replace the flushing pad in the following situations: ❏ When the flushing pad becomes deformed ❏ When smears of ink appear on paper ❏ One year after replacement A B Turn on the printer. C Press the / button to display MAINTENANCE, and then press the button. D Press the mode. The print head moves to the left, and the cleaning wiper moves forward.
EPSON Stylus Pro GS6000 User’s Guide Maintenance and Move or Transportation H Install the new flushing pad. Set the flushing pad until it clicks into place. I Close the right maintenance cover firmly until it is locked. Regular Maintenance Cleaning the cleaning wiper Clean the cleaning wiper once a month, or when blurs or lacking parts appear on printed paper after head cleaning. Note: ❏ Use the cleaning stick that comes with the printer to clean the cleaning wiper.
EPSON Stylus Pro GS6000 User’s Guide Maintenance and Move or Transportation E Press the button to start Carriage Maintenance. Cleaning wiper front side: Remove the ink and dust to right and left. The print head moves to the left, and the cleaning wiper moves forward. OPEN MAINT COVERS is displayed on the LCD panel. F Cleaning wiper back side: Remove the ink and dust upward. Open the maintenance cover on the right of the printer.
EPSON Stylus Pro GS6000 User’s Guide Maintenance and Move or Transportation Cleaning around the print head D Press the / button to display CARRIAGE MAINTENANCE, and then press the button. E Press the button to start Carriage Maintenance. Clean around the print head when foreign objects, such as dust or ink causing omitted dots or ink drops are attached around the print head. Note: ❏ Before starting to clean around the print head, read and understand this procedure, then clean promptly and accurately.
EPSON Stylus Pro GS6000 User’s Guide Maintenance and Move or Transportation G H Confirm, using a light such as a penlight, that there are no foreign objects, such as dust or ink attached to the gray parts in the illustration below. c Caution: ❏ Do not touch the nozzle of the print head. Doing so may damage the print head. Do not touch the head of the cleaning stick. Oil on your hands may attach to the cleaning stick, causing damage to the print head.
EPSON Stylus Pro GS6000 User’s Guide Maintenance and Move or Transportation Adjusting the Print Head You may need to adjust the print head if white lines appear in your printed data or if you notice the print quality has declined. You can perform the following printer maintenance functions for maintaining the print head in good condition to ensure the best print quality. Manual cleaning function You can perform cleaning manually according to the print quality.
EPSON Stylus Pro GS6000 User’s Guide Maintenance and Move or Transportation Nozzle check E Press the button to start printing a nozzle check pattern. F Check the nozzle check pattern. This function checks the print head*1 nozzles*2 for clogging by printing a nozzle check pattern. Perform head cleaning if you find that the nozzle check pattern is unexpectedly faint or has missing dots in the nozzle check pattern. *1 Print head: The part that prints by spraying ink onto the paper.
EPSON Stylus Pro GS6000 User’s Guide Maintenance and Move or Transportation D Head cleaning See “Nozzle check” on page 65 If you find that the printed data is unexpectedly faint or dots in the printed data are missing, you may be able to solve these problems by performing head cleaning, which ensures that the nozzles are delivering ink properly.
EPSON Stylus Pro GS6000 User’s Guide Maintenance and Move or Transportation C Draining the ink cleaner Automatic maintenance function The message instructs you to remove the cleaning cartridges and empty the drain tank. This printer has a self-cleaning function and capping function for maintaining the print head in consistently good condition to ensure the best print quality. After draining the ink cleaner, turn off the printer. It takes about 33 minutes to complete the head washing.
EPSON Stylus Pro GS6000 User’s Guide Maintenance and Move or Transportation Capping function Cleaning the Printer Capping is a function for automatically covering the print head with a cap (lid) to prevent the print head from drying out. Capping is performed in the following situations. To keep your printer in top operating condition, clean it thoroughly if it becomes soiled.
EPSON Stylus Pro GS6000 User’s Guide Maintenance and Move or Transportation Cleaning inside of the printer A Make sure the printer is turned off and all the lights are off, and then unplug the power cord from the electrical outlet. B C Leave the printer for a minute. D E Apply a damp and tightly squeezed soft cloth to wipe out paper powder and ink attached to the platen and paper guide.
EPSON Stylus Pro GS6000 User’s Guide Maintenance and Move or Transportation Keeping the Printer Moving or Transporting the Printer When storing the printer, place it on a horizontal surface with the ink cartridges installed in the printer. This section describes how to move or transport the printer. c Caution: The printer must be kept flat. Do not tilt it, Moving the printer stand it on end, or turn it upside down.
EPSON Stylus Pro GS6000 User’s Guide Maintenance and Move or Transportation Setting up the printer after moving Transporting the printer After moving the printer, follow the procedure below to set it ready for use. A Make sure that the place is proper. B Plug in the power cable to the electrical outlet, and turn on the printer. When transporting the printer, the printer must be packed in the same condition as purchased. Contact your local Epson customer support.
EPSON Stylus Pro GS6000 User’s Guide Problem Solver Problem Solver 2007/03/07 17:39:571 Error Messages on the LCD Panel Error messages Messages are either status messages or error messages. Many common printer problems can be identified by the lights and messages on the LCD panel. See the following messages to solve problems. Error messages Description What to do INK LOW The ink cartridge is nearly expended. Replacement of the ink cartridge is nearly needed.
EPSON Stylus Pro GS6000 User’s Guide Problem Solver Error messages Description What to do NO CARTRIDGE INSTALL INK CARTRIDGE No ink cartridge is installed. Install an ink cartridge correctly. Do not reinstall the ink cartridge that caused an error. See “Replacing Ink Cartridges” on page 56 INK CARTRIDGE ERROR REPLACE CARTRIDGE The ink cartridge was found faulty. There may be some bad contact or dew condensation in the cartridge. ❏ Remove the ink cartridge and reinstall it.
EPSON Stylus Pro GS6000 User’s Guide Problem Solver Error messages Description What to do PAPER ERROR LOAD PAPER PROPERLY REFER TO THE MANUAL The paper is not loaded correctly. Release the paper lever, and set the paper correctly. PAPER OUT LOAD PAPER No paper is loaded in the printer. Load paper correctly. The paper is not ejected properly. Set the paper lever to the released position, and remove the paper. The roll paper runs out while printing is in progress. Load a new roll paper.
EPSON Stylus Pro GS6000 User’s Guide Problem Solver When the maintenance request error occurs A maintenance request warns you to replace the consumables with a new one very soon. If MAINTENANCE REQUEST XXXX is displayed on the LCD panel, contact your dealer and tell them the maintenance request code. If you continue to use the printer, the service call error occurs. When the service call error occurs A service call error occurs when: ❏ The carriage lock is not removed from the print head.
EPSON Stylus Pro GS6000 User’s Guide Problem Solver Does not work after loading the paper Cause What to do Is the front cover open or paper lever raised? Close the front cover. Lower the paper lever. See “Setting roll paper” on page 35 Is the maintenance cover open? Close the maintenance cover. See “Cleaning the cleaning wiper” on page 60 See “Cleaning around the print head” on page 62 Is the paper loaded at an angle? Load the paper straight.
EPSON Stylus Pro GS6000 User’s Guide Problem Solver Paper-related troubleshooting Note: If the paper is jammed or torn, see the following section to remove it. “The paper is jammed” on page 81 The paper slips or is torn during initialization Cause What to do Are you using the recommended paper? Use the recommended paper. For details of the recommended paper, contact your local Epson customer support. Is the loading position of the paper correct? Set the paper correctly.
EPSON Stylus Pro GS6000 User’s Guide Problem Solver The wrong paper size is set during initialization Cause What to do Are you using the recommended paper? Use the recommended paper. Is the paper loaded at an angle? Set the paper straight. For details of the recommended paper, contact your local Epson customer support. See “Setting roll paper” on page 35 When the paper is set, does it curl upward? Straighten the paper or set a new paper.
EPSON Stylus Pro GS6000 User’s Guide Problem Solver Printing-related troubleshooting Note: Proper print quality may not be obtained with the paper other than the recommended one. Printing is partially stained or incomplete Cause What to do Does the paper contain moisture? Replace it with new paper. Are you using folded or wrinkled paper? Does the paper bend? See “Replacing Roll Paper” on page 39 Use the recommended paper.
EPSON Stylus Pro GS6000 User’s Guide Problem Solver White or black lines appear on printed paper Cause What to do Are you using the recommended paper? Use the recommended paper. Is the roll paper set correctly? Set the roll paper correctly. For details of the recommended paper, contact your local Epson customer support. See “Loading roll paper” on page 32 Is the nozzle in good condition? Perform head cleaning. See “Head cleaning” on page 66 Did you perform head alignment? Perform head alignment.
EPSON Stylus Pro GS6000 User’s Guide Problem Solver The paper is jammed E Pull the paper to your side, and cut the torn part with cutting tools such as a razor blade. F Turn the flanges of the roll paper holders and wind roll paper. G If paper dust or pieces of paper remain inside the printer, remove them. When the set paper is jammed, follow the procedure below to remove it. A B C D Turn off the printer. Open the front cover. Move the print head section from the top of the paper to the right.
EPSON Stylus Pro GS6000 User’s Guide Where To Get Help Contacting Customer Support Where To Get Help New :See comments to select sections you need. The word "other" indicates products except for inkjet, SPC, Page, and SIDM. New :For All products Technical Support Web Site Before Contacting Epson If your Epson product is not operating properly and you cannot solve the problem using the troubleshooting information in your product documentation, contact customer support services for assistance.
EPSON Stylus Pro GS6000 User’s Guide Where To Get Help Help for Users in North America Help for Users in Europe Check your Pan-European Warranty Document for information on how to contact EPSON Customer support. Epson provides the technical support services listed below. New :Use Inkjet, SPC, and "other" products Only. Internet Support Help for Users in Australia Visit Epson’s support Web site at http://support.epson.com and select your product for solutions to common problems.
EPSON Stylus Pro GS6000 User’s Guide Where To Get Help Epson Helpdesk Help for Users in Singapore Epson Helpdesk is provided as a final backup to make sure our clients have access to advice. Operators on the Helpdesk can aid you in installing, configuring and operating your Epson product. Our Pre-sales Helpdesk staff can provide literature on new Epson products and advise where the nearest dealer or service agent is located. Many types of queries are answered here.
EPSON Stylus Pro GS6000 User’s Guide Where To Get Help Help for Users in Thailand Help for Users in Indonesia Contact for information, support, and services are: Contacts for information, support, and services are: World Wide Web (http://www.epson.co.th) World Wide Web (http://www.epson.co.id) Information on product specifications, drivers for download, Frequently Asked Questions (FAQ), and e-mail are available.
EPSON Stylus Pro GS6000 User’s Guide Where To Get Help Help for Users in Hong Kong Help for Users in Malaysia To obtain technical support as well as other after-sales services, users are welcome to contact Epson Hong Kong Limited. Contacts for information, support, and services are: New :For All products New :For All products Internet Home Page World Wide Web (http://www.epson.com.
EPSON Stylus Pro GS6000 User’s Guide Where To Get Help Help for Users in India Help for Users in the Philippines Contacts for information, support, and services are: New :For all products To obtain technical support as well as other after sales services, users are welcome to contact the Epson Philippines Corporation at the telephone and fax numbers and e-mail address below: New :For All products World Wide Web (http://www.epson.co.
EPSON Stylus Pro GS6000 User’s Guide Product Information Printer Specifications Product Information Printing System Requirements Your computer should meet the following system requirements: Printing method On-demand ink jet Nozzle configuration Black: 180 nozzles × 1 × 2* (Black) Color: 180 nozzles × 7 × 2* (Cyan, Magenta, Light Cyan, Light Magenta, Yellow, Green, Orange) System requirements Depends on RIP (Raster Image Processor) specification you use. * Each color has two lines.
EPSON Stylus Pro GS6000 User’s Guide Product Information Paper feed method Friction Paper path Roll paper Dimensions Width: 2,698 mm (106.22") Depth: 943 mm (37.11"), 1045 mm (41.14") when using Auto Take-Up Reel Unit Height: 1,267 mm (49.88") Weight Ink cartridges Colors Cyan Magenta Yellow Black Printer: Approx. 150 kg (331 lb) without the ink cartridges Light Cyan Light Magenta Stand: Approx. 34 kg (75 lb) Green Orange Auto Take-Up Reel Unit: Approx.
EPSON Stylus Pro GS6000 User’s Guide Product Information Paper Note: ❏ The ink cartridges packaged with your printer are partly used during initial setup. In order to produce high-quality prints, the print head in your printer will be fully charged with ink. This one-off process consumes a quantity of ink and therefore these cartridges print fewer pages compared to subsequent ink cartridges.
EPSON Stylus Pro GS6000 User’s Guide Product Information Standards and Approvals Safety Interface Your printer is equipped with a USB interface and an Ethernet interface. UL 60950-1 CSA No. 60950-1 Low Voltage Directive 2006/95/EC EMC USB interface EN 60950-1 The printer’s built-in USB interface is based on the standards specified in the Universal Serial Bus Specifications Revision 2.0 and the Universal Serial Bus Device Class Definition for Printing Devices Version 1.1.
EPSON Stylus Pro GS6000 User’s Guide Index Index A H AC inlet, 9 Active indicator, 9 Adjuster, 9 After heater, 22 Automatic maintenance function, 67 Auto Take-Up Reel, 20 Auto Take-Up Reel Unit, 9 Head alignment, 21 Head cleaning, 66 Head fan, 20 Head washing, 24, 66 Heating time, 19 B Initialize setting, 20 Init network setting, 26 Ink cartridge, 51 Ink cartridge compartment, 10 Ink cartridge status icon, 13 Ink drain tank, 9 Ink level, 25 IP, SM, DG setting, 26 IP address setting, 26 I Bonjour, 2
EPSON Stylus Pro GS6000 User’s Guide Index Paper size check, 19 Paper skew check, 19 Paper suction, 23 Paper type, 20 Plastic glove, 53 Platen, 9 Platen heater, 22 Pre heater, 21 Pressurizing rollers, 9 Printable pages, 25 Printer Status menu, 25 Print head alignment, 47 Print mode, 21 Print multiple layer, 24 Print nozzle pattern, 19 R Recommended paper, 51 Regular cleaning, 20 Replacing ink cartridges, 57 Roll paper holders, 10 S Self-cleaning function, 67 Service, 82 Side margin, 19 Specifications el