All rights reserved. No part of this publication may be reproduced, stored in a retrieval system, or transmitted in any form or by any means, electronic, mechanical, photocopying, recording, or otherwise, without the prior written permission of SEIKO EPSON CORPORATION. The information contained herein is designed only for use with this EPSON printer. EPSON is not responsible for any use of this information as applied to other printers.
Declaration of Conformity According to ISO/IEC Guide 22 and EN 45014 Manufacturer: Address: Representative: Address: SEIKO EPSON CORPORATION 3-5, Owa 3-chome, Suwa-shi, Nagano-ken 392-8502 Japan EPSON EUROPE B.V. Prof. J. H.
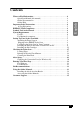
Contents English Where to Find Information . . . . . . . . . . . . . . . . . . . . . . . . . . . . . . . . . . . . . . . 4 Quick Start Manual (this manual) . . . . . . . . . . . . . . . . . . . . . . . . . . . . . . 4 Online Documentation . . . . . . . . . . . . . . . . . . . . . . . . . . . . . . . . . . . . . . . 4 Online Help . . . . . . . . . . . . . . . . . . . . . . . . . . . . . . . . . . . . . . . . . . . . . . . 4 Important Safety Instructions . . . . . . . . . . . . . . . . . . . . . . . . . . .
■ Where to Find Information ❚ Setup Guide (this manual) Contains information about how to set up your Stylus Scan 2000, install the Stylus Scan 2000 software and access your online documentation. It also provides instructions for daily operation. Keep this manual near your printer. ❚ Online Documentation The CD-ROMs supplied with the Stylus Scan 2000 include a set of online documentation in PDF format containing further information and reference tips.
■ Unplug the Stylus Scan and refer servicing to qualified service personnel under the following conditions: The power cord or plug is damaged; liquid has entered the Stylus Scan; the Stylus Scan has been dropped or the cabinet damaged; the Stylus Scan does not operate normally or exhibits a distinct change in performance.
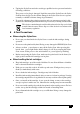
■ When choosing a place for the Stylus Scan ■ ■ Place the EPSON Stylus Scan on a flat, stable surface that extends beyond the Stylus Scan base in all directions. The Stylus Scan will not operate properly if it is tilted or at an angle. Avoid places subject to rapid changes in temperature and humidity. Also, keep the Stylus Scan away from direct sunlight, strong light, and heat sources. ■ Avoid places subject to shocks and vibrations.
Minimum System Requirements Recommended System i486/25 MHz for Windows 95 i486/66 MHz for Windows 98 Pentium or higher processor 32 MB RAM 32 MB RAM or more for Windows 95 and 98 50 MB hard disk space for Windows 95, and 98 50 MB or more free disk space for Windows 95, and 98 VGA size, 16 bit color SVGA or better 24 bit color English Your computer should also meet the following system requirements. Your computer dealer can help you update your system if it does not meet these requirements.
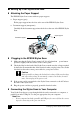
■ Setting Up Your Stylus Scan 2000 ❚ Attaching the Paper Support The EPSON Stylus Scan comes with two paper supports. ■ Paper support (gray) Fit the paper support into the slots at the rear of the EPSON Stylus Scan. Document support (transparent) ■ Carefully fit the document support into the holes at the rear of the EPSON Stylus Scan. paper support document support ❚ Plugging in the EPSON Stylus Scan 1. 2. Make sure that the Stylus Scan is turned off.
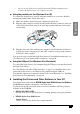
❏ Using the parallel port (for Windows 95 or 98) To connect the Stylus Scan to your PC using the parallel port, you need a shielded, twisted-pair parallel cable. Follow these steps. 1. Make sure both the Stylus Scan and computer are turned off. 2. Plug the cable connector securely into the parallel interface connector at the rear of the Stylus Scan. Then squeeze the wire clips together until they lock in place on both sides. 3. Plug the other end of the cable into the computer’s parallel interface.
EPSON Stylus Scan SF TWAIN Allows you to use the Stylus Scan’s scanner function. The included CD-ROM also contains the following software. Acrobat Reader This software enables you to read the manuals for EPSON SMART PANEL and WinFAX, or any other files that are in the Portable Document Format (PDF). ■ ■ ■ WinFax BASIC EDITION Includes applications that support the Stylus Scan’s fax features and other special operations.
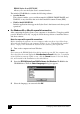
Click the Add Software button. 5. The EPSON Software Setup dialog box appears. Make sure there is a check mark next to EPSON SMART PANEL and EPSON Stylus Scan 2000 Drivers. Clear the check marks next to the names of any other software that you do not want to install. 6. 7. 8. Click OK. Follow the on-screen instructions to install the EPSON SMART PANEL. When the EPSON SMART PANEL installation is complete, the EPSON Stylus Scan Setup dialog box appears. Click Next. English 4.
9. In Windows 98, the following dialog box appears. Select LPT (Printer Port), then click Next to begin installation. (If this dialog box does not appear, go to the next step.) 10. When installation is complete, click OK to start the EPSON Screen Calibration utility. Note: Be sure to calibrate your screen and Stylus Scan to ensure that the colors of reproduced images closely match the originals.
English 11. In the following window, move the slider to the right or left until the two shades of gray horizontal stripes match. d Note: The gray stripes will not perfectly blend together; however, try to make the two tones match as closely as possible. 12. Click OK to register the calibration setting. 13. When the EPSON Stylus Scan Drivers installation is complete, installation for other applications begins automatically. Follow the on-screen instructions. 14.
Note: If you turn on the EPSON Stylus Scan before turning on your computer, the computer may detect the Stylus Scan and display the New Hardware Found dialog box, or a similar wizard, following start-up. If this occurs, click the Cancel button to close the dialog box and remove the USB cable. Then continue with installation as described below. 14 2. Insert the EPSON Stylus Scan 2000 Software for Windows CD-ROM in the CD-ROM drive. The Select Language dialog box appears. 3. 4.
Follow the on-screen instructions to install the EPSON SMART PANEL. When the EPSON SMART PANEL installation is complete, the EPSON Stylus Scan Setup dialog box appears. Click Next. 9. The following dialog box appears. Select USB, then click Next. English 7. 8. 10. The following message appears. Click OK. Installation for other applications begins automatically. Follow the onscreen instructions.
11. After the applications have been installed, the following message appears. Click OK and restart your computer. Then turn on the Stylus Scan by pressing the power button. P 12. Plug the appropriate end of the cable into the USB port on the back of the Stylus Scan. (The end that fits the Stylus Scan has a different shape from the end that fits the computer.) Note: To connect the Stylus Scan to a USB port, you need a standard shielded USB cable. 13.
English 15. The following dialog box appears. Click Next. 16. In the following dialog box, clear all the check boxes, then click Next. 17. In the following dialog box, click Next to install the required drivers. Note: If a dialog box appears asking you to specify the location of the Windows 98 CD-ROM, insert the Windows 98 CD-ROM into the CD-ROM drive and click OK.
. Click Finish to complete the USB Hub driver installation. 19. The following message appears. Make sure the EPSON Stylus Scan 2000 Software for Windows CD-ROM is still in your CD-ROM drive, and click OK. 20. The following dialog box appears. In the Copy files from box, type D:\EPSON\ENGLISH (or your preferred language). Then click OK. If your CD-ROM drive has a drive letter other than D, substitute the appropriate letter. The system installs the required driver. 21.
Note: Be sure to calibrate your screen and Stylus Scan to ensure that the colors of reproduced images closely match the originals. English 23. In the following window, move the slider to the right or left until the two shades of gray horizontal stripes match. d Note: The gray stripes will not perfectly blend together; however, try to make the two tones match as closely as possible. 24. Click OK to register the calibration setting. 25. Follow the on-screen instructions to complete the installation.
■ Acrobat Reader This software enables you to read the manual for Presto! PageManager for EPSON, or any other file that is in the Portable Document Format (PDF). c Follow these steps to install your Stylus Scan software, and to connect the Stylus Scan to your Macintosh. Caution: Turn off all virus protection programs before you install your EPSON Stylus Scan software. Note for iMac users: If you are using Mac OS 8.1, you need to install the iMac Update 1.0 before installing the Stylus Scan software.
The EPSON Screen Calibration utility starts automatically. In the following window, move the slider to the right or left until the two shades of the gray horizontal stripes match. English 7. d Note: The gray stripes will not perfectly blend together; however, try to make the two tones match as closely as possible. 8. Click OK to register the calibration setting. The computer restarts automatically. 9. Turn on the Stylus Scan by pressing its P power button. 10.
■ Selecting your EPSON Stylus Scan in the Chooser After you install the printer software in your Macintosh, you need to open the Chooser to select your Stylus Scan. You have to choose the Stylus Scan the first time you use it or whenever you want to switch to another printer. Your Macintosh always prints using the last printer selected. 1. Select Chooser from the Apple menu. Then click the Stylus Scan icon, and the port your Stylus Scan is connected to. ■ 2.
❚ Installing the Ink Cartridges w Warning: The ink cartridges are self-contained units. Under ordinary use, ink will not leak from a cartridge. If ink does get on your hands, wash them thoroughly with soap and water. If ink gets into your eyes, flush them immediately with water. Note: ❏ Do not open the ink cartridge packages until just before you install them, or the ink may dry up. ❏ Always use new ink cartriges.
3. Lift up the ink cartridge clamp. 4. Open the color ink cartridge package that came with your Stylus Scan. Remove only the yellow tape seal from the ink cartridge. c 5. 24 Caution: ❏ Be sure to remove the yellow tape seal from the cartridge before installing it; otherwise the cartridge may become unusable. ❏ Do not remove the blue portion of the tape seal from the cartridge; otherwise the cartridge may become clogged and cannot print.
Press the cartridge clamp down until it locks into place. The A ink out light goes off after you close the clamp. c 7. 8. English 6. Caution: Once you install the ink cartridges, do not open their clamps again until you replace the ink cartridges. Otherwise, the cartridges may become unusable. Press the R cleaning button and release quickly. The print head moves left to the black ink cartridge installation position. c Caution: Install both ink cartridges.
9. Open the black ink cartridge package that came with your Stylus Scan. Remove only the yellow tape seal from the ink cartridge. c Caution: ❏ Be sure to remove the yellow tape seal from the cartridge before installing it; otherwise the cartridge may become unusable. ❏ Do not remove the blue portion of the tape seal from the cartridge; otherwise the cartridge may become clogged and unable to print. ❏ Do not remove the tape seal from the bottom of the cartridge; otherwise, ink will leak. 10.
English 12. Press the R cleaning button and release quickly. The EPSON Stylus Scan moves the print head and begins charging the ink delivery system. While the ink is charging, the P power light flashes and the Stylus Scan produces a variety of mechanical sounds. These sounds are normal. When the ink delivery system has been charged, the print head returns to its home (far right) position and the P power light comes on. c Caution: Never turn off the EPSON Stylus Scan while the P power light is flashing.
1. Lower the output tray and slide out the extension. Next, slide the paper edge guide to adjust the width of the loading area so that it is slightly wider than the width of your paper. paper edge guide output tray 2. 3. Fan a stack of paper; then tap it on a flat surface to even the edges. Load the stack of paper with the printable side up and the right edge of the paper resting against the right side of the paper feeder. Then slide the edge guide against the edge of the paper.
E English Hold down the load/eject button (➀ in the illustration below) and press the P power button (➁ in the illustration below) to turn on the EPSON Stylus Scan. Then release both buttons. The Stylus Scan starts printing a nozzle check page. Here are sample printouts. Good sample Print head needs to be cleaned segments are missing If the nozzle check page does not print satisfactorily (for example, if any segment of the printed lines is missing), then clean the print head as explained below.
3. c Caution: Never turn off the EPSON Stylus Scan while the P power light is flashing. Doing so may damage the Stylus Scan. When the P power light stops flashing, print a few lines from a document to confirm that the head is clean and to reset the cleaning cycle. If the print quality still has not improved after replacing the ink cartridges, contact your dealer.
To connect the Stylus Scan using the USB port, see “Using the USB port (for Windows 98 or Macintosh)” on page 9. After making sure your printer is operating correctly, you are ready to print your first page. To familiarize yourself with the printer software, we recommend printing the README file provided with your printer software. The README file contains the latest information about your printer software. Follow the instructions for Windows or Macintosh in this section.
❚ For Macintosh Follow these steps to print the README file. 1. Insert the printer software CD. 2. Open the EPSON folder and double-click the README file. 3. Choose Page Setup from the File menu. The following dialog box appears. 4. 5. 6. Select the paper size you loaded in the printer from the Paper Size list. Select Portrait as the Orientation option. After making your settings, click OK to close the Page Setup dialog box. Note: You cannot print from the Page Setup dialog box.
EPSON’s unique print head with its innovative Piezo technology enables high printing speeds. In addition, each ink dot that is placed on the page has sharp edges with no satellite effect. EPSON ink has been specially developed for use with printers of the EPSON Stylus COLOR range.
Note: If the Adobe Acrobat Reader is not installed on your system, the manual will not open and an error message will be displayed. ❚ Installing the Adobe Acrobat Reader 1. 2. Make sure the printer is off and your computer is switched on. Insert the EPSON printer software CD-ROM into your computer’s CD-ROM drive. Windows 95/98: The setup program on the CD-ROM will be started automatically and displays the start screen.
Note: If your CD-ROM drive has a drive letter other than E, substitute the appropriate letter. 2. 3. Select the preferred language. PC: Select Online manuals. The setup program displays the name of the available online manual. Select the preferred online manual. Select manual name - Read if you wish to open the manual from the CD-ROM. The Acrobat Reader will be started automatically and the online manual opened.