
Operating instructions

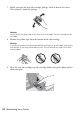
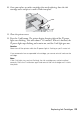

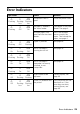

Table Of Contents
- Contents
- Introduction
- Loading Paper
- Using Special Papers
- Basic Printing
- Printing in Windows
- Printing With a Macintosh
- Selecting the Correct Paper Type
- Maintaining Your Printer
- Checking the Print Head Nozzles
- Cleaning the Print Head
- Checking the Ink Cartridge Status
- Replacing Ink Cartridges
- Solving Problems
- Checking for Software Updates
- Error Indicators
- Problems and Solutions
- Where To Get Help
- Notices
- Important Safety Instructions
- FCC Compliance Statement
- Declaration of Conformity
- Epson America, Inc., Limited Warranty
- Copyright Notice
Replacing Ink Cartridges 23
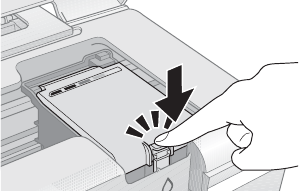
10. Once you replace any other cartridges that need replacing, close the ink
cartridge cover and press it until it clicks into place.
11. Close the printer cover.
12. Press the
H ink button. The printer begins charging ink and the P power
light starts flashing. This takes about 1 1/2 minutes. When it’s finished, the
P power
light stops flashing and remains on, and the H ink light goes out.
Caution:
Never turn off the printer while the P power light is flashing or you’ll waste ink.
If you removed a low or expended ink cartridge, you cannot reinstall and use the
cartridge.
Note:
If the
H ink light stays on (not flashing), the ink cartridge may not be installed
correctly. Press the
H ink button again and reinstall the ink cartridge until it clicks
into place.