
User's Guide

Using the Control Panel Menu 126
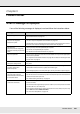
The Maintenance Menu
The Maintenance menu can be accessed directly by pressing the # button.
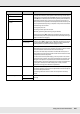
Item Parameter Explanation
Nozzle Check Print A nozzle pattern will be printed. Inspect the pattern visually and perform
head cleaning if you detect faint or missing colors. See “Checking for
Clogged Nozzles” on page 84.
The menu displayed depends on the Media Size Check setting and the
width of the loaded media.
Print At Right
Print At Center
Print At Left
Cleaning
All Nozzles Execute (Light)/
Execute (Medium)/
Execute (Heavy)
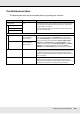
Note the numbers of patterns that contain faint or missing colors and
clean all or selected nozzles. Select All Nozzles to clean all nozzles.
Choose Selected Nozzles to clean only the nozzles in selected arrays.
The level of cleaning can be selected from Execute (Light), Execute
(Medium), and Execute (Heavy). Select Execute (Light) first. If the
problem persists after you have used Execute (Light), choose Execute
(Medium). If the problem persists after you have used Execute
(Medium), choose Execute (Heavy). See “Head Cleaning” on page 86.
Selected Nozzles Execute (Light)/
Execute (Medium)/
Execute (Heavy)
Head Maintenance Move Head Position the print head for maintenance. Perform such maintenance as
cleaning the wiper, caps, and the area around print head only after using
this option to position the head for cleaning. Moving the print head
manually could cause malfunction. See “Maintenance Around the Print
Head” on page 88.
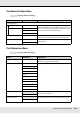
Waste Ink Counter - Use this item to reset the waste ink counter after placing a new waste ink
bottle. Only reset the counter when replacing the waste ink bottle.
Resetting the counter before the waste ink bottle is replaced will result in
the printer being unable to accurately track the waste ink level.